2. Vendor Portal Documentation
Help with the Sytewise Vendor Portal.
Logging In
Helpful information for accessing your Vendor Portal Account
Log in Screen Help
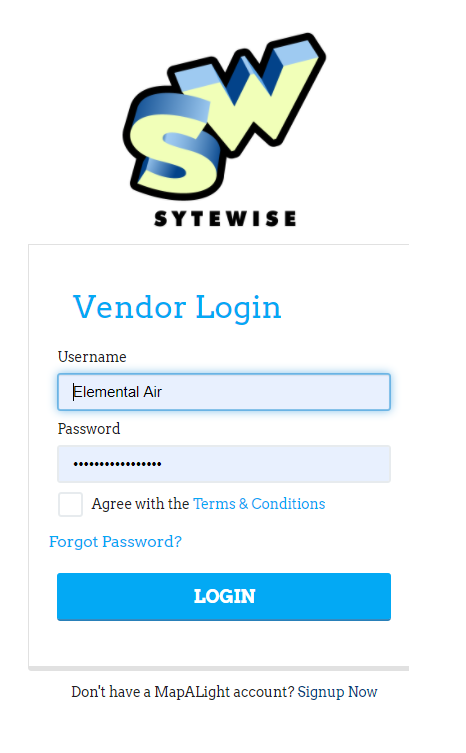
Point your browser to the vendor.sytewise.com. You will land on the login page automatically.
To sign in:
- Enter your username in the first field.
- Enter your password in the second field. If you need to double-check what you typed, click the eye icon to the right of the password field to reveal it.
- Check the box to agree to the terms of use.
- Click Sign In.
If your credentials are not accepted, double-check that your caps lock key is off -- passwords are case-sensitive. If you have forgotten your password, click the Forgot My Password link below the sign-in button and follow the prompts.
Once you are signed in successfully, you will see a brief "Logging You In" message before landing on your dashboard.
Tip: Your session will time out after a period of inactivity. If the portal suddenly asks you to log in again, that is why. Just sign back in and you will be right where you left off.
Work Order Help
How to access Sytewise Work Orders
Vendor Main Page
Main Dashboard
Your dashboard is the first thing you see after logging in, and it is your home base for everything in the portal. It displays a card for each section that has been enabled for your account.
Each card shows:
- An icon representing the section
- The section name and a short description
- A blue number badge showing how many items are currently waiting for you (shown on Work Orders and Checklists)
Click any card to jump straight into that section. The navigation bar at the bottom of every page has a home icon to bring you back to the dashboard at any time, and a sign-out icon to log off when you are done.
The sections you may see on your dashboard:
|
Section |
What it is for |
|
Work Orders |
View and act on jobs assigned to you by your administrator |
|
Checklists |
Complete task-based checklists, sometimes tied to a specific work order |
|
HSE Forms |
Submit required health, safety, and environment compliance forms |
|
Files |
Manage your insurance certificates and compliance documents |
Work Orders
Work Orders
The Work Orders section is where you will find all the jobs your administrator has assigned to you. By default the list shows your open (incomplete) work orders, but you can switch views at any time.
The Work Order List
Each work order in the list shows you:
- The work order number in brackets
- The name of the property or job site, which is a clickable link to the full detail page
- A color-coded due date badge so you can see at a glance what needs attention:
- Blue means the due date is coming up and you have time
- Yellow means the job is due today
- Red means the job is past its due date
- Green means the job has been completed
- The property address, with a map pin icon you can tap to open directions in your maps app (Apple Maps on iPhone and iPad, Google Maps everywhere else)
- The management company name and their contact information
- Any work instructions provided by your administrator
- A list of checklists linked to that work order, also color-coded by due date
Switching between open and completed work orders:
Click the Show Completed WOs button in the upper right corner to see work orders you have already finished. Click Show Incompleted WOs to switch back to your active list.
Rejected work orders:
If a work order has been rejected, it will appear with a yellow background and a warning icon. Click into it to see the details and take action.
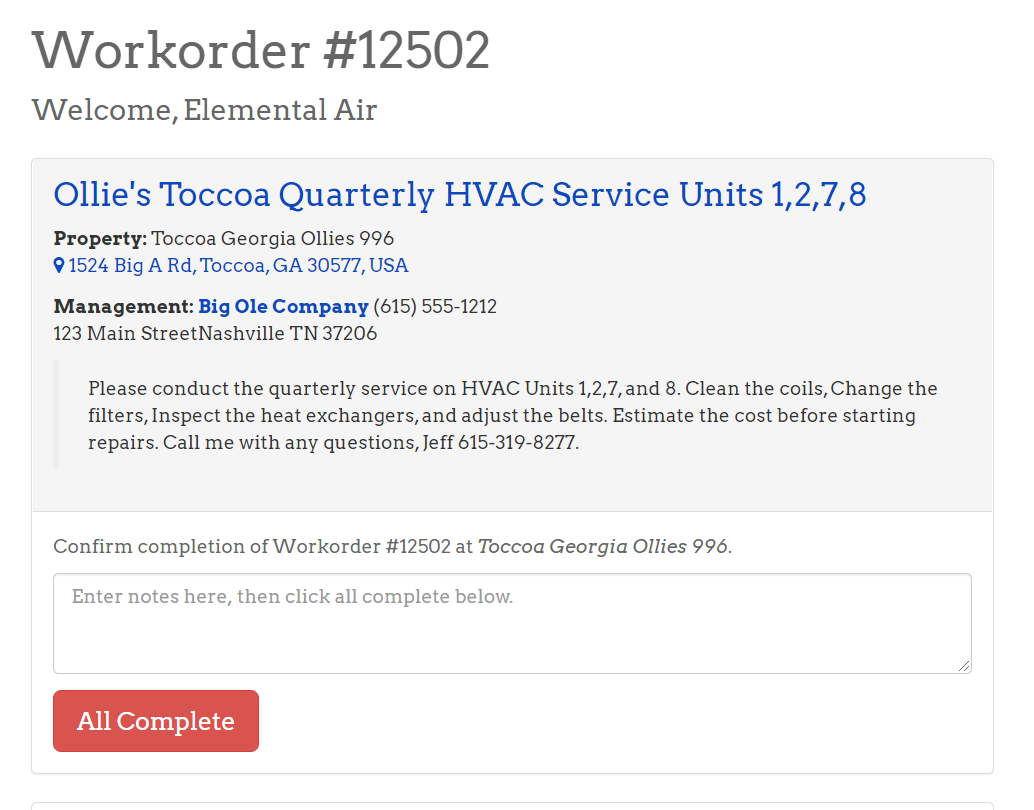
The Work Order Detail Page
Clicking a work order opens its detail page. What you see here depends on the type and current state of the job.
If the work order is already completed, the page shows a completed label and a link back to your list. No further action is needed.
If the work order is active, you will see one or more of the following sections:
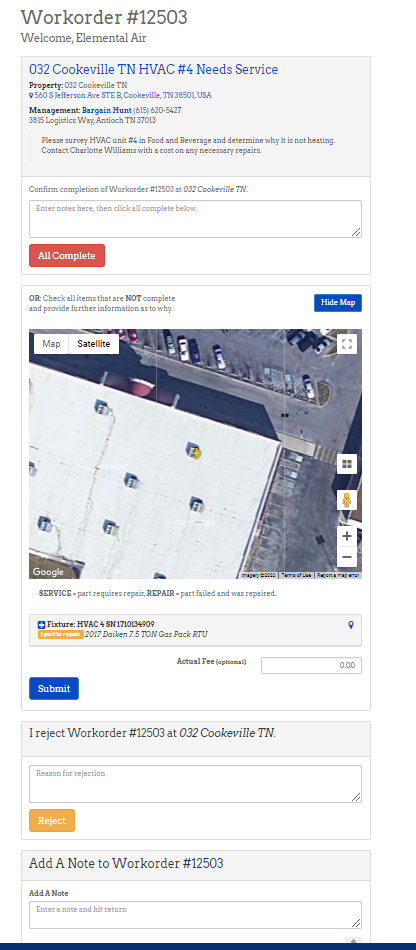
Simple Completion
This section is for straightforward jobs where you just need to confirm the work is done.
- Read through the job details, property address, and instructions.
- Click the address to open it in your maps app if you need directions.
- Enter any notes about the work in the notes field.
- Optionally update the account or invoice number and your actual fee for the job.
- Click the red All Complete button to submit your completion.
Detailed Completion
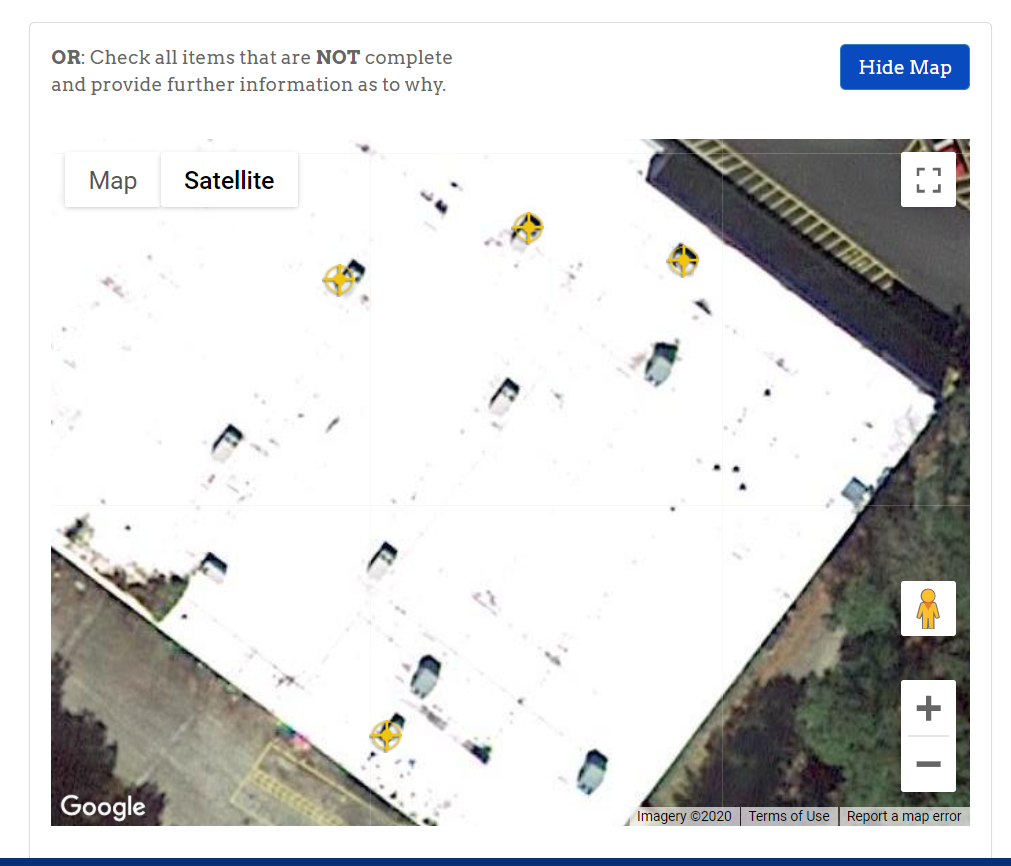
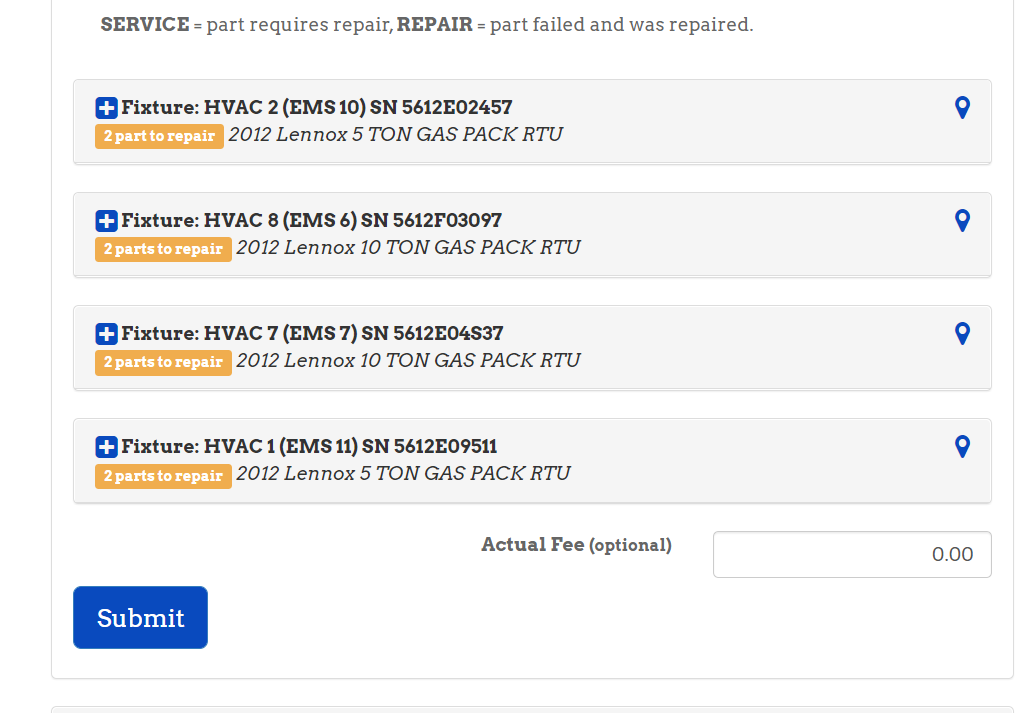
If the work order includes specific fixtures or equipment items, you will see the Detailed Completion section also. This is where you document the condition of each individual piece of equipment. If some equipment isn't repaired, this is where you will note what you found on site and recommend next steps.
A map at the top of the section shows the locations of fixtures at the property. Click Hide Map if you want more screen space. Each fixture is listed below the map as a collapsible card. Tap or click the fixture name to expand it and see its parts.
For each part, select one of three status buttons:
- OK means the part is in good condition and no action is needed.
- Needs Service means the part requires repair or follow-up. When you select this option, an extra area appears where you can enter a note describing the issue and upload photos of the problem.
- Repair Complete means the part had an issue and you have already fixed it. The same note and photo area appears so you can document what you did.
Uploading photos: Click Add Images to open the photo uploader. You can choose an image from your device or take a new photo with your camera. Uploaded photos appear as thumbnails. Click the X badge on any thumbnail to remove a photo you added by mistake. Photos that were already on file before you arrived are shown for reference but cannot be deleted from this page.
Once you have gone through all fixtures and parts, fill in the account or invoice number and your actual fee if needed, then click Submit.
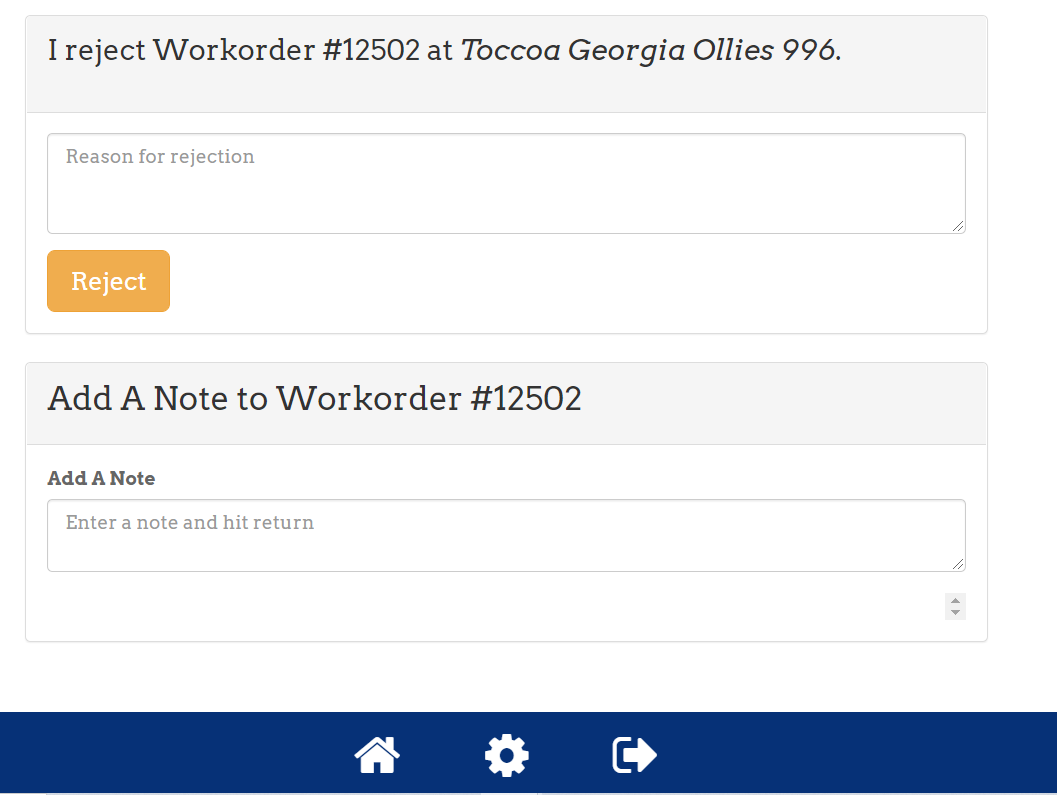
Reject This Work Order
If for any reason you cannot accept the work order, use this section to send it back to your administrator. Enter a reason for the rejection in the text field and click Reject. Rejected work orders appear highlighted in yellow on your work order list.
Notes
The Notes section is available on every active work order. It is a running log of comments visible to both you and your administrator.
To add a note, click in the text field, type your message, and press Enter. The note is saved immediately with your name and a timestamp. You do not need to click a separate save button.
To delete one of your notes, click the X icon next to it. You will be asked to confirm before it is removed permanently.

Sample Work Order
Congratulations! You made it! Here is a sample of a Sytewise Work Order.
Click here for a full explanation of all of the features.
Vendor Profile Help
Editing your information in the Vendor Profile.
Vendor Profile Help
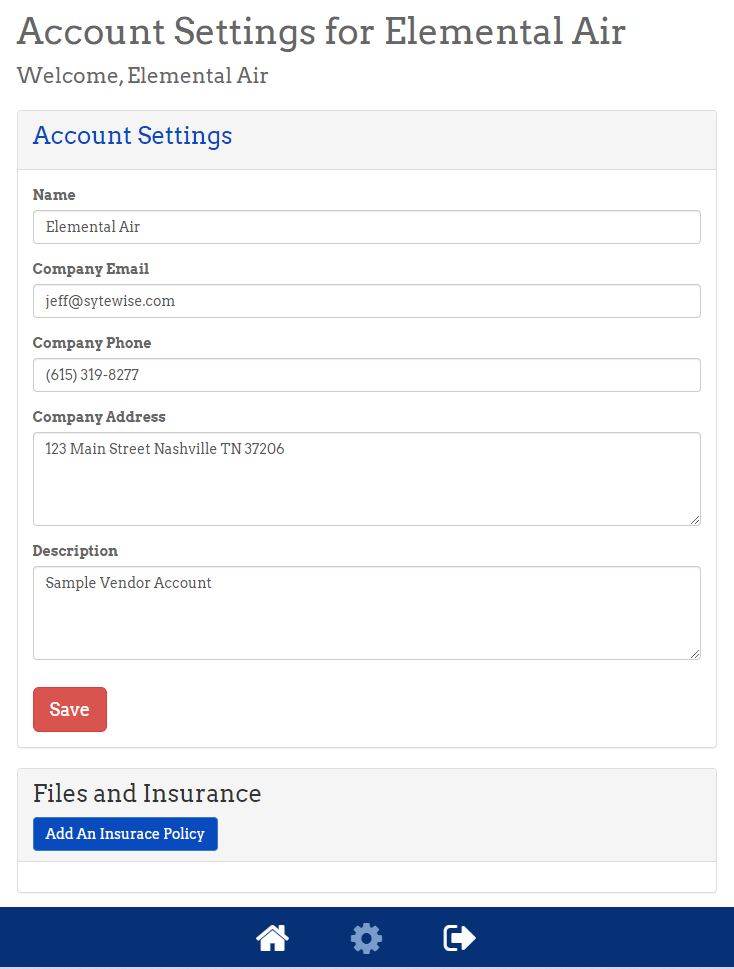
On the Vendor Account Setting Page you can:
- Enter and update your Company Name, Address and Contact Information.
- Add a description of the work you are available to do.
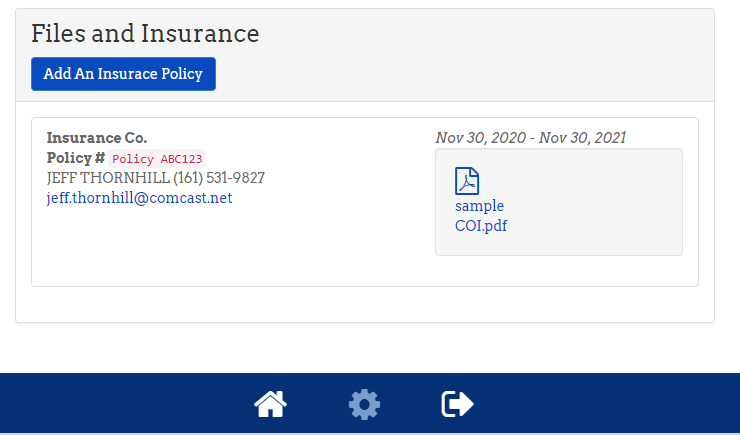
- Add a copy of your Certificate of Insurance to keep your record of Insurance up to date.
To add an Certificate of Insurance:
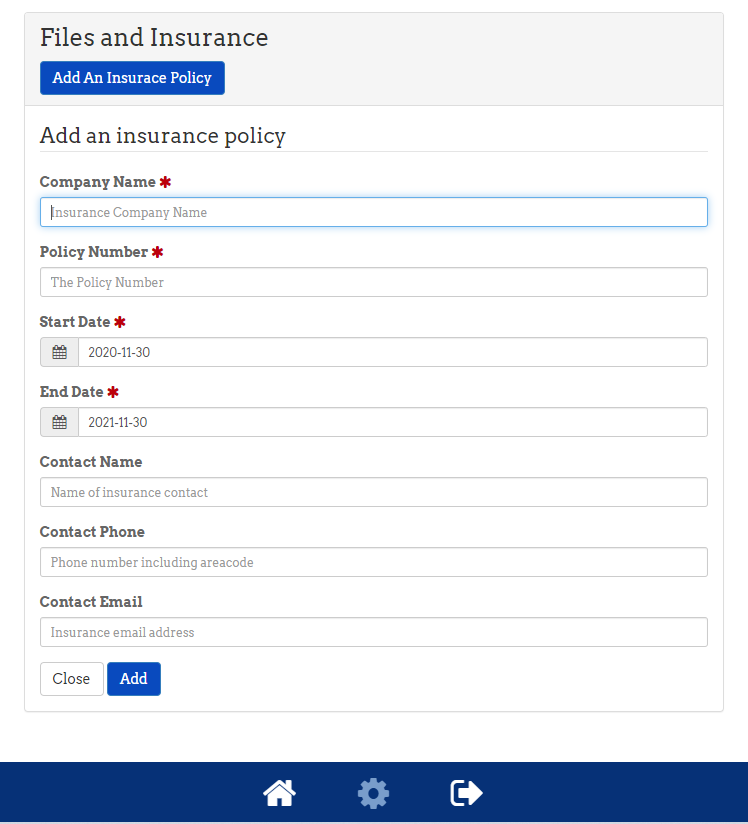
Once you've entered the details:
- You will see your insurance Policy Listed
- You can upload a copy of your COI
- Click on Choose File
- Navigate to a JPG or PDF of the Certificate of Insurance you want to upload
- Click Upload
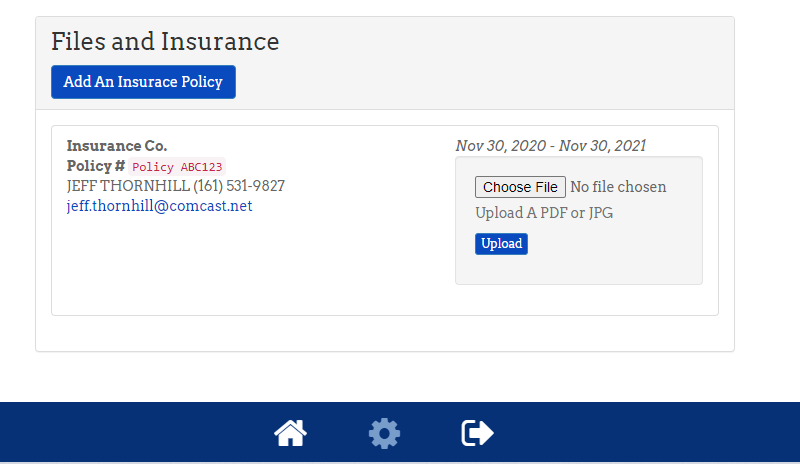
After you click Upload, and will appear for that Certificate of Insurance.
- Indicate the name of the project and location when naming the file that you upload.
- example: bargain hunt cookeville hvac coi
- don't worry about adding the dates to the file name. They will appear automatically.