1. Admin Documentation
Help articles for using the Sytewise property asset management software.
- Getting Started
- Quick Start Guide & Suggested Reading Order
- What Is Sytewise?
- Welcome to Your Dashboard
- Left Menu Options
- Creating a Vendor
- Creating a Property in Sytewise
- Creating Your First Fixture
- Using the Fixture Library to Build Properties Fast
- Creating Your First Work Order
- Set Up Recurring Work Orders
- Creating Your First Survey
- Using the Property Library to Build Your Portfolio Fast
- Setting Up Admin Users in Sytewise
- Managing Properties and Assets
- Creating and Managing Work Orders
- Setting Up Vendors in Sytewise
- Building an Annual Workflow with Reminders
- Reporting in Sytewise: What You Have, How to Use It, and How to Make It Work for You
- Reference: Terms & Concepts
- Properties
- Trades
- Fixtures
- Parts
- Clients
- Adding Photos to Fixtures
- Work Orders in Sytewise
- Why Property / Trade?
- Survey
- Tenants
- Users
- Contracts
- Contacts
- The Sytewise Information Funnel
- WO, Survey Email Preferences
- Favorite Properties
- Reference: The Sytewise User Interface
- Sytewise User Interface
- The Dashboard
- Property Page (part 1)
- Property Page (part 2)
- Fixture Page
- Work Orders in the Vendor Portal
- Adding and Managing Clients
- Contracts
- Email Log
- Creating a Checklist Template
- Fixture Checklists: From Assignment to Archive
- Using Checklists with Work Orders
- Adding Parts to Fixtures
- Creating and Managing Fixtures
- Creating and Managing Displays in Sytewise
- Vendor Forms: Compliance, Certification, and Credentials
- Reference Articles
- Surveys and Surveyors
- Tips and Best Practices
- Naming Fixtures and Parts
- Grouping Fixtures
- Descriptions Save You Time and Money
- How to Set Up Fixtures and Parts: A Guide to Choose What Works for You
- Work Orders
Getting Started
Quick Start Guide & Suggested Reading Order
Where to Start
The articles below cover the core features of Sytewise. If you're new to the system, reading them in order is a reasonable path. If you're looking for something specific, fee; free browse the topics and jump straight to the subject that interests you.
-
What Is Sytewise — An overview of the platform and how it serves property managers, vendors, and AV integrators
-
A Tour of the Dashboard — Understanding your stats, map, property list, and navigation at a glance
-
Setting Up Vendors — How to add vendors, build out their contact records, and assign them as defaults for specific property trades
-
Creating a Property — Adding a property to the system, validating its location, and using the Library to build a fully populated property from a saved template
-
Adding Parts to Fixtures — How to document the equipment inside a fixture by hand, by cloning, or from a Library item, and why that record pays off over time
-
Creating and Sending a Work Order — Building a work order, selecting fixtures, assigning a vendor, sending the job, and managing it through completion
-
Using Checklists on Work Orders — How checklists and work orders work together, when to attach versus send directly, and what happens when a work order is reassigned or deleted
-
Fixture Checklists: From Assignment to Archive — The full lifecycle of a checklist from creation through vendor completion, media download, and archive
-
Creating Checklist Templates — How to build reusable checklist templates with required photos, signatures, notes, and custom checkboxes
-
Building an Annual Workflow with Reminders — Setting up recurring work orders, surveys, and inspections so your planned work runs on a calendar instead of on memory
-
Reporting in Sytewise — Property reports, fixture reports, work order and survey reports, CSV exports, and how to use a checklist as a fully customizable inspection report
-
The Left Menu: A Guide to Every Page — A quick reference to every page in the navigation and what it does
What Is Sytewise?
Sytewise is a systems operations platform built for teams that manage physical spaces and the work that keeps them running. Whether you're overseeing a portfolio of commercial properties, coordinating vendors across dozens of locations, or tracking the AV systems inside a building, Sytewise puts the whole operation in one place.
For Property Managers
Managing a portfolio means keeping track of a lot of moving parts simultaneously. Sytewise is built around that reality.
Properties and Fixtures are the foundation. Every property in your portfolio gets its own record, and every piece of equipment or infrastructure inside that property is tracked as a fixture. You always know what's where, what trade it belongs to, and what's been done to it.
Work Orders are how you assign and track jobs. Create a work order, assign a vendor, attach the relevant fixtures, and send it. The vendor gets an email with everything they need, including links to any checklists assigned to that job. When the work is done, the record stays.
Checklists let you define exactly what a vendor needs to do, step by step. Require photos, signatures, notes, or file uploads at specific steps. Vendors complete checklists from their phone through a simple public link, no login required. Completed checklists with all their attached media are stored permanently and downloadable in one ZIP file.
Surveys let you send structured inspections to surveyors and track their responses across properties.
Contracts and Bills keep the financial side organized. Track vendor contracts, service agreements, and bills all tied to the properties and work orders they belong to.
Reminders handle the recurring stuff automatically. Set up rules tied to property events and Sytewise keeps the actions queue filled so nothing slips through.
The Email Log records every outbound email the platform sends, so you can always confirm what was delivered and when.
For Vendors
Vendors don't need to learn a new system. When a work order is created and assigned to them, they get a plain email with the job details and direct links to any checklists they need to complete. No account required, no app to download.
Checklist links open a clean, mobile-friendly page. The vendor works through each step, uploads photos or files as required, signs where needed, and submits. The property manager sees completion in real time.
If a work order is reassigned, vendor assignments on linked checklists update automatically. Vendors only ever see what's theirs.
For AV Integrators
AV integrators working in commercial spaces regularly manage complex fixture environments: racks, cabinets, displays, control systems, and the relationships between them. Sytewise handles this through the Parts and Fixtures pages.
Fixtures track every piece of equipment at a property, organized by trade. Each fixture has its own record, its own checklist history, and its own media archive. Nothing gets lost in a spreadsheet.
The Cabinets module allows integrators to manage custom displays. Build display cabinet preset layouts using a grid-based editor to represent cabinet configurations and equipment wiring layout drawings. These presets can be attached to fixture records, giving integrators a visual reference for what's installed and how it's arranged.
Checklists on fixtures make commissioning and maintenance workflows precise. Define a commissioning checklist with required photos at specific steps, assign it to a fixture, send it to the integrator, and collect signed photographic proof of completion. The same checklist template can be reused across every similar installation in the portfolio.
Work Orders tie it all together. When a service call is needed, the work order captures the scope, the vendor, the fixtures involved, and the checklists required to close the job out. Integrators receive everything they need in a single email and complete the job record without a back-and-forth paper trail.
Sytewise is designed to reduce the communication overhead that comes with managing physical spaces and the people who work in them. Less chasing, more doing.
Additional Reading: DASHBOARD, WORK ORDERS, CHECKLISTS, REMINDERS, VENDORS
Welcome to Your Dashboard
The dashboard is the first thing you see after logging in, and it earns that spot. It gives you a live count of everything happening in your account, a map of all your properties, a full browsable property list, and quick access to vendors and clients. Whether you're getting your bearings or jumping straight into a busy day, this is where it all starts.
The Info Boxes
Running across the top of the page is a row of colorful shortcut buttons. Each one shows a live count of something important in your account: Properties, Vendors, Users, Work Orders, Surveys, Tenants, Reminders, Contracts, Bills, and Clients. Every button is clickable and takes you straight to the corresponding page.
You can choose up to 5 shortcuts to display on your Dashboard. To do this, scroll to the bottom of the info box row and click Shortcuts to pick the ones that matter most to your day. If you only care about Work Orders and Vendors, show just those. If you want the full picture every morning, keep them all.
If your account has an overdue invoice, a red alert banner will appear at the top of the dashboard above everything else. It won't be subtle.
Quick Actions
Just below the info boxes is a three-part action bar.
On the left, you have property management shortcuts:
- + Property creates a new property record.
- Print All Properties opens a print-ready view of your full property list.
- Download All to CSV exports your property list as a spreadsheet, up to 200 properties at a time.
In the middle, there's a vendor search field. Type at least three characters and a matching list of vendors appears. Select one and you go straight to that vendor's detail page.
On the right, a client search works exactly the same way. Three characters minimum, pick from the results, land on the client page.
The Map
The left half of the lower dashboard is an interactive Google Map showing a red pin for every property in your account. The map automatically adjusts its zoom level to fit all your properties in view when it loads.
Click any pin and a small popup shows the property name as a clickable link. Clicking that link takes you to the property page. At the same time, that property gets highlighted in the list on the right side of the page, so you always know exactly which one you clicked.
If you don't need the map taking up screen space, click the chevron in the Map card header to collapse it. Click again to bring it back.
The Properties List
The right half of the lower dashboard is your full browsable property list. By default it loads up to 200 properties at a time. If you have more, a Load Next 200 button appears at the bottom to pull in the next batch.
Searching and Filtering
You have four ways to narrow the list:
Search by Name or Zip is the search field at the top of the properties card. Type at least three characters and matching properties appear instantly. Selecting one takes you to that property's page.
View By State is a dropdown that filters the list to a single state. Pick a state and only properties in that state are shown. Changing the state filter automatically clears any manager filter you had active.
All Properties (the manager dropdown) filters the list to properties assigned to a specific manager or user in your account. Selecting a manager clears the state filter. These two filters work independently of each other.
Search by Address is a secondary search tucked below the other filters. Click the "Search by address" link to expand it. Type at least six characters of a street address and click Search to find a property by its address. This is handy when you know the street but not the property name.
What Each Property Shows
Every property in the list displays:
- Property name as a clickable link to the full property page
- Property ID (a small badge in the corner, or a QuickBooks ID if your account uses that integration)
- Print icon to open a printable report for just that property
- Full address
- Client assigned to the property, if one exists, as a clickable link
- Vendor assigned to the property, if one exists, as a clickable link
- Trade badges showing every trade active on that property. Each badge is clickable and takes you directly to that property/trade combination.
- Contracts are available via a file icon on the property row. Click it and the contracts associated with that property load inline.
If a property has been marked as sold, a red SOLD! label appears next to its name.
How the Map and List Work Together
The map and the property list are connected. When you apply a state or manager filter, both the list and the map update together. The map clears its current pins and redraws with only the properties that match your filter. Whatever you're looking at in the list, the map reflects it.
Clicking a map pin highlights the matching property in the list. Clicking a property link in the list navigates to that property. They're two views of the same data, and you can use whichever makes more sense for what you're trying to find.
Additional Reading: SYTEWISE USER INTERFACE, LEFT MENU
Left Menu Options
Dashboard
The Dashboard provides an at-a-glance summary of recent account activity, including open Work Orders, pending Surveys, and system notifications.
Properties
The Properties section manages the physical locations, buildings, and sites tracked in your account.
Properties — View and manage all Property records in the account.
New Property — Create a new Property record.
Property Search — Search Properties by name, address, or other criteria.
Merge — Combine duplicate Property records into a single unified record.
Clients — additional module required
The Clients section manages the organizations or individuals who are clients of your account. Sub-menu items are generated dynamically based on account configuration.
Vendors
The Vendors section manages the contractors, service providers, and other Vendors associated with Work Orders and property maintenance.
Surveyors
The Surveyors section manages the individuals assigned to conduct property and Fixture surveys.
Tenants
The Tenants section manages the occupants of properties tracked in Sytewise. Tenants can be linked to specific properties and associated with service requests and communications.
Users
The Users section manages access and contact records for the account.
Users — View and manage admin user accounts and their permission levels.
Contacts — Manage contact records associated with the account, independent of portal access.
Work Orders
The Work Orders section manages the creation, assignment, tracking, and completion of maintenance and service tasks across all properties.
Surveys
The Surveys section manages property and Fixture survey workflows, including survey assignment, completion tracking, and results.
Contracts — additional module required
The Contracts section manages service agreements and contractual arrangements associated with properties, Clients, or Vendors. Allows tracking of negotiated prices on invoices with the billing module.
Bills — additional module required
The Bills section manages billing records and payment tracking associated with Work Orders and service activity. Billing for your particular accounting platform may require an additional module or attachment to an API.
Fixtures
The Fixtures section manages the individual assets and equipment items installed at properties, including details, maintenance history, and associated Work Orders.
Cabinets — additional module required
The Cabinets section manages cabinet and controller records for AV integrators installing large display screens, including preset configurations for cabinets and equipment layout.
Forms — additional module required
The Forms section manages vendor-facing forms used to collect field data, safety and injury reports, training and compliance information from contractors and service providers.
Checklists — additional module required
The Checklists section manages structured work, inspection, and maintenance work by created curated lists of work steps so field technicians can follow and report on completed work including photos, checkboxes, notes, and signatures.
Insurance
The Insurance section manages insurance policy records associated with Vendors, properties, or Clients, including coverage details and expiration tracking.
Library
The Library section provides a list of all part, Fixture, Trade, and Property presets to allow Admins to deploy those Items on any property. I have the same HVAC unit on two properties. Create the Fixture once, then save it as a Library item. Deploy it on any property in your portfolio with the click of a button. Just change to location and serial number..
Reference — additional module required
The Reference section provides access to internal knowledge base articles and reference content to attach to Fixtures including maintenance, firmware, and support information for everyone.
Email Log
The Email Log displays a record of all outbound emails sent from Sytewise, including system notifications, Work Order communications, and survey-related messages.
Reminders
The Reminders section manages scheduled alerts and notifications associated with properties, Work Orders, Fixtures, or other records to establish an annual work flow.
Account
The Account section provides access to account-level settings, user preferences, and system configuration options.
Creating a Vendor
Vendors are the people who work on your properties — outside contractors, service companies, or even employees whose work you want to schedule and document. Before you can create a property or issue a work order, at least one vendor must exist in the system.
To create a new vendor:
- Go to Vendors in the left navigation menu and select Vendors.
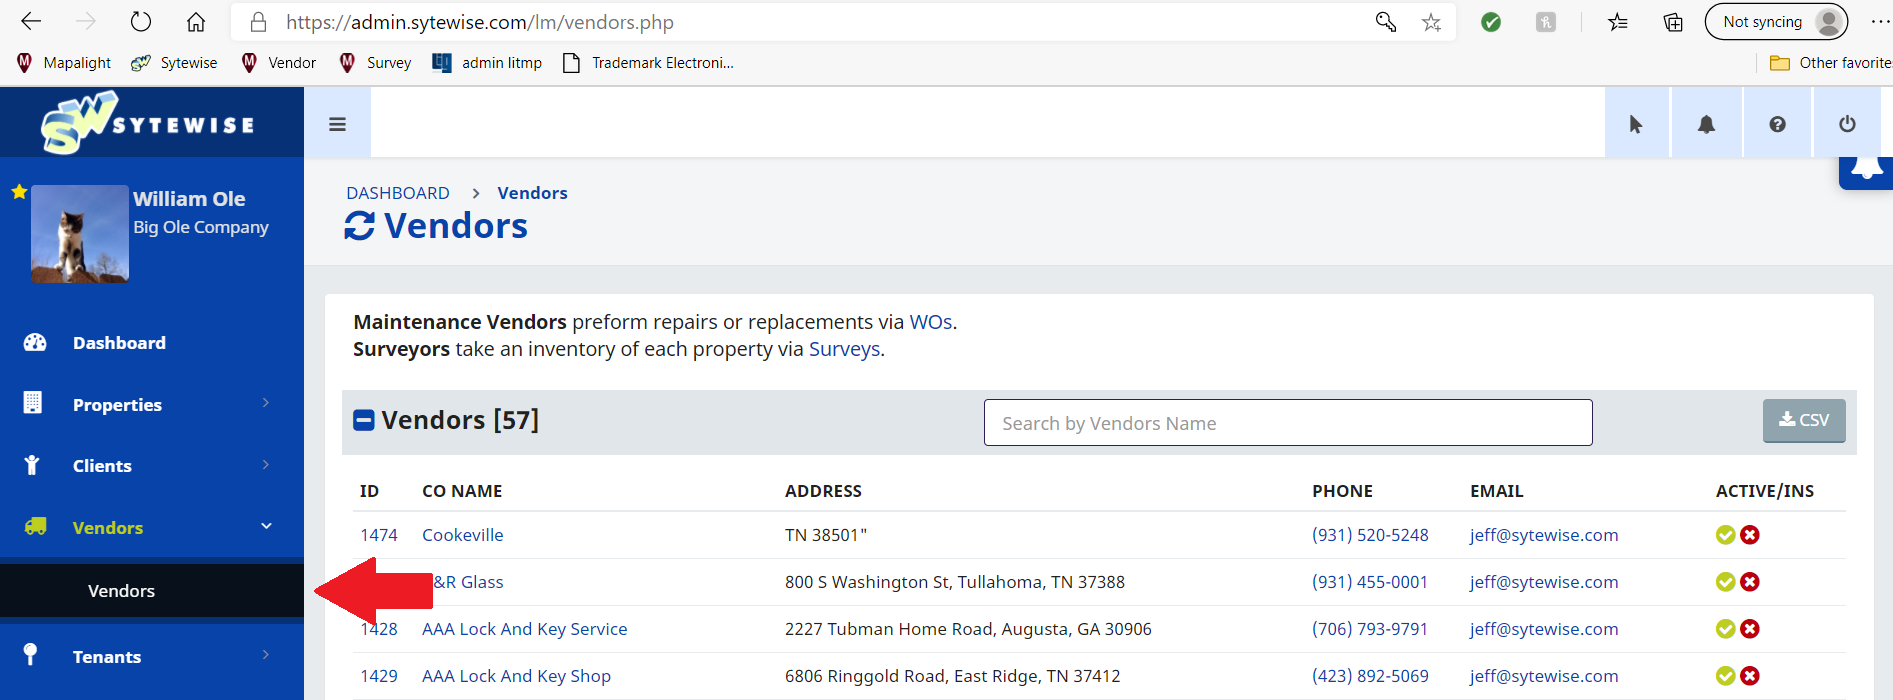
- Expand the Create A New Vendor section at the top of the page.
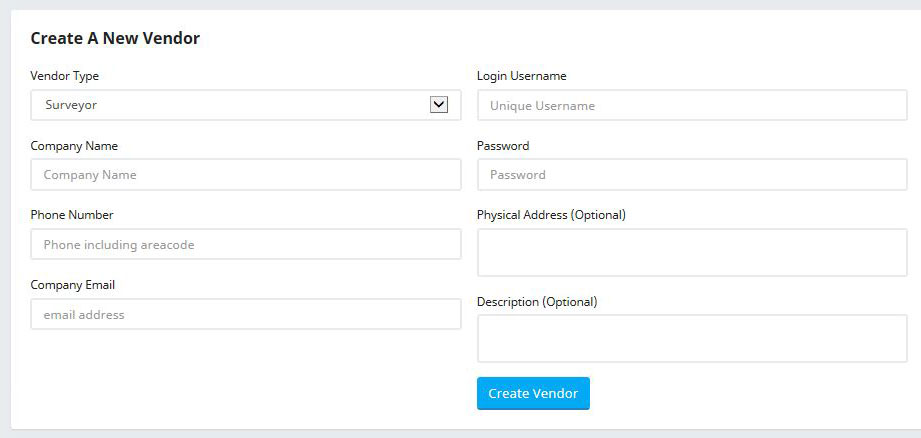
- Fill in the required fields:
- Company Name — must be unique in your account
- Phone Number — primary contact number
- Company Email — the main inbox for this vendor
- Login Username — the vendor's credential for the Vendor Portal
- Password — minimum 8 characters, one capital letter, and one number
- Address — the vendor's physical business address
- Click Lookup Geolocation to validate the address. The Create Vendor button will not appear until this step is completed.
- Click Create Vendor.
Once the vendor is created, you can add contacts, attach insurance certificates, and assign the vendor as the default for specific property trades.
Adding an Insurance Certificate (COI)
Most accounts keep a Certificate of Insurance on file for every vendor. To add one:
- On the vendor's profile page, scroll to the files section and click Add a File or Policy.
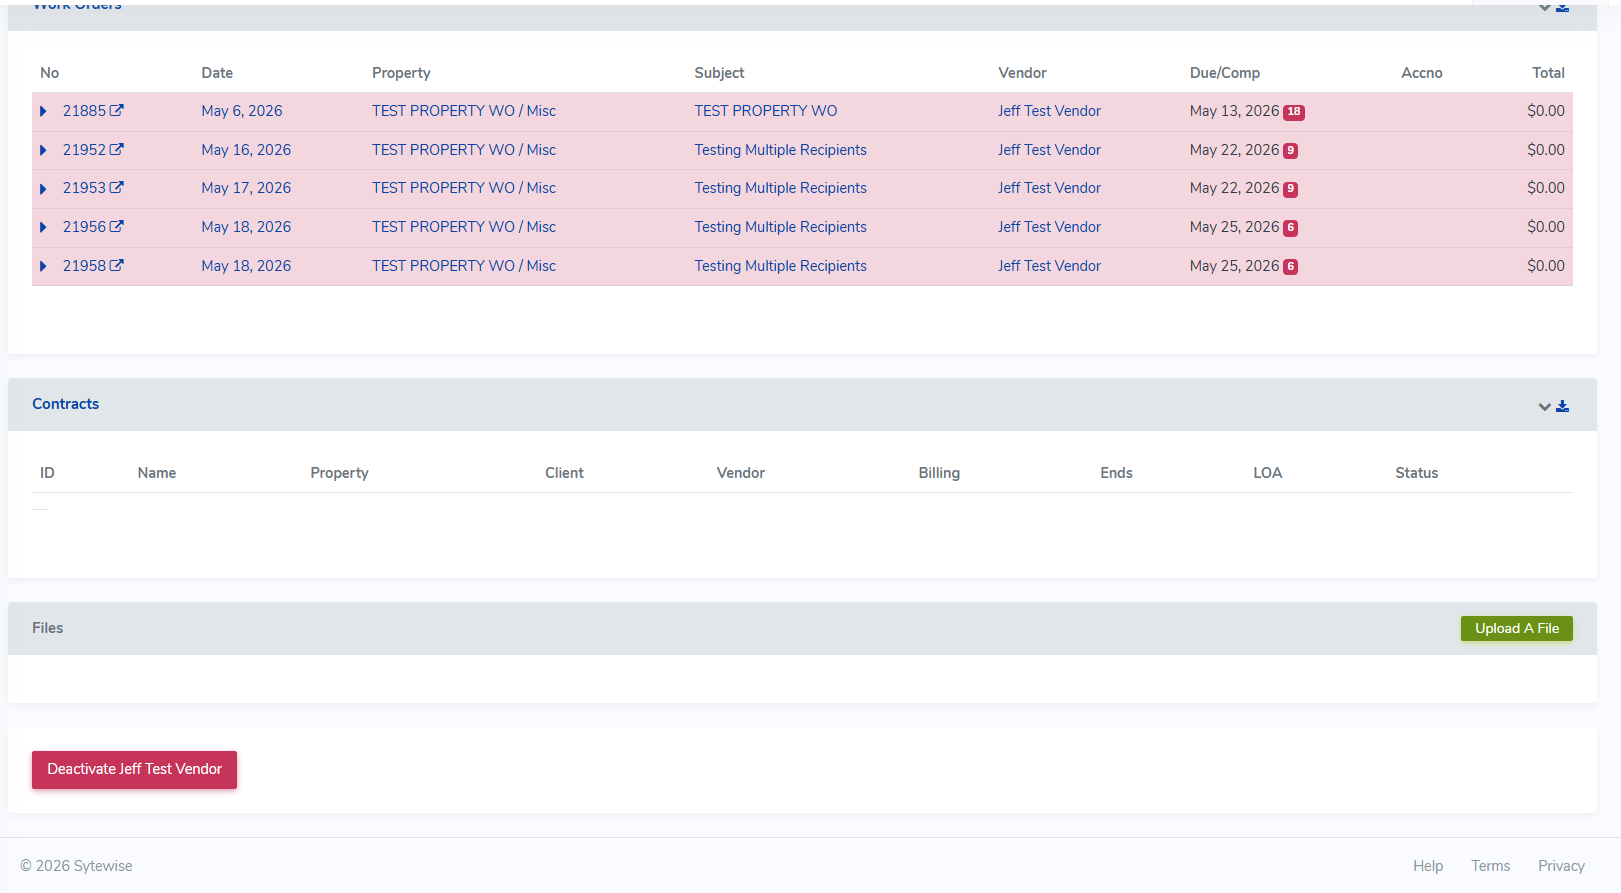
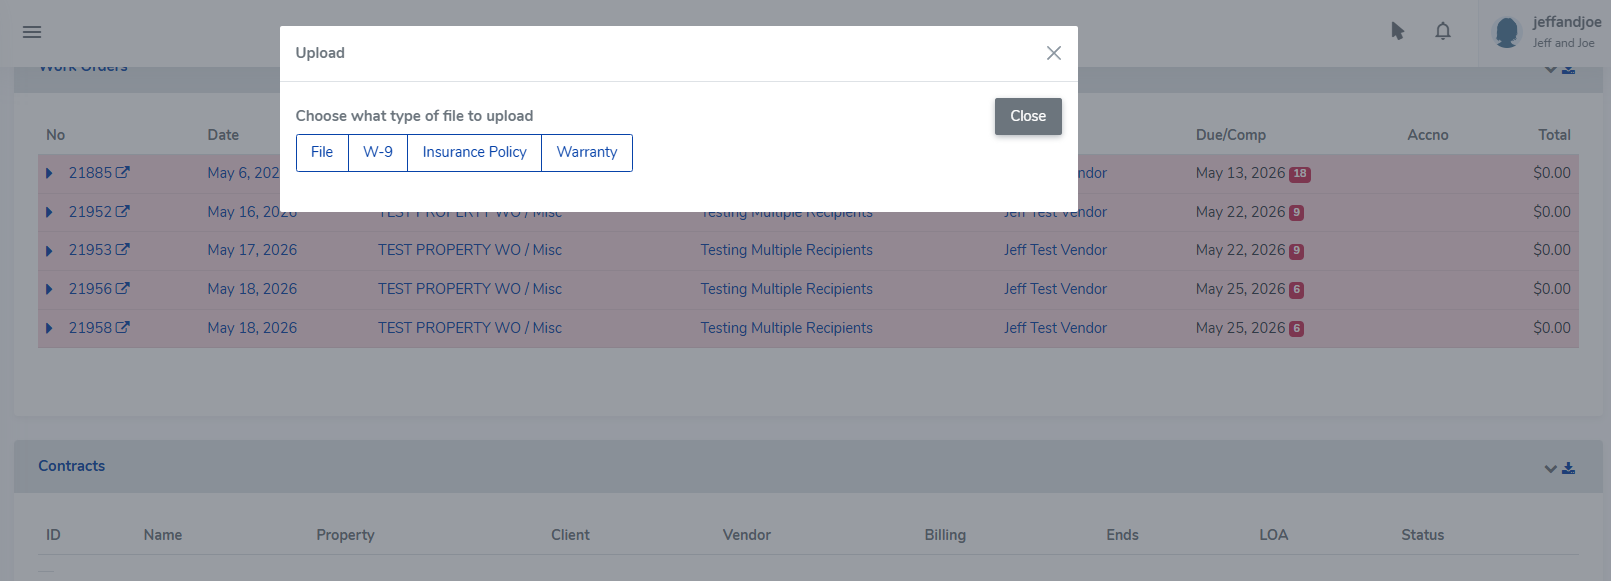
- Select the Insurance Policy tab.
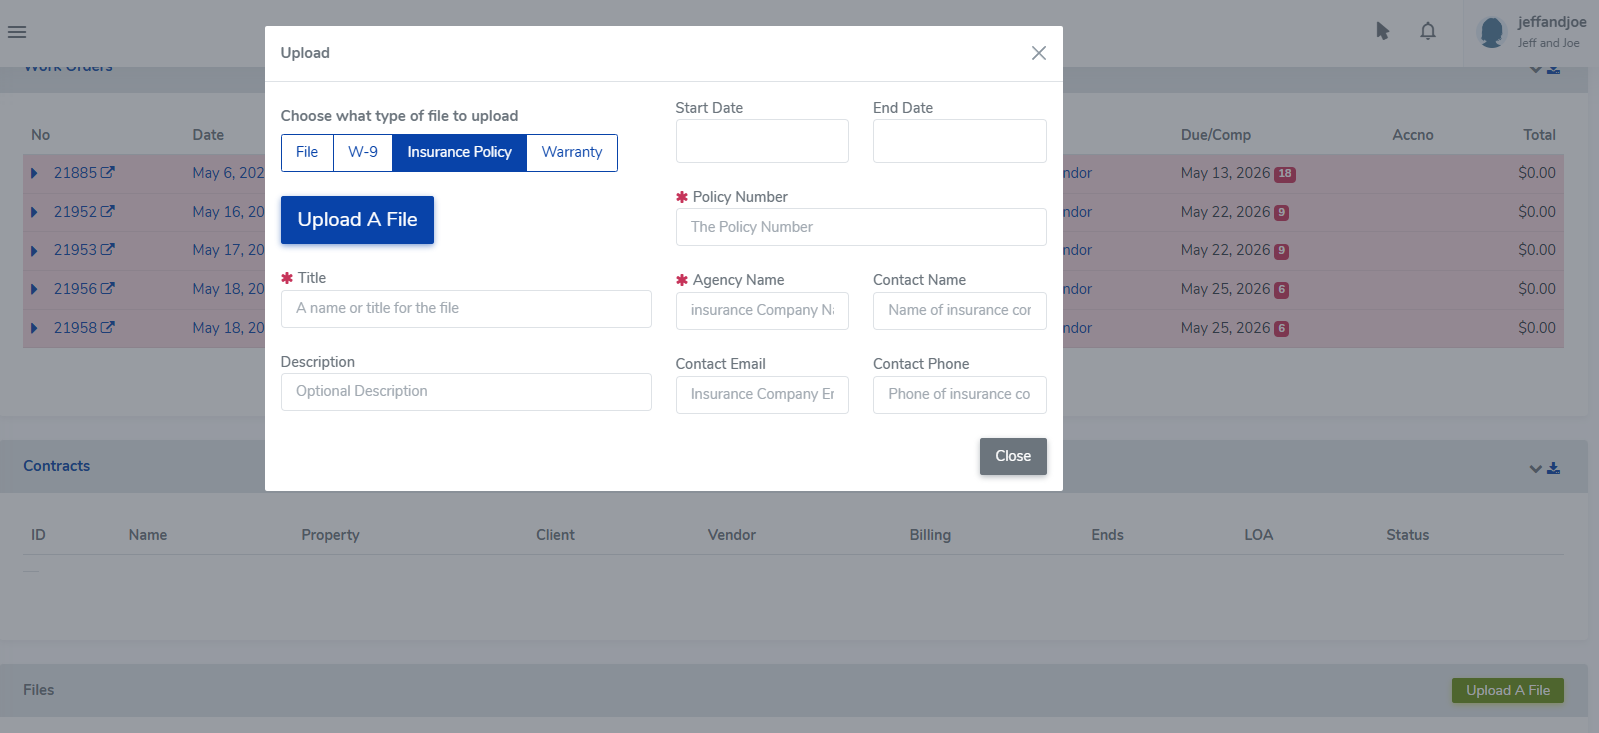
- Enter the policy details (carrier, policy number, effective and expiration dates) and click Save.
- Once the record is saved, a Choose File button appears. Select your COI document and click Save.
Your policy information will be listed with a link to the uploaded file. To edit or delete a policy or document, click the pencil icon next to the file link.
Vendors can add insurance and location information to their profiles from the vendor portal! Add instructions on how to do this in your invitational email and vendors are more likely to make those entries on their own. Vendors can have multiple COI's in their profile to confirm certificates on multiple properties.
For a complete guide to organizing vendors, assigning them to property trades, setting default vendors, and managing contacts, see Setting Up Vendors in Sytewise →
Creating a Property in Sytewise
Every building, location, or managed space in your portfolio starts as a property record. The property is the anchor for everything else: trades, fixtures, vendors, work orders, surveys, checklists, and reports all connect back to it. Getting a property created correctly takes about two minutes, and this article walks through every step, including how to use the Library to build a fully populated property from a saved template instead of starting from a blank slate.
Before You Start
Two things need to exist before you create a property:
A vendor must be in the system. The property creation form requires a default vendor for the first trade, and you can't proceed without one. If the vendor isn't in Sytewise yet, add them on the Vendors page first.
The property limit for your account must not be met. If your account has a maximum property count and you've reached it, the creation form won't appear and you'll see a message prompting you to contact your account representative. For most accounts this won't be an issue, but it's worth knowing.
Getting to the New Property Page
From the Dashboard, click + Property in the quick action bar or navigate to Properties in the left menu and select New Property from the submenu. Either route lands you on the same page.
The page has three cards working together: the property information form on the left, a library selection card in the middle (if you have library items saved), and the map and location confirmation on the right.
Creating a Property from Scratch
Step 1: Property Title
Property Title is required and must be unique within your account. Use a name that will be immediately recognizable in lists, reports, and dropdown menus. "2400 Commerce Street Nashville" or "Riverside Plaza HVAC" will serve you better than "New Property 1." Keep it descriptive enough that it reads clearly out of context.
The system checks title uniqueness in the background as you type. If the name is already in use, you'll know before you try to save.
Step 2: Full Address
Full Address is required and needs at least nine characters. Enter the complete street address including city, state, and zip. This is the address that gets sent to Google Maps for validation and coordinate lookup, so the more complete and accurate it is, the cleaner the result.
Step 3: Default Vendor
The Default Vendor field searches your vendor list as you type. Enter at least a few characters of the vendor name and select the right one from the autocomplete results. This vendor becomes the default assigned to the first trade on the property. You can change it later and add different vendors for additional trades once the property is created.
Step 4: Trade
The Trade dropdown shows all available trades in the system. Select the trade that applies to the first service area you're setting up on this property. If the property has multiple trades (HVAC, plumbing, electrical, AV, etc.), you'll add the others after the property is created. Every property needs at least one trade to start.
Step 5: Lookup Geolocation
This step is required and the Create Property button will not activate until it's complete.
Click Lookup Geolocation. Sytewise sends the address you entered to Google Maps, which validates it, formats it, and returns the precise coordinates. The map on the right zooms in to satellite view at the location, drops a marker, and displays the latitude, longitude, and formatted address.
Take a look at the formatted address that comes back. If Google interpreted the address differently than you entered it (a common occurrence with suite numbers or informal address formats), the formatted version shows you exactly what was matched. If the coordinates look right on the map, you're good. If the marker is in the wrong spot, you can drag it to the correct location. Dragging the marker updates the coordinates automatically.
If the geocoding fails (wrong address, unrecognized location, or an API issue), you'll see an error message describing what went wrong. Correct the address and try again.
Step 6: Create Property
Once geolocation succeeds and the map shows the right location, the Create Property button activates. Click it.
If the address is already in the system on another property, Sytewise will warn you about the potential duplicate and ask whether to proceed or start over. This is a safety check, not a hard block. If the property genuinely shares an address with an existing record (a multi-tenant building with separate property records, for example), choose Create Property Anyway.
On success, a confirmation message appears with a link to go to the new property detail page. From there you can add additional trades, assign a manager, link a client, add images, and start building out the full property record.
Creating a Property from a Library Item
If your account has property library items saved, a library selection card appears between the property information form and the map. This is one of the most powerful shortcuts in Sytewise for anyone managing a portfolio of similar or identical properties.
What a Library Item Contains
A property library item is a complete snapshot of a property's structure: trades, fixtures, and all the parts inside each fixture, including full part specifications. When you create a property from a library item, Sytewise builds all of that structure automatically as part of property creation. You end up with a fully populated property, with trades, fixtures, and parts already in place, rather than an empty shell you have to build from scratch.
The library card displays each saved item with its name and a set of trade badges showing how many fixtures each trade contains. A badge reading "HVAC 5 fixtures" means that library item includes an HVAC trade with five fixtures and all their associated parts ready to deploy.
Selecting a Library Item
The first option in the library card is always No Library: create a new, empty property, which is selected by default. To use a library item instead, click the radio button next to the one you want. The rest of the creation process is identical: fill in the title, address, vendor, and trade, run the geolocation lookup, and click Create Property.
When the property is created, Sytewise writes the base property record and then immediately layers in everything from the library item. Trades are created, fixtures are inserted with their coordinates and descriptions, and every part record from the library is recreated on the new property. You land on the property detail page with a complete structure waiting for you rather than an empty map.
What This Means for a Large Portfolio
The library feature is where Sytewise pays real dividends at scale. If you manage fifty retail locations that all run the same HVAC configuration, or a hundred venues with identical AV installations, you don't need to manually build out each property's trades, fixtures, and parts one by one. You build the first one carefully, save it to the library, and every subsequent property inherits that structure in seconds.
The consistency matters as much as the speed. When every property of a given type starts from the same library item, the records are structured identically. Trade names match. Fixture names match. Part numbers follow the same convention. That uniformity makes cross-portfolio reporting cleaner, makes searching more predictable, and makes onboarding new team members simpler because every similar property looks the same in the system.
The library item is a starting point, not a locked template. Once a property is created from it, every record on that property is fully independent and editable. You update the install dates, adjust the part numbers for the specific units on site, add location-specific notes, and the new property becomes its own complete record. The library item stays unchanged, ready for the next property.
Saving a Property to the Library
To save an existing property to the library, go to the property detail page, find the Fixtures section, and click the Library button. A small modal asks for a library title of up to 24 characters. Give it a name that clearly identifies the property type or configuration, something like "Standard Retail HVAC Config" or "Venue AV Platform v2," and click Save.
The system captures the complete structure: all trades, all fixtures with their coordinates and descriptions, all parts with their full specifications including manufacturer, model, part numbers, and technical detail fields. That snapshot is stored at the account level and immediately available on the new property page for any future property creation.
After the Property Is Created
The property detail page is where the rest of the setup happens. A few things to take care of right away:
Additional trades are added from the property detail page. Click New Trade, select the trade type, assign a vendor for that trade, and save. Each trade becomes its own operational area with its own fixture list, work orders, vendor assignment, and checklists.
Manager assignment is set on the property detail page. Assigning a manager connects this property to a specific admin user, which feeds into the manager filter on the dashboard property list and into property-level permission scoping.
Client assignment links the property to a client record. This is what makes the Clients module useful at a portfolio level: one client organization can have multiple properties grouped under it, with consolidated reporting and billing.
Property images can be uploaded after creation. Use the upload function in the map section of the property detail page to add site photos, floor plans, or reference images. Images appear in the property's map card and are included in the property print report.
Property details like square footage, number of units, contact phone and email, billing address, store hours, and QuickBooks ID are all editable on the property detail page. Fill in whatever is relevant for your workflow.
The property is ready the moment it's created. Everything else is refinement that makes the record more complete and more useful over time.
Additional Reading: SETTING UP VENDORS IN SYTEWISE, NAMING FIXTURES AND PARTS
Creating Your First Fixture
A fixture is any fixed asset on a property that requires maintenance, service, or documentation — an HVAC unit, a pole light, an AV system, a door, or any piece of equipment you need to track. Fixtures live inside a property's trade, and they're what work orders, surveys, checklists, and reports are built around. Here's how to create your first one.
Step 1: Find the New Fixture Form
From the property detail page, navigate to the trade where the fixture belongs. Look for the + Fixture button in the fixtures section and click it. A modal window opens with the New Fixture tab selected by default.
Step 2: Name Your Fixture
Fixture Name is required. Keep it short and specific — something like "RTU-4" or "Pole Light 6" rather than "Unit" or "Light." This name appears in work orders, surveys, reports, and dropdown menus throughout the system. A name that means something on its own, without any surrounding context, will serve you well as your fixture list grows.
Step 3: Write a Description
Description is also required. Think of the name as a label and the description as a sentence. "Northwest corner rooftop gas pack, 25-ton, 3-phase" tells the next technician something they can actually use when they arrive on site.
Step 4: Select a Type
Type is a dropdown populated from the fixture types configured in your account. Select the category that best fits this piece of equipment. If the type you need isn't listed, an account administrator will need to add it before you can proceed.
Step 5: Confirm the Vendor
The Vendor field is pre-filled with the default vendor assigned to this property and trade. If a different vendor is responsible for this specific fixture, start typing a name and select the right one from the autocomplete list.
Step 6: Save and Position
Click Save. You'll land on the fixture detail page. The fixture is created, but its map marker is sitting at the property's center coordinates — go ahead and drag it to the fixture's actual location on the map or floor plan right away, before the list gets long and harder to sort out.
From the fixture detail page you can add parts, upload photos, assign the fixture to a group, and attach checklists.
More Ways to Create Fixtures
Creating fixtures one at a time works well when you're building a new property or adding individual pieces of equipment. When you need to add a large number of fixtures at once, Sytewise offers additional options: you can import fixtures in bulk using a CSV file, deploy a complete fixture with all its parts from a saved Library template, or clone an existing fixture on the same property to avoid re-entering identical specifications. For a full walkthrough of all these methods, see the complete article below.
Additional Reading: CREATING AND MANAGING FIXTURES
Using the Fixture Library to Build Properties Fast
If you manage more than a handful of properties, you already know the feeling: new location comes on board, and someone has to sit down and build out every fixture from scratch. Again. The Fixture Library exists specifically to eliminate that repetition. Build a fixture once, save it to the library, and deploy it to any property in your portfolio in seconds -- with all its parts, specs, and group associations intact.
What the Library Actually Does
When you save a fixture to the library, Sytewise takes a complete snapshot of everything attached to it: the fixture definition, every part with its full specifications (manufacturer, model number, part numbers, firmware versions, install dates, table details), and any of its group associations you want to include. That snapshot sits at the account level, available to any property, any trade, any time.
When you deploy a library item as a new fixture, all of that comes with it. You're not getting a blank fixture with a familiar name -- you're getting a fully populated record that's ready to work with the moment it lands on the property.
Saving a Fixture to the Library
Before you can use the library, you need something in it. Once you have a fixture built and documented the way you want it, here's how to save it:
- Go to the fixture detail page.
- In the parts section, click the Library button.
- Enter a library title -- up to 24 characters.
- Click Save.
That's it. The fixture is now available for deployment across your entire account.
One thing worth spending a moment on: the title. You'll be selecting this item from a list later, possibly months from now, possibly by a team member who didn't build it. "Standard 20ft LED Pole w/ Driver" or "Plumbing - 2 Restroom Standard" will serve you far better than "Fixture 1" or "HVAC Template." Be specific enough that the name tells you exactly what's inside without having to open it.
Choosing the Right Fixtures for the Library
The library shines brightest when the fixtures you're deploying are either identical across properties or generic enough that the specifics get filled in after deployment.
If you standardize on a single manufacturer and part number across all your locations for a given fixture type -- the same AV controller in every venue, the same RTU model across a retail chain -- the library carries the full spec to every property automatically. One import, fully documented.
For fixture types where the specific part numbers vary by location (plumbing is the classic example), the library still earns its keep by getting the right fixture names and structure onto the property quickly. You fill in the location-specific details -- serial numbers, model variants, install dates -- after the fixtures land. "Commode 1," "Commode 2," "Mop Sink," "Floor Drain" all show up on the property in the right trade in one operation, and you work through the details at your own pace.
Building a Good Library Group
Before you save a fixture set to the library, it helps to think about what a useful group template looks like. A good group puts as many relevant fixtures on the property as possible without creating a cleanup problem on the exceptions.
For example: if most of your locations have two commodes per restroom, build your plumbing library group with two commodes. The handful of locations with three commodes just need one addition after import -- much less work than building from zero at every location. Think of the group as a sensible starting point that covers the common case, not a perfect fit for every edge case.
Generic, consistent names are your friend here. "Front Door," "Back Door," "Overhead Dock Door" or "Commode 1," "Commode 2," "Commode 3" give your staff, vendors, and surveyors clear reference points across every property without requiring location-specific creativity at import time.
Deploying a Library Item to a Property
When you're ready to add fixtures to a new property using a library item, here's the flow:
- Go to the property and select the trade where the fixtures belong.
- Click the + Fixture button.
- Switch to the Add From Library tab.
- Select the library item you want to deploy using the radio buttons.
- Set the Parts Install Date -- this becomes the installation date recorded on every part created from the template.
- Check or uncheck Include Groups (see below).
- Click Add From Library.
Sytewise creates the fixture and all of its parts in a single operation. Every part field from the library item copies to the new fixture with the install date you specified.
The Include Groups Checkbox
When you deploy a library item, you'll see an Include Groups checkbox. This is worth understanding before you click past it.
If the fixture was saved as part of a group, checking this box recreates that group association on the new fixture automatically. If you're building out a property and want your lighting fixtures to land in the "Pole Lights" group right out of the gate, check it. If you'd rather start fresh and organize your groups manually once everything is on the property, leave it unchecked.
For large bulk imports where group organization is part of your workflow, checking Include Groups can save a significant amount of post-import cleanup.
After the Library Item Lands: Reposition Right Away
Every fixture created from a library item starts its life at the property's center point on the map or floor plan. If you're adding a dozen fixtures at once, you'll have a dozen markers stacked on top of each other at the property center until you move them.
Make repositioning the first thing you do after a library import. Open each fixture, find the marker on the map, and drag it to where the fixture actually lives. The coordinates update automatically when you drop it. It takes less than a minute per fixture and makes the property map genuinely useful instead of decorative.
The Payoff at Scale
The first time you use the library it saves you some typing. By the tenth property it's saving you hours. By the fiftieth it's one of those things you can't imagine not having.
More than speed, though, the library enforces consistency. Every property built from the same library item has the same fixture names, the same part structure, the same trade organization. That uniformity makes cross-portfolio searching cleaner, makes reporting more predictable, and makes it much easier to onboard someone new because every similar property looks the same in the system.
Build your library items carefully the first time, name them well, and let them do the heavy lifting from there.
For a complete reference on all fixture creation methods including manual entry, cloning, and CSV import, see Creating and Managing Fixtures →
Creating Your First Work Order
Work orders are how you assign tasks to a vendor and kick off the paperwork trail. You create them right from the property page, and once you save, the system takes it from there and handles the email notifications automatically.
Opening the Work Order Form
On the property page, look for the New Work Order button. Clicking it opens a dialog with the full work order form, split into two columns. The left side covers the details and costs, and the right side handles fixtures, instructions, and who gets the email. If the property does not have a default vendor assigned yet, the form will not open and you will see a prompt to add one first, so take care of that ahead of time if you are setting up a new property.
Filling Out the Basics
The Subject or Title field gives the work order its name and pre-fills with the property name. You can leave it as-is or make it more specific. Order Date pre-fills with today, and Due Date pre-fills with five business days out. Adjust either one if your situation calls for it.
The Vendor field pre-fills with the property's default vendor. Start typing if you need to swap in a different one. If the property has contracts on file, the Contract field lets you pick the right one or choose to proceed without one. Reference No. is optional and useful for account numbers or tracking codes you want tied to the work order.
Use the Add Line Item button to break costs down by task or trade, or just drop a number into the Total field if you are keeping it simple.
Additional Options
If the job has a specific start date that differs from the order date, check the Include a Work Start Date box and a date field will appear. Leave it unchecked if the vendor can begin whenever and a separate start date is not needed.
The Include Management Details in WO Emails checkbox controls whether the property's management contact information gets included in the vendor email. It pre-checks based on the property's default setting, so you can leave it or toggle it for this particular work order without changing the default.
If you need to send the vendor supporting documents like floor plans, photos, or specs, use the Add A Zip File field to attach a zip archive. Zip files only here. The file gets stored with the work order and a download link will appear on the work order page after saving.
Choosing Who Gets Copied
At the bottom of the right column you will find a card listing all your Sytewise admin users. Check anyone who should receive a copy of the work order email. This is a great way to loop in the right people without having to remember to forward anything after the fact.
Selecting Fixtures
The right column also includes a fixture selector. Use Load All Fixtures to pull in the full list, then check the ones this work order covers. Any fixture already assigned to another open work order is highlighted in green, so you can see at a glance what is already spoken for.
Special Instructions
Use the Special Instructions text area for anything the vendor needs to know before arriving on site. Access details, timing requirements, contact names at the property, any of it goes here and gets included in the work order email.
Saving the Work Order
When everything looks good, hit Save. Sytewise will create the work order, send the notification email to the vendor contacts and any admins you selected, and drop you right on the new work order page.
Additional Reading: CREATING AND MANAGING WORK ORDERS
Set Up Recurring Work Orders
Setting up recurring work orders in the Sytewise platform is easy to do and keeps your recurring work up to date with minimal input.
Recurring work can be anything from grease trap maintenance to air conditioner filters. For our purposes we will use a work order for conducting the Annual Fire Alarm Inspection.
To set up recurring work orders:
- Select a Work Order you would like to replicate
- Click on the Reminder Bell in the Upper Right Corner
- Click on the Check Boxes to Attach a Reminder and Replicate a Work Order
- Add a Subject and Message Note about the work order
- Click the Checkbox for High Priority if desired
- Choose a recipient for Reminder from the list of Sytewise Users
- Click the Repeating Check Box to establish as Schedule for the Work Orders to Repeat
- Choose the Beginning and End Date of the Reminders. Forever equals 100 Years.
- Select your Repeat Time Frame of Day, Week, Month, or Year
- Click Save
Select a Work Order you would like to Replicate
This can be any work order. It can be Open or Completed. It can be past due. It doesn't matter. When selecting a work order make sure you look at the Special Instructions to make sure they will be appropriate over time. If you have a lot of information about special dates or times that won't be applicable in the future, it would be better to start with a new work order. Make sure your special instructions are going to be evergreen for any future work order they will be part of.
Click on the Reminder Bell in the Upper Right Hand Corner
Select the Reminder Bell at the Top Right Hand Corner of your browser and the New Reminder Modal will Appear. Once the Reminder Modal opens, click on the check boxes to Attach Reminder to this WO and Replicate This WO.
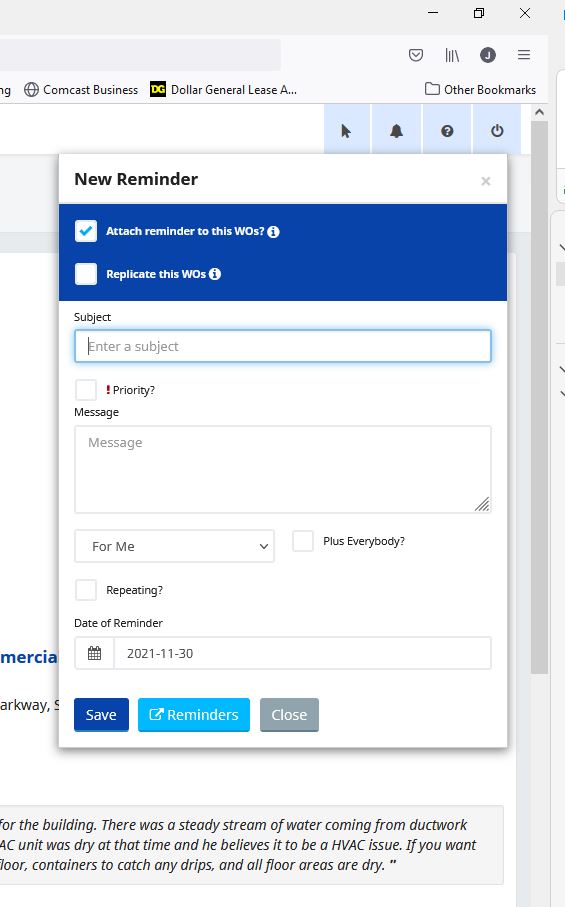
Add a Subject and Message Note about the Work Order
Once you have selected the check boxes for Attaching and Replicating the Work Order, Type in a Subject and Message about the work order. This is a note to you or another person that will be tracking this Work Order in the Future. Any Special items to remember as you go about getting the work completed. This is not the work order instructions to your vendor. Those are already in the work order you selected.
Check the box for Priority
This may be a simple item, but it will help work orders stand out in your work order list. It will also help you notice important items that may only come up once a year. All items are important. I usually add this to time sensitive items that may cause additional expense if they aren't handled in a timely manner. You can use it however best suits your workflow.
Choose a recipient for Reminder from the list of Sytewise Users
Every Sytewise System User is a potential candidate to receive the Reminder you are creating. The default will always be to the creator of the Reminder. You can select another user, or Select All users. If you opt to send the Reminder to Everyone it show up on everyone's Reminder List until one User completes the reminder activity. Then it will drop off of Everyone's list.
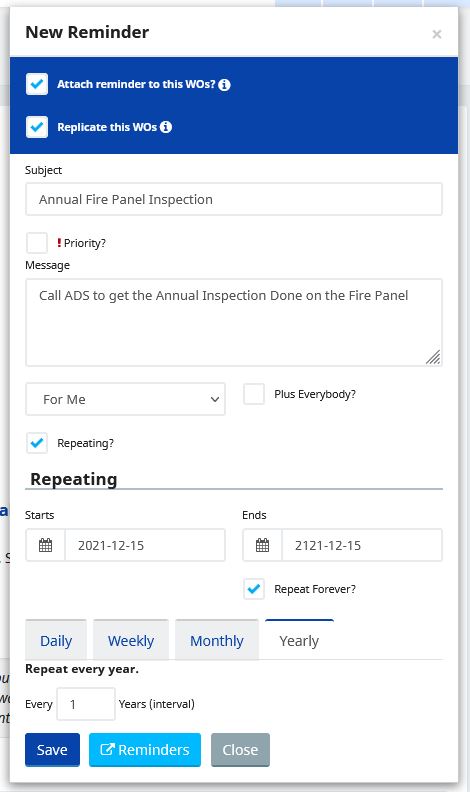
Click the Repeating Check Box to establish as Schedule for the Work Orders to Repeat
Once you Select the Repeat Check box you will see two boxes for a Start Date and an End Date for Reminders ( and Work Orders) to be scheduled and created. Reminders created today will show up the next calendar day. Choose your Starting Date and Ending Date for the recurring work orders. If you want them to recur indefinitely then select the Forever Check Box. That will immediately set the reminders to last for 100 years.
Select your Repeat Time Frame of Day, Week, Month, or Year
The calendar for reminders is very flexible. You can select a daily reminder for something, or make a weekly reminder for every Tuesday, or every Third Tuesday. You can select a Monthly Schedule to have reminders and work orders recur on a specific day of the month, or every other month. Yearly reminders are great for those annual inspections that show up again before you know it. That being said, best practice is to factor the amount of lead time you need for this work order into the reminder date. The work order will be generated on the date you select. Make sure that date gives your Vendor enough time to get the work on the books and completed by your deadline. I try to give my Fire Panel inspectors at least a couple of weeks to respond. Your lead times may be different.
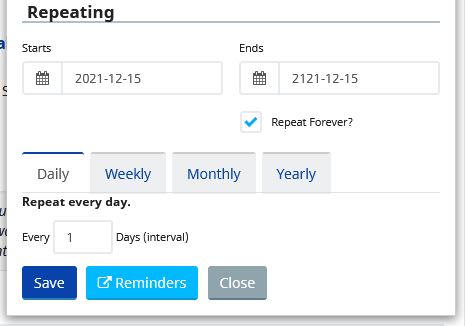
A Daily Schedule will repeat every day, or every interval of days you select. If you enter a 1 the reminder will show up every day. If you enter a 3 it will show up every day.
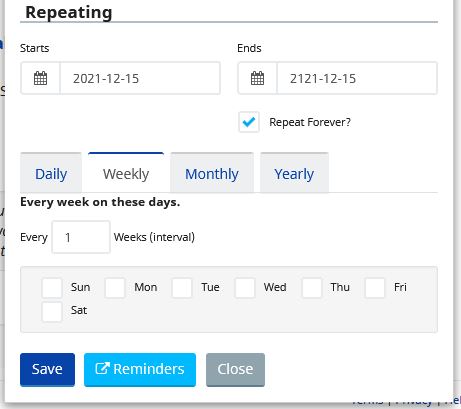
A Weekly Schedule is much the same. Select the days of the week you would like the reminder to occur and then select the number of weeks in between each reminder. This is great for work orders that repeat every other week or or on specific days of the week regardless of the number of monthly visits. Any Weekly Service Schedule is perfect for this.
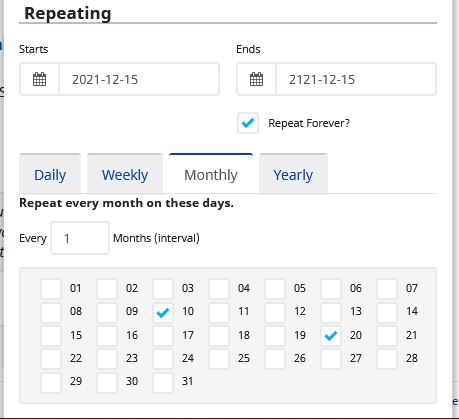
The Monthly schedule is great for events that occur on specific days of the month, every month, regardless of the day of the week.
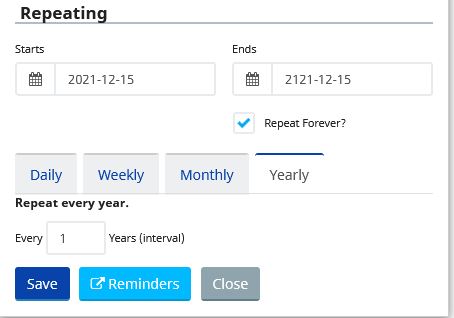
Annual is great for those inspections or reports that need to be done every year. Send a Work Order out to get your Annual Sprinkler or Backflow inspections on the calendar before your Vendor gets backed up. You can also set multi year reminders and work orders for specific Contractual Work or Lease Sensitive Items. I have tenants that require repaints every 5 years. Asphalt repairs or striping are other good uses of the multi year reminder. If you have new staff, they may not know when the parking lot in front of Kroger was last striped. Sytewise remembers and can remind them that this is the year to get it done.
Click Save
Of course you must hit save to complete the work. Once you click Save your Reminder can be found on the Reminder Page. Whe a
What happens Next?
Once your reminder is in the Sytewise System your calendar takes over. Every morning the Reminder System looks for actions that are to be completed today. When that happens you will have a Notification icon telling you how many reminders or actions that are current in your Reminder and Actions List.
The reminder will have an Action Button that says Create Work Order. Select this button and a duplicate of the original work order is made. Look at the work order, Make whatever changes you like. Change the text. Change the Vendor. Once you are done, click on the Send Work Order button and you are done.

If the Reminder is attached to the work order, the Action Button will say Create Work Order. If it is attached to a Survey, the Action Button will say Create Survey.
The Circle with Line icon will delete this instance of the recurring Work Order, but future Work Orders will still be created. To Edit the Reminder Settings for your Work Order Reminder, click on the Pencil button.
You can always edit the reminder settings for the work order . If you want to go from quarterly filter changes to every two months. Change it in the settings. If you want to Change the Vendor for all future work orders, you can do that in the Settings.
Creating Your First Survey
Creating Your First Survey
Surveys are how Sytewise puts a trained set of eyes on a property before any decisions get made. Instead of scoping work from the office and hoping for the best, you send a surveyor to document what is actually out there, and the results become the factual basis for whatever comes next. A surveyor walks the fixtures, notes what they find, uploads photos, and submits a report. You review it and decide what warrants a work order. This article covers how to create and send a survey from the Admin Portal.
Before You Begin
You will need at least one active surveyor in the system before you can create a survey. If you have not set one up yet, head to the Surveyors page in the left navigation and create a record there first. The surveyor will need a username and password, which become their login credentials for the Survey Portal. Once that is in place, come back here and you are ready to go.
Creating the Survey
Due Date is required and must be a future date. This is the deadline for the surveyor to complete and submit their findings.
Surveyor is an autocomplete search field. Start typing the surveyor's company name and select from the results. Only active surveyors will appear in the list.
Special Instructions is your chance to set the surveyor up for success before they arrive. Access codes, on-site contacts, specific systems to prioritize, areas that are off-limits, or particular questions you need answered all belong here. The more useful context you give a surveyor upfront, the better the report you get back.
The property and trade are already set based on where you started the form, so you do not need to select those.
Sending the Survey
When you save the form, Sytewise creates the survey and lands you on the survey detail page. Take a moment to look everything over. The survey email has not gone out yet, and this is your chance to catch anything before the surveyor is notified.
When you are ready, click Send Survey. Sytewise will send an email to the surveyor's address on file with the survey details, due date, special instructions, and a login link to the Survey Portal. From there the surveyor takes it and the field work begins.
What Happens Next
Once the surveyor submits their findings you will be able to review the results on the survey detail page, including fixture conditions, part statuses, notes, and any photos they uploaded. From there you decide what warrants a work order and what does not. That review step is yours, and it is intentional.
For a complete walkthrough of survey results, surveyor permissions, and how surveys fit into your broader maintenance workflow, see Surveys and Surveyors.
Additional Reading:
- Surveys and Surveyors -- the complete reference for everything the survey system can do
- Surveys and Surveyors: Reading Survey Results -- understanding what comes back when a surveyor submits
- Surveys and Surveyors: Surveys in the Work Order Chain -- how assessments and work orders work together
- Creating and Managing Work Orders -- turning survey findings into actionable vendor assignments
Supporting setup:
- Surveys and Surveyors: Setting Up a Surveyor -- creating records, login credentials, and permissions
- Surveys and Surveyors: Surveyor Permissions -- understanding Can Edit and Can Create and when to use them
Broader workflow context:
- Building an Annual Workflow with Reminders -- scheduling recurring surveys so nothing falls through the cracks
- Fixture Page -- Managing, Editing Parts Status
Using the Property Library to Build Your Portfolio Fast
Using the Property Library to Build Your Portfolio Fast
You just added a new location to your portfolio. It's the same retail format you manage at fifteen other properties -- same trades, same HVAC configuration, same lighting setup, same plumbing fixtures. You could spend the next two hours building it out from scratch. Or you could be done in about two minutes.
That's what the Property Library is for.
What Makes the Property Library Different
You may already know about the Fixture Library, which lets you save and redeploy individual fixtures across properties. The Property Library operates at a bigger scale. When you save a property to the library, Sytewise captures the entire structure of that property: every trade, every fixture in each trade, and every part inside each fixture -- with full specifications, manufacturer data, model numbers, part numbers, firmware versions, and all technical detail fields included.
When you create a new property from that library item, all of that structure gets built automatically as part of the creation process. You don't land on an empty property and start adding trades one by one. You land on a fully populated property, ready to refine, with the whole framework already in place.
How to Save a Property to the Library
The best time to save a property to the library is after you've built out a location carefully and completely -- one where the trades, fixtures, and parts are accurate and well-named. That first property becomes the master template for every similar location you add afterward.
Here's how to save it:
- Go to the property detail page.
- Find the Fixtures section and click the Library button.
- Enter a library title -- up to 24 characters.
- Click Save.
The system captures everything: all trades, all fixtures with their positions and descriptions, and all parts with their complete specifications. That snapshot is stored at the account level and is immediately available the next time you create a property.
Take your time with the title. "Standard Retail HVAC + Lighting" or "Venue AV Platform v2" will mean something six months from now. "Property Template 1" will not.
Creating a Property from a Library Item
When you go to create a new property and your account has library items saved, a library selection card appears on the New Property page, sitting between the property information form and the map. By default it shows "No Library" selected, which creates a standard empty property. To use a library item instead, just click the radio button next to the one you want.
From there, the process is exactly the same as creating any other property:
- Enter the Property Title.
- Enter the Full Address.
- Select the Default Vendor for the first trade.
- Select the Trade.
- Select your Library Item from the library card.
- Click Lookup Geolocation to validate the address and place the map marker.
- Click Create Property.
Sytewise writes the base property record first, then immediately layers in everything from the library item. Trades are created, fixtures are inserted with their descriptions, and every part record is recreated with the specifications from the library. By the time you land on the property detail page, the structure is already there.
What the Library Item Brings -- and What It Doesn't
A property library item is a structural starting point, not a locked-in clone. Once the property is created, every record on it is fully independent and editable. The library item itself stays unchanged, ready for the next property.
What comes with the library item:
- All trades, with their names and configurations
- All fixtures in each trade, with names, descriptions, and types
- All parts inside each fixture, with full specifications
What you'll fill in after creation:
- Map positions -- every fixture starts at the property center point, just like individual library imports. Plan on spending a few minutes moving markers to their actual locations after the property is built.
- Install dates -- part records are created, but installation dates should reflect the actual install at this specific location.
- Serial numbers and site-specific variants -- model numbers and part numbers come from the library, but serial numbers and any location-specific details get added as you document the actual equipment.
- Property details -- square footage, unit count, contact phone and email, store hours, QuickBooks ID, and any other property-level information.
- Manager and client assignments -- these are set on the property detail page after creation.
Think of the library item as handling the 80 percent that's the same at every location so you can focus on the 20 percent that's specific to this one.
Designing a Good Property Library Item
The quality of what comes out of the library is only as good as what you put into it. A few things worth thinking about before you save a property as a library item:
Build to the common case. The same principle that applies to fixture library groups applies here. If most of your retail locations have four HVAC units, build the library item with four. The locations with six get two additions. The locations with three get one deletion. Either way, it's faster than starting from zero.
Name fixtures generically but clearly. Library items work best when the fixture names are consistent across every property that uses them. "RTU-1," "RTU-2," "RTU-3," "RTU-4" will show up on every property in the same way, making cross-portfolio searching predictable. Location-specific names can always be added in the description field once the property is live.
Include your most complete property. The library captures part specifications, so if one of your properties has especially thorough part documentation -- correct model numbers, firmware versions, warranty data -- that's the one to save. Every subsequent property starts with that level of detail rather than having to be built up to it.
One library item per property type. If you manage multiple formats -- say, a standard retail configuration and a larger anchor tenant configuration -- save one library item for each. A few well-built templates cover a lot of ground.
The Payoff Compounds Over Time
The first time you use a property library item, you save yourself an hour or two of fixture entry. By the time you've brought ten properties on board from the same template, you've saved a day's worth of data entry and ensured that all ten properties are structured identically.
That consistency is the part that keeps paying off. When every similar property starts from the same library item, the trade names match, the fixture names match, the part structure matches. Cross-portfolio reports are cleaner because the data is organized the same way everywhere. New team members can navigate any property in the portfolio because they all look the same. And when a problem shows up at one location, you can search for the same fixture type across all similar properties in seconds rather than hunting through inconsistent naming conventions.
Build the first property right. Save it to the library. Let it do the work for you from there.
For more on how the Fixture Library works at the individual fixture level, including saving parts, deploying library items to existing properties, and using Include Groups, see Using the Fixture Library to Build Properties Fast →
For a complete walkthrough of the property creation process including all fields and geolocation setup, see Creating a Property in Sytewise →
Setting Up Admin Users in Sytewise
This article walks through the entire process: creating the account, configuring every setting on the user profile page, and understanding how Assigned Properties and Favorite Properties work together to give each of your team members exactly the right slice of the portfolio.
Who Can Create and Manage Users
User management in Sytewise is a superuser privilege. Only accounts flagged as Super Users can access the Users page, create new users, or modify another user's superuser status. Standard admin users can view and edit their own profile, but they cannot see the full user list or create new accounts. If you need access to the Users page and don't have it, find your account's superuser and have them take a look at your profile.
Creating a New User Account
Name is the user's display name throughout the system. It shows up in work order assignments, the user list, and anywhere Sytewise identifies who did what. Use the person's real name, or at least something recognizable to the rest of the team. "User 4" will confuse everyone including you.
Username is what the person types at login. It must be unique across the account, at least five characters, and cannot contain special characters. Spaces are allowed, but keeping it simple (first initial and last name, for example) will make everyone's life easier. Once the account is created, the username cannot be changed, so take a moment before you finalize it.
Email is where Sytewise sends work order and survey notifications. Make sure it's accurate. A misspelled email address is a quiet problem: the account creates successfully, the user can log in, and you only find out something is wrong the first time an important notification goes nowhere.
Password and Confirm Password set the initial login credentials. Passwords must be at least eight characters, include at least one capital letter, and include at least one number. The user can change their password after logging in, so the initial password just needs to get them through the door.
Click Create User. The account is active immediately and the user can log in right away.
The User Profile Page
Once the account is created, click the user's name in the list to open their profile page. This is where the real configuration happens. The page is organized into a left sidebar with profile details and a series of cards on the right covering account settings, password management, email preferences, and property assignments.
Account Settings
The main account settings card contains the fields you filled in during creation, plus a few more that only appear after the account exists.
Name can be updated here at any time.
Username is displayed but locked. It cannot be edited after creation, which is a good reason to get it right the first time.
Email can be updated here. If a user changes their email address, update it here so notifications keep reaching them.
Phone is an optional contact number for the user. It's for internal reference only and doesn't affect any system behavior.
Default Trade for Properties sets the trade that is pre-selected when this user creates a new property. If your account primarily manages one type of system, setting this saves a step every time a new property gets added. A user who creates nothing but lighting properties, for example, should have their default trade set to Lighting so they're not hunting through the dropdown every time.
User Permissions
Four checkboxes sit in the account settings card. Each one is small. Each one matters.
Active, can log in is the on/off switch for the account. Unchecking it locks the user out without deleting the account or any of its history. When a team member leaves and you're not sure yet whether their records need to stay associated with their name, deactivate rather than delete. You can always reactivate later.
Super User This role gives the user full administrative access: the ability to create and edit other users, manage the full property list regardless of assignments, and access every area of the system. Assign this carefully. Most users don't need it. If the user is managing a group or team, I recommend it.
Can view onboarding results grants access to vendor onboarding files with personal information. Enable this for team members who are involved in vendor management and HR. Users who do not handle vendor onboarding, or should not have access to private information do not need this
Do not show reminder popups suppresses the reminder notification that appears when the user logs in. By default, users with pending reminders see a popup drawing attention to them. If a particular user finds that disruptive or manages their reminders through other means, check this to give them a quieter login experience.
Global Email Preferences
This section is small on the page but has a significant effect on how useful Sytewise is as a communications tool. Three checkboxes control whether this user automatically receives email notifications for activity across the entire account, regardless of which specific properties are involved.
Receive All Work Order Responses (including Rejections) sends this user an email every time a vendor submits a response to any work order in the account. That's every completion, every partial update, every rejection. For the person running operations who needs a finger on the pulse of everything in motion, this is the right setting. For a regional manager who only cares about their twelve properties, it will quickly become noise.
Receive All Work Order Rejections is a narrower version of the above. Instead of all responses, this user only gets notified when a vendor rejects a work order. Rejections typically require some kind of follow-up action, making this a good fit for a supervisor or dispatch coordinator who doesn't need to know about every completed WO but absolutely needs to know when something got turned down.
Receive All Survey Responses sends a notification every time a survey is submitted anywhere in the account. Survey responses often include photos, inspection results, and field notes. The people who need to review those and act on them should have this checked. The people who don't should not, or their inbox will tell the story of every survey in the portfolio whether it involves them or not.
These are global settings. They apply to every property and every vendor in the account. For users who need notifications tied to specific properties rather than the whole portfolio, the per-property email preferences live in the Favorite Properties section below, and they offer more precise control.
Assigned Properties
The Assigned Properties card shows which properties this user has been designated as the managing user for. Assigning a property to a user is a superuser action: the search field only appears for superusers, and the assignments are made directly on the user's profile page by searching for a property name and selecting it.
When a user has properties in their Assigned list, those properties are associated with their user record in the system. The dashboard defaults to showing that user's assigned properties, and the system can filter work orders, reports, and other views by the assigned user. This is how you organize a large portfolio among multiple managers: each person's assigned properties represent their territory or their responsibility.
To remove a property from the Assigned list, click the remove action next to the property name. The property itself is not affected. Only the association between this user and that property is removed.
A regional manager who handles all retail locations in the Southeast is a good example. Assigning those twelve properties to her profile means her dashboard shows her portfolio when she logs in, work orders for those properties can be filtered by her name, and the rest of the team's view stays organized around their own assignments.
Favorite Properties
Favorited properties are important for workflow. If you want to work on a specific Client's properties, select them as favorites. Or if you are working on HVAC maintenance on a group of properties, select those properties of favorites and they will show up as a subset of the entire portfolio. You can also select to see properties by state, map view, and other users.
Adding a property to your Favorite List is easy. To add a property to your Favorites, start typing the name of the property in the field and select the property from the list that appears. To remove it, click the trashcan icon and it will be removed.
The Difference Between Assigned Properties
These two lists are easy to conflate, but they serve different functions.
Assigned Properties is an organizational designation. It answers the question: who is responsible for this property? Assigning a property to a user is typically done by a superuser and reflects the actual structure of the team. It affects dashboards, reporting filters, and how the account's portfolio is divided among the people managing it.
Favorite Properties is a personal preference and a notification tool. It answers the question: which properties does this user want to watch closely? Any user can add or remove their own favorites, independent of who is formally assigned to what.
Two examples to make the distinction concrete:
A maintenance coordinator oversees a portfolio of twenty warehouse properties. All twenty are assigned to her by a superuser. Her dashboard opens to those twenty properties and excludes everything else in the account. Inside her Favorites, she's added three properties that have been especially active recently so she gets email notifications every time a work order comes back or a survey is submitted at those locations.
A company owner wants visibility into everything but isn't the hands-on manager for any individual property. He has no Assigned Properties at all, so his dashboard shows the full portfolio. He's added four flagship client locations to his Favorites and has survey notifications turned on for each one, so he sees those results when they come in without being buried in notifications from the rest of the account.
Dashboard Shortcuts
Profile Picture
Also in the left sidebar is a Profile Picture card. Click Upload New Profile Image to upload a photo via Cloudinary. The image appears on the user's profile card and, in some views, alongside the user's name in the interface. It's entirely optional and has no effect on system behavior, but it does make the user list feel a little less like a spreadsheet.
Changing a User's Password
The Edit Password card provides a straightforward two-field form for setting a new password. This is useful when a user is locked out, when an initial temporary password needs to be replaced by an admin, or when someone has forgotten their credentials entirely. The same rules apply as during account creation: at least eight characters, one capital letter, one number.
Managing Properties and Assets
Sytewise is a powerful asset management tool that has a property-centric view of fixtures and devices that need maintenance and regular service.
Creating and Managing Work Orders
A work order is the engine of property operations in Sytewise. It captures what needs to be done, who's doing it, which fixtures are involved, what it costs, and proves it all happened when the job is done. This article walks through every step from creating the work order to closing it out, including how to reassign it, attach checklists, and add line items along the way.
Starting a Work Order
Work orders are created from the property detail page. Navigate to the property, find the trade you're creating the work order for, and click the New Work Order button. The work order modal opens and immediately gets to work on your behalf.
The Work Order Modal
The modal is organized into two columns. The left side handles the job details. The right side handles fixtures, instructions, and email configuration.
Subject and Dates
Subject is auto-filled with the property name and "WO" as a starting point. You'll almost certainly want to change this to something that describes the actual work. Keep it specific enough that it means something six months from now when it shows up in a report. Four characters minimum.
Order Date defaults to today. Change it if you're backdating or scheduling in advance.
Due Date defaults to five business days out from the order date. Adjust it to match the actual deadline. This is the date the system uses to flag the work order as overdue if it hasn't been completed.
Work Start Date is optional. Check the Include a Work Start Date? checkbox and a second date field appears. Use this when the vendor needs to know when they can begin the work, separate from when it needs to be done.
Vendor
The Vendor field is pre-filled with the default vendor assigned to this property/trade combination. If the right vendor is already there, leave it. If you need someone different, start typing a vendor name and the autocomplete will find them. As soon as a vendor is selected, their contact emails load automatically in the email section below, ready to be checked or unchecked.
If the vendor field shows no name or the wrong name, it means either no default vendor is set for this trade or the default needs to be updated on the property record. See the vendor setup article for how to assign default vendors to property trades.
Contract and Costs
If the property has active contracts, a Select a Contract dropdown appears. Selecting a contract auto-fills the Reference Number with the account number from that contract and may pre-populate the Total field with the contract's monthly fee. Both are editable.
Add Line Item lets you build out a cost breakdown directly in the modal. Each line item has a description, amount, and total. Add as many as the job requires. Line items can also be added and edited after the work order is created, so don't let an incomplete cost picture hold up the process.
Fixtures
The right column shows every fixture in the property/trade. This is where a common question comes up: do you have to flag a fixture for maintenance before you can add it to a work order?
No. Every fixture in the property/trade is available to add to a work order regardless of its current status. The colored status indicator next to each fixture (green for all items working, yellow or red for partial or full outage) is informational. It tells you the state of that fixture at a glance, but it doesn't gate whether you can include it in the work order. If a fixture needs attention, add it. If you want to include fixtures as part of a routine service visit even though nothing is broken, add them. The choice is yours.
Click All to select every fixture at once. Click None to deselect. Or check individual fixtures one by one. Fixtures highlighted in green are already included in another open work order, which is useful context before you add them to a second one.
Special Instructions and Files
Special Instructions is a free-text field for anything the vendor needs to know before they show up. Access codes, safety requirements, specific contacts to call on arrival, scope details that don't fit in the subject line. It all lands in the email the vendor receives.
Add A Zip File lets you attach a reference document, drawings, spec sheet, or any supporting file that should travel with the work order.
Checklists
If fixtures are selected and existing checklists are available for those fixtures, a checklist chooser appears below the fixture list. Check any checklists you want to attach to this work order. Attached checklists are included in the vendor email as direct links. The vendor opens the email and has both the work order and the checklist tasks in the same message.
If the checklists you need don't appear here, it's likely because they haven't been created yet or they're assigned to a different vendor. Checklists can also be linked to the work order after it's created.
Email Recipients
Vendor Contacts appear as checkboxes showing each contact on file for the selected vendor with their name and email address. Check the contacts who should receive this work order. If the vendor has no contacts in the system, a warning appears here. That's your cue to go add contacts to the vendor record before sending.
Admins to receive the WO emails lists the admin users in your account. Check any who should receive a copy.
Include Management in WO Emails is a checkbox that adds property management contact information to the body of the email sent to the vendor, useful when the vendor may need to reach someone on-site.
Saving
Click Save and the work order is created. You land on the work order detail page where the full record lives.
The Work Order Detail Page
The work order detail page is where everything about the job is visible and manageable. It's worth knowing what's where.
The header shows the work order number and subject. Superusers can click the pencil icon to edit the subject after creation.
The left column shows the key metadata: order date, start date (if set), due date or completion date, the admin user assigned, the associated contract, the fee, account number, and any bills linked to this work order.
The middle column is the notes section. Add notes here at any point during the life of the work order. Notes are timestamped and attributed to whoever adds them. Use notes to document conversations with the vendor, status updates, changes in scope, or anything relevant to the job. These notes also appear in the property print report, so they contribute to the permanent record of the property.
The right column shows the vendor, admin contacts, and client (if one is assigned to the property).
Editing the Work Order
While the work order is open, an edit form sits below the header. From here you can update the subject, instructions, assigned user, contract, fee, order date, start date, due date, and account number. Click Save to apply changes.
Fixtures, Line Items, and Checklists on the Detail Page
Fixtures appear in a table below the edit form showing the fixture name, part number, description, and status. Each row expands to show individual parts when clicked. Fixtures are added during creation and are shown here as a read-only reference. The fixture table updates with status outcomes when the vendor submits their report through the vendor portal.
Line items appear in an editable table. Add new items using the input row at the bottom: enter a quantity, description, amount, and line total, then click the plus button. Edit existing items by clicking the pencil icon on any row. The fields become editable in place. Press Enter or click save to commit the change. Delete items with the X icon. This makes it easy to update costs as the job scope evolves.
Linked Checklists appear in their own section below the fixtures. If you didn't attach checklists during creation, you can add them here. The dropdown shows all checklists that are eligible for this work order, meaning they share the same vendor, property, and trade. Select one from the dropdown and click Link Checklist. To remove a linked checklist, click the trash icon next to it and confirm.
Sending the Work Order to the Vendor
When you're ready, click Send Work Order. This triggers the email to all checked vendor contacts and admin users. The email includes the work order details, the vendor link for accessing the portal, any instructions, fixture information, attached checklist links, and line item costs.
The Email Log section at the bottom of the work order page records every email sent: who it went to, when, and whether it was delivered successfully. Green rows are successful sends. Red rows are failures. This log is included in the work order print report, so you always have documented proof of when the vendor was notified.
The Send Work Order button only appears if the vendor has a valid email address on file. If it's missing, go to the vendor record and add contact information first.
Reassigning the Work Order to a Different Vendor
Vendors change. Schedules conflict. A better option becomes available mid-job. Reassigning a work order is straightforward and the system handles the downstream effects automatically.
On the work order detail page, find the vendor section in the right column and click Change Vendor. An autocomplete field appears. Search for the new vendor, select them, and their contacts load as checkboxes. Check the contacts who should receive the reassignment email. You can also update which admin users receive a copy.
Click Update Vendor when ready. Several things happen at once:
The work order vendor record is updated. The old vendor contacts are deactivated. The new vendor contacts are recorded. A new email goes out immediately to all selected recipients with the full work order details. And every checklist linked to this work order that hasn't been completed yet is automatically updated to the new vendor so the checklist assignments stay in sync.
Updating admin contacts only (without changing the vendor) uses a separate Update Admin Contacts button and does not send a new email.
Completing and Closing a Work Order
There are two ways to mark a work order complete.
Mark complete at creation by checking the Status: Complete checkbox in the creation modal. This is useful when you're creating a historical record for work that already happened.
Close from the detail page using the Close Without Changes button, available to superusers. This marks the work order complete, records the current date and time as the completion date, and adds an automatic note logging who closed it. Use this when the work is done and no fixture status updates need to be recorded from the vendor portal.
If a work order needs to be reopened after being closed, the Reopen Work Order button appears in place of the close button on completed work orders. Clicking it clears the completion date and puts the work order back into the active queue.
Survey Results and Fixture Status
It is worth mentioning here just how a survey impacts the which Fixtures show up as needing service in the work order modal. When a surveyor marks a part as Off during a survey, Sytewise does not just note it in the report and move on. That status change flows directly into the fixture record itself, which means the fixture is now flagged as needing attention.
Here is why that matters when you go to create a work order. On the property page, when you open the work order form and load the fixture list, fixtures with parts marked Off surface at the top so they are easy to find and select. The surveyor's findings in the field become your ready-made punch list in the office.
This is the handoff point between the survey workflow and the work order workflow. The surveyor documents the condition. The status updates automatically. You create the work order with the right fixtures already flagged and waiting for you.
No manual cross-referencing, no sticky notes, no trying to remember what the surveyor said about the third floor AV rack. The system connects the dots.
Keeping It Organized
A few habits make work orders more useful over time.
Write descriptive subjects. "HVAC Service Visit" is far more useful in a report six months later than "WO 142." The subject appears in property reports, work order search results, and vendor emails. Make it count.
Use notes generously. Every status update, vendor conversation, or scope change is worth a note. The note history on a work order tells the story of the job. When a question comes up about what happened, the notes are the answer.
Attach checklists whenever the job involves documented work. A completed checklist attached to a work order gives you photographic evidence, signed acknowledgment, and a step-by-step record of what was done. That combination is hard to argue with.
Set accurate due dates and update them when they change. The overdue indicator on the work order detail page and the dashboard count of open work orders both depend on due dates being realistic. A work order set due two years from now is invisible to the system's urgency tracking.
Setting Up Vendors in Sytewise
Vendors are at the center of how work gets done in Sytewise. Before you can issue a work order, assign a checklist, or track who serviced what, the vendors doing that work need to be in the system. This article covers every way to add vendors, how to organize their contacts, and why assigning default vendors to your property trades is one of the most time-saving things you can do.
Three Ways to Add Vendors
Add Vendors One at a Time
The Vendors page has a collapsible Create A New Vendor section. Fill it out and you have a vendor in the system.
Required fields:
- Company Name — must be unique in your account
- Phone Number — primary contact number for the company
- Company Email — the main inbox for this vendor
- Login Username — the vendor's credential for accessing their portal
- Password — at least 8 characters, one capital letter, and one number
- Address — the vendor's physical business address
Before you can save the record, you need to click Lookup Geolocation. This validates the address through Google Maps and stores the coordinates used for distance-based vendor searches. The Create Vendor button won't appear until that step is done, so don't skip it. Vendors can have multiple address in the system.
Optional fields include a Description and a QuickBooks ID if your account uses QuickBooks for accounting reference.
Import Vendors from a CSV
If you're bringing a vendor list over from a spreadsheet or another system, the Import Vendors List section on the Vendors page accepts a CSV upload. The required columns are Company Name, Email, and Phone. Address, Description, Username, and Password are optional. If a username or password isn't included, Sytewise generates one automatically.
A sample CSV file is available to download directly from the import section so you can see the expected format before you build your file.
Import from the Sytewise Vendor Network
Sytewise maintains a broader vendor network shared across accounts. If a vendor you work with is already in the system from another account, the Import Sytewise Vendors section lets you search for them by name and add them directly to your account without re-entering their information.
Building Out a Vendor Record
Once a vendor is created, their detail page is where the full picture lives. A few things worth setting up here before you start issuing work:
Contacts are the people at the vendor company who receive communications. Work order emails and checklist notifications go to vendor contacts, not just the generic company email. Add the right contacts and the right people get notified automatically when jobs are assigned.
Insurance and W-9 tracking is built into every vendor record. If a vendor has a current insurance certificate on file, a badge appears on their record and on the vendor list so you can see coverage status at a glance without digging. Same for W-9 status. No more spreadsheets tracking who sent their cert and who hasn't. To add an insurance certificate, click Add a File or Policy on the vendor's profile page and select the Insurance Policy tab. Enter the policy details and save the record — a Choose File button will then appear to attach the actual document. To edit or delete any file or policy on record, click the pencil icon next to the file link.
Working Trades shows which trades this vendor has performed or been assigned to. This builds over time as work orders are issued and completed.
Alternate Vendors can be added to a vendor record for situations where the primary vendor is unavailable. Having alternates ready means you're never stuck searching for a backup when the regular vendor can't make it.
Default Vendors: The Part Worth Getting Right
Here's where the real efficiency lives. In Sytewise, vendors aren't just assigned to properties — they're assigned to specific trades within a property. That combination, a property plus a trade, can have a default vendor that Sytewise uses to pre-fill work orders automatically.
When you open the new work order modal for a property, Sytewise looks at which trade the work order is for and fills in the default vendor for that trade automatically. The vendor field arrives pre-populated with the right company, and their contacts load up ready to select as email recipients. You don't have to search, you don't have to remember who handles HVAC at that building. It's just there.
This matters more as your portfolio grows. A property with ten trades and a different vendor for each one becomes a mental load fast. Default vendors eliminate that load entirely for the routine case.
How to Assign a Default Vendor to a Trade
When adding a new trade to a property: The New Trade modal includes a vendor search field right in the form. Select the trade, search for the vendor, and both are saved together. The default vendor is set from day one.
For an existing trade: On the property detail page, click into the trade tab, find the Vendor card, and click Change Vendor. Search by name, select the vendor, and the assignment updates immediately.
Find vendors by distance: Not sure who's closest? The Vendor card on a property trade lets you search for vendors by proximity: 10, 25, 50, 100, or 250 miles from the property. Results come back ranked by distance so you can make an informed choice before assigning.
Why Default Vendors Pay Off
The short version: every work order you create for a property trade with a default vendor set takes one fewer decision. The vendor is pre-selected, their contacts are loaded, and you move straight to describing the work and setting the due date. Also, if anyone has to pinch hit for your projects, the vendor you have a relationship with is a known quantity.
Multiply that across every work order your team issues in a month and it adds up quickly. More importantly, it reduces the chance that a work order goes to the wrong vendor because someone picked from a list in a hurry.
If the default vendor ever changes because of a new contract or a better relationship with a different company, updating the property trade record takes fifteen seconds. Every future work order for that trade at that property picks up the new default automatically.
Building an Annual Workflow with Reminders
Reactive property management is exhausting. Something breaks, you scramble. A vendor falls through, you scramble again. The antidote is a planned calendar of recurring work that runs itself in the background, so when the unexpected does show up, you already have the routine under control.
The Reminders system in Sytewise is how you build that calendar. Set up your recurring inspections, work orders, and service checks once, and the system generates the actions, notifies the right people, and keeps a running record of what got done and when.
Two Things Worth Understanding First
Reminders in Sytewise have two parts that work together.
Reminder Sources are the rules. They define what the reminder is, when it repeats, who it's for, and what it creates when it fires. You set these up once and they run as long as you need them to.
Reminder Actions are the individual instances. Each time a reminder source fires, it generates an action on that date. Actions show up in your Incomplete Reminder Actions list and on the calendar, waiting for you to acknowledge or act on them.
Think of the source as the recipe and the action as each meal it produces. You write the recipe once. Dinner shows up on schedule.
Creating a Reminder
From the Reminders page or from within any property, work order, survey, fixture, or contract record, click New Reminder to open the reminder form.
Subject is required and becomes the label you'll see on the calendar and in the actions list. Be specific. "HVAC Filter Check" is more useful than "Maintenance" when you're looking at a full year of planned work.
Priority marks the reminder with a red indicator so it stands out in the list. Use it for anything time-sensitive or compliance-driven.
Message is the details. Instructions, notes, context for whoever is handling the action.
For lets you assign the reminder to a specific user on your team. Leave it as "For Me" if you're the one handling it. The Plus Everybody checkbox makes the reminder visible to all users regardless of who it's assigned to, useful for team-wide visibility on shared responsibilities.
Single Reminders vs. Recurring Reminders
Leave the Repeating? checkbox unchecked and you get a simple one-time reminder. Pick a due date and it shows up once.
Check Repeating? and the form expands into a full recurrence builder. This is where the annual workflow lives.
Starts and Ends define the window the recurring reminder is active. Check Repeat Forever? if the work has no planned end date (routine maintenance, annual inspections) or set a specific end date for things tied to a contract or lease term.
Frequency Options
Daily creates an action every day. Best for short-term tracking situations or daily checklists on active job sites.
Weekly lets you choose specific days of the week and an interval. Every Monday. Every other Friday. Every two weeks on Tuesday and Thursday. Weekly reminders are good for recurring vendor check-ins, safety walkthroughs, or any work that happens on a regular weekly schedule.
Monthly lets you pick specific days of the month and how many months between occurrences. The 1st of every month. The 15th and last day of every other month. Monthly reminders handle lease deadlines, billing cycles, filter changes, and equipment logs.
Yearly repeats on the same calendar date each year, with an interval if you need every two or three years instead of every one. Annual inspections, equipment certifications, fire system tests, and anything tied to a specific time of year all live here.
Attaching Reminders to Records
Reminders get much more powerful when they're attached to the records they relate to. When you create a reminder from within a property, work order, fixture, or contract, a checkbox appears asking whether to link the reminder to that record.
Leave it checked. Linked reminders appear in context when you open that record, and the action in your list will include a direct link to the related property, vendor, fixture, or contract so you're never hunting for context.
The Part That Makes Recurring Work Orders Possible
When you create a reminder attached to a work order, a second checkbox appears: Replicate this Work Order. This is the feature that closes the loop between planning and execution.
When this box is checked, Sytewise stores a snapshot of the work order including the subject, instructions, vendor, line items, fixtures, and fee. Every time that reminder fires and you click the action to complete it, the system offers to generate a brand new work order with all of that information pre-loaded. You confirm, the work order gets created in the queue, and you adjust the due date and send it to the vendor.
The same option exists for surveys. Check Replicate this Survey when attaching a reminder to a survey record, and each annual or recurring action gives you a ready-to-send survey with the same surveyor, structure, and instructions.
This means the recurring maintenance work order you build once in January can reproduce itself every quarter, every year, or on whatever schedule you define, without rebuilding it from scratch each time.
The Calendar View
The Reminders page has a calendar in the right panel showing all your upcoming reminder events. Future events appear faded so you can easily distinguish between what's already arrived and what's on the horizon. Click any event on the calendar to see its details.
Use the Current/Upcoming and Completed toggles to switch between your active queue and your history. Completed actions stay in the record so you always have a log of when work was done, by whom, and against which reminder source.
Notifications and the Actions List
When a reminder action arrives, it appears in the Incomplete Reminder Actions list on the Reminders page and increments the badge counter in the navigation. If you haven't seen it yet, it also appears as a toast notification in the upper right corner of the screen.
You can filter the actions list by reminder type to focus on just work orders, just surveys, just properties, or any other category. Click any action to navigate to the related record, or click the pencil icon to edit the reminder source settings without leaving the list.
If a category of planned work no longer applies, you can clear actions individually or use Clear All Incomplete Actions to dismiss the whole list at once. Note that clearing actions does not create work orders or surveys automatically, it only marks them as handled.
If reminder popups are distracting during a focused work session, check Do Not Show Reminder Popups in the settings panel at the top of the Reminders page. The actions list still accumulates normally, you just won't get the toast interruptions.
Building Your Annual Calendar
Here is a practical approach to turning the reminders system into a full annual operating calendar for a property or portfolio.
Start with the fixed dates. Annual inspections, fire system certifications, HVAC service contracts, elevator permits, roof inspections, and anything with a regulatory or contractual deadline all get yearly reminders first. These are the non-negotiables. Set them with the exact due date, attach them to the relevant property or fixture, and replicate the associated work order if vendor dispatch is required.
Layer in the seasonal work. Landscaping changeovers, winterization, cooling startup, holiday lighting, pressure washing cycles, and similar seasonal tasks get monthly or yearly reminders tied to the appropriate time of year. These don't always have regulatory teeth but they do have consequences when they're missed. A reminder that fires three weeks before the service date gives you time to issue the work order and confirm the vendor.
Add the routine recurring checks. Filter changes, pest control, generator exercise runs, fire extinguisher checks, exit lighting tests, and similar recurring maintenance live as monthly or quarterly reminders. Replicate the associated work order for each one so dispatch takes one click when the action fires.
Set reminders for contract and insurance milestones. Attach reminders to vendor contracts and insurance records with a start date set 60 or 90 days before expiration. When the action fires, you have time to renew before anything lapses. No surprises.
Assign the right people. A reminder nobody sees is just a calendar event. Assign each reminder to the user responsible for that category of work, and use Plus Everybody for anything with shared visibility. When an action fires, the right person knows.
When all of that is in place, the unplanned work, the burst pipe at 2am, the failed compressor, the storm damage, lands in a context where you already know where things stand, who your vendors are, and what's coming next on the calendar. The planned work runs on its own. You show up for the surprises.
Reporting in Sytewise: What You Have, How to Use It, and How to Make It Work for You
Good reporting is the difference between managing a property and understanding it. Sytewise generates detailed reports at every level of the system, from a single fixture to an entire portfolio, and gives you the tools to turn those reports into a recurring documentation habit that builds a real operational history over time. This article covers what each report includes, how to get it, and how to wire the whole thing into a workflow that practically runs itself.
Property Reports
The property print report is the most comprehensive single document in the system. Open any property, click the print icon, and you get a full snapshot of everything tied to that property at that moment.
What it includes:
The report opens with the property header, address, unit count, and square footage alongside your company's contact information. A map or property image appears at the top depending on what's configured.
From there the report works its way through every layer of the property record:
Contacts lists every person associated with the property, with phone, email, and their role.
Trades and vendors shows which trades are active on the property and which vendor and surveyor are assigned to each one, so anyone picking up the report knows who handles what without having to dig through the system.
Property notes appear in chronological order with timestamps and their source, whether they were entered by an admin, generated from a work order, or submitted through a survey. Reading the notes history of a property tells you the story of that building's issues and resolutions over months and years. That accumulation of notes is genuinely useful when you're trying to figure out why a recurring problem keeps happening.
Fixtures appear as a summary table with status, recent notes, image status, type, and description. If checklists are attached to fixtures, their completion percentages and progress bars appear in the report so you can see at a glance how much documented maintenance has been completed.
Work orders appear in a table with number, date, subject, vendor, due date, completion date, account number, and total fee. The full work order history of a property in a single table is one of the fastest ways to see how much was spent, what vendors were used, and how often specific types of work recurred.
Surveys appear similarly with surveyor, dates, and completion status.
Bills and insurance/files round out the financial and compliance picture.
At the bottom, a chart shows fixture status changes over time so you can see visually whether a property's overall condition is trending up, holding steady, or declining.
This report works well as a handoff document when a property changes management, as a quarterly review packet, or as the foundation of a client-facing condition summary.
The Properties Report Page
The Properties Report page (separate from the property print view) lets you search and filter across your entire portfolio and export results as a CSV. You can report by:
- Trade: All properties with a specific trade, showing the property name, address, vendor, and client for each.
- Vendor: All properties served by a specific vendor across the portfolio.
- Line item type: For portfolios with service contracts, report by specific contract line items across all locations.
- Fixture text search: Find all properties containing fixtures that match a name, part number, or model.
Every result table has a Download CSV button so you can pull the data into a spreadsheet for further analysis or client reporting.
The portfolio-level reporting is where you start to see patterns that individual property views can't show you. Which vendor shows up on the most work orders? Which trade generates the most spend across the portfolio? Which properties have the most open work? The CSV exports make it straightforward to answer those questions.
Fixture Reports
The fixture print report goes deep on a single piece of equipment and its complete documented history.
What it includes:
The header identifies the fixture by name, description, and property context. Any cover image designated as the primary archived photo appears at the top.
Notes appear in chronological order with timestamps, giving you the full running log of everything observed, repaired, or noted about this specific piece of equipment.
Images are displayed in a gallery grid, providing a visual record of the fixture's condition over time. A picture taken during a service call six months ago is still there when a problem recurs, and being able to compare current condition to past photos is genuinely useful for diagnosing whether something got worse or was never properly fixed.
Parts and specifications appear in a structured table with part numbers, manufacturer, model, description, and installation dates. For AV and technical fixtures, this is the complete equipment manifest for that installation.
Checklists attached to the fixture appear in full detail, with every item, its completion status, notes entered, images uploaded, and signatures captured. A fixture that has been through three annual maintenance checklists has three years of documented inspections in this report.
The fixture log at the bottom shows a chart of status changes over time, the same visual history as the property report but scoped to this one fixture.
The fixture report is the document you want when a vendor questions whether a piece of equipment was ever serviced, when an insurer asks for maintenance records, or when you need to make a capital replacement case based on documented decline.
Work Order Reports
Every work order has a print view that serves as a formal record of the job.
What it includes:
The header identifies the work order by number and name. The report shows the from and to parties (your company, the client, the property, the vendor) alongside the account number, issued date, due date, and fee.
Instructions appear in full, followed by any vendor notes and a chronological notes history showing every entry made during the life of the work order.
Fixtures appear in a table showing the fixture name, part number, description, and the status outcome for each one as reported during the work. Status badges (OK, FAIL, FAIL/REP, No Change) give a quick visual summary of what was found.
Line items show the detailed cost breakdown with quantities, descriptions, and amounts.
The email log at the bottom of the work order print is one of the most underappreciated parts. It records every email sent from that work order, who it went to, when it was sent, and whether it succeeded or failed. This is your proof of notification if a vendor ever claims they didn't receive the assignment.
Work order reports are the natural output at the close of a job. Archiving them by property gives you a searchable maintenance history. The CSV export from the work orders list lets you pull the full WO history for a property, a vendor, a date range, or a trade combination and analyze it however you need.
Survey Reports
Survey reports document what a surveyor observed in the field.
What it includes:
The header identifies the survey, property, and surveyor. The report shows due and completion dates, with color coding for overdue status.
Instructions given to the surveyor appear first, followed by the submitted fixtures section showing each fixture the surveyor reviewed. For each one: its on/off status, part number, position, description, surveyor notes, and any images captured during the visit.
Fixture updates and part updates capture any changes the surveyor noted during the inspection.
The email log records every communication sent as part of the survey workflow.
Survey reports work well as scheduled condition documentation. A quarterly survey with a consistent set of fixtures builds a time-stamped record of how each one looked at each visit, which is exactly the kind of documentation that supports capital planning conversations and vendor accountability.
Checklist Reports and the Custom Report Engine
Here is where reporting in Sytewise gets genuinely flexible.
A completed checklist is a report. Every item in the checklist is a data point: a note, a photo, a signature, a set of checkboxes, a file upload. The checklist print view presents all of that in a clean, structured document with the fixture and property context, completion percentages, who completed each step, and when.
That means the checklist system is not just a task-completion tool. It is a fully customizable report builder.
Building a Property Condition Report
A property condition report is a structured walk through a property or set of systems that documents what was found, with evidence, signed off by whoever conducted the inspection. Here is how you build one using a checklist template.
Create the checklist template. Go to the Checklists page and create a new template. Give it a name like "Property Condition Report" and set the trade to "Any Trade" so it's available across property types.
Build the checklist items as inspection categories. Each item in the checklist becomes a section of the report. For a property condition report, you might build items like:
- Exterior Condition with a note field (required), up to five images (required), and simple checkboxes for items like "No visible damage," "Landscaping maintained," "Signage intact"
- Parking Area with a note field and image upload, checkboxes for "No standing water," "Lines visible," "Lighting functional"
- Roof Access and Condition with a note field, required image upload, and a signature requirement so the inspector certifies the observation
- HVAC Units with a note field, images, and checkboxes for "Units operational," "No visible leaks," "Filters checked"
- Common Areas with notes and images
- Any system, space, or component you want documented
Use the requirement options to enforce quality. Mark photos as required on any item where visual evidence matters. Require notes on anything where a written observation is necessary. Require a signature on the final summary item to capture who conducted the inspection and certify the report. These requirements mean the checklist can't be marked complete without the evidence being submitted.
Assign it to the property as a fixture checklist. When it's time to conduct the inspection, assign the checklist template to the relevant fixture or property-level fixture, set a due date, choose the inspector as the vendor or internal user, and send the link.
The inspector completes it from their phone. They walk the property, tap through each section, write their notes, upload photos from their camera, check the applicable boxes, and sign off at the end. All of it is submitted and stored.
Print the completed checklist. The checklist print view becomes the condition report: every section, every note, every photo, every checkbox result, every signature, with the date and name of who completed it. It is a fully documented property condition assessment built from a single checklist completion.
The same template can be reused. Assign it again in six months and you have a second condition report. Compare the two and you have a documented record of whether conditions improved, held steady, or declined. Over two or three years, that pattern becomes a legitimate basis for capital planning, vendor performance conversations, insurance documentation, or client reporting.
The template is fully customizable to any report type. A fire safety walkthrough. A move-in/move-out inspection. An AV system commissioning sign-off. A post-storm damage assessment. An annual vendor performance review. An equipment inventory audit. Any structured inspection or documentation process that benefits from notes, photos, signatures, and checkboxes can be built as a checklist template and reused indefinitely.
Turning Reports Into a Recurring System
A report generated once is useful. A report generated on a schedule, consistently, over time, becomes a documented operational history. Here is how to wire reporting into a recurring workflow using the Reminders system.
Create a checklist template for each recurring report type. Property condition report, quarterly HVAC inspection, annual fire safety walkthrough, whatever your portfolio requires. Build the template once so the structure is consistent every time it's run.
Set up a work order with a recurring reminder. Create a work order for the inspection or service, assign the vendor or inspector, and attach the relevant checklist. Then attach a reminder to that work order with Replicate this Work Order checked, set to the correct recurrence frequency (quarterly, annually, semi-annually). Each time the reminder fires, one click creates a new work order with the same structure, the same vendor, and the same checklist, ready to be sent.
Set a reminder to assign the checklist directly. For condition reports or inspections that don't require a full work order, create a reminder attached to the relevant property or fixture and set it to the appropriate frequency. When the action fires, you assign a fresh checklist from the template to the fixture, send the link to the inspector, and the report is collected and stored.
Use the calendar view to see the full year. The Reminders calendar shows every scheduled recurring event across your portfolio. A properly set-up calendar shows you inspection months, service windows, contract renewal dates, survey cycles, and reporting deadlines all in one view. Planned work is visible. Unplanned events land in a context where you already know what's coming and can respond without losing track of the routine.
The long-term value compounds. A property that has a condition report completed every six months for three years has six documented snapshots of its physical state. That record answers questions before they're asked. It supports warranty claims. It demonstrates due diligence to insurers. It shows clients that conditions are being actively monitored. And it gives you the factual basis to have productive conversations with vendors about work quality and recurring problems.
Reports are only as useful as the habit behind them. The Reminders system is how you turn that habit into infrastructure.
Reference: Terms & Concepts
Terms and concepts related to using the Sytewise platform.
Properties
Properties are one of the fundamental concepts of the Sytewise system. A Property can be an actual property that you manager, or it may just be an address of the location where you have an asset that you manage. It can be the location where you do contractual work or provide a service. Whatever it means to you and your company, Sytewise sees a Property as a location and that location is unchangeable once established in the system.
When you add a property to your Sytewise account you are establishing a physical location on the planet for any Trade you use within your account. HVAC, Plumbing, Asphalt, Doors, and Keys are just a few of the many Trades you can establish for a Property Location in your account.
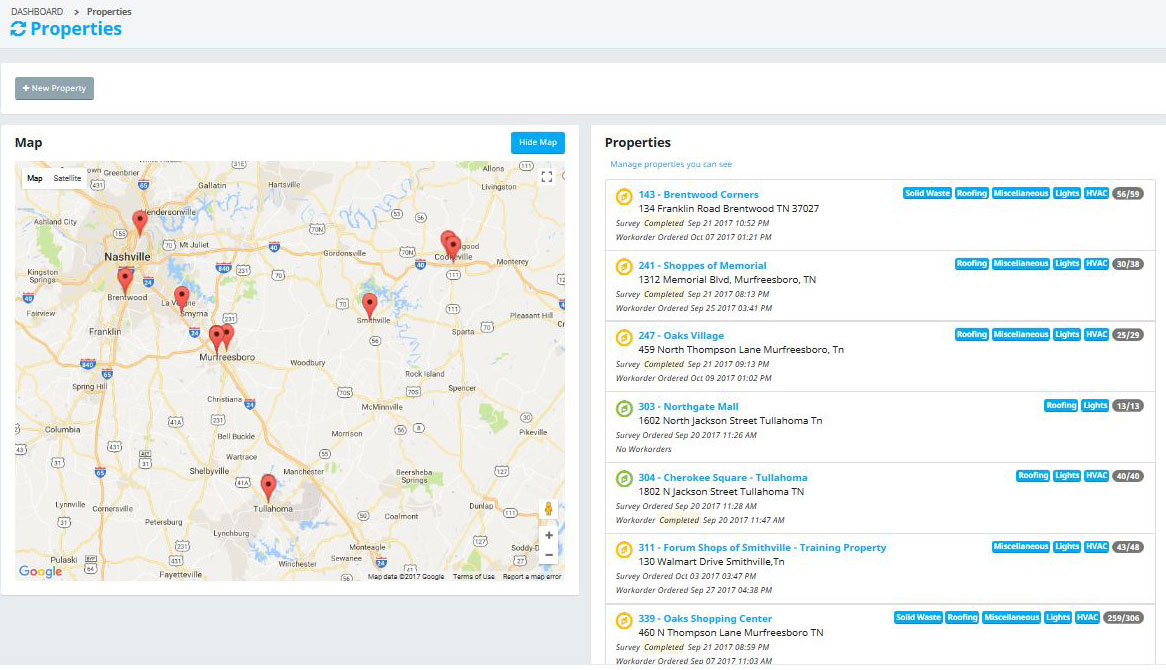
Favorite Properties
Your Dashboard and Properties pages in the Sytewise Admin show a list of your favorite properties. This is a convenient list for quick reference. Otherwise you can search for properties by name, by state, or by other user's favorites at the top of the property list.
To make a property your favorite
- Find the property you want to make your favorite and go to the property page.
- Find the star to the left of the property name
- Click the star.
Make a property your favorite from your User page.
- Go to your user page
- Find the list of favorite properties on the right.
- Start typing the name of the property in the search box
- Select with your arrow keys of your mouse the property you wish to add.
- Hit return.
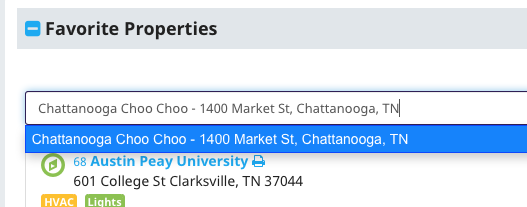
Trades
A Trade is a type of work conducted on your property locations. It can be work conducted by your staff or outside Vendors. Establishing a Trade for a property allows you to do the following:
- Establish a location to store Work Orders and Information for Similar Types of Work. (HVAC, Plumbing, Roofing, etc..)
- Establish a default Vendor for Certain Types of Work at Certain Properties. (Who's our Plumber in TN? What's his number?)
- See all of a specific type of Fixtures on your Property in One Place.
- Quickly access trade specific notes about your properties. (Does the Landlord maintain the HVAC units or the Tenant?)
Below is a Property Header showing several Trades. Notice that the Keys Trade is Highlighted. The Preferred Vendor and Surveyor are listed just below the Property info. Your Client for this Property is listed along with any special notes. Moving from one Trade to another is as simple as clicking the Trade tab at the top of the Header.
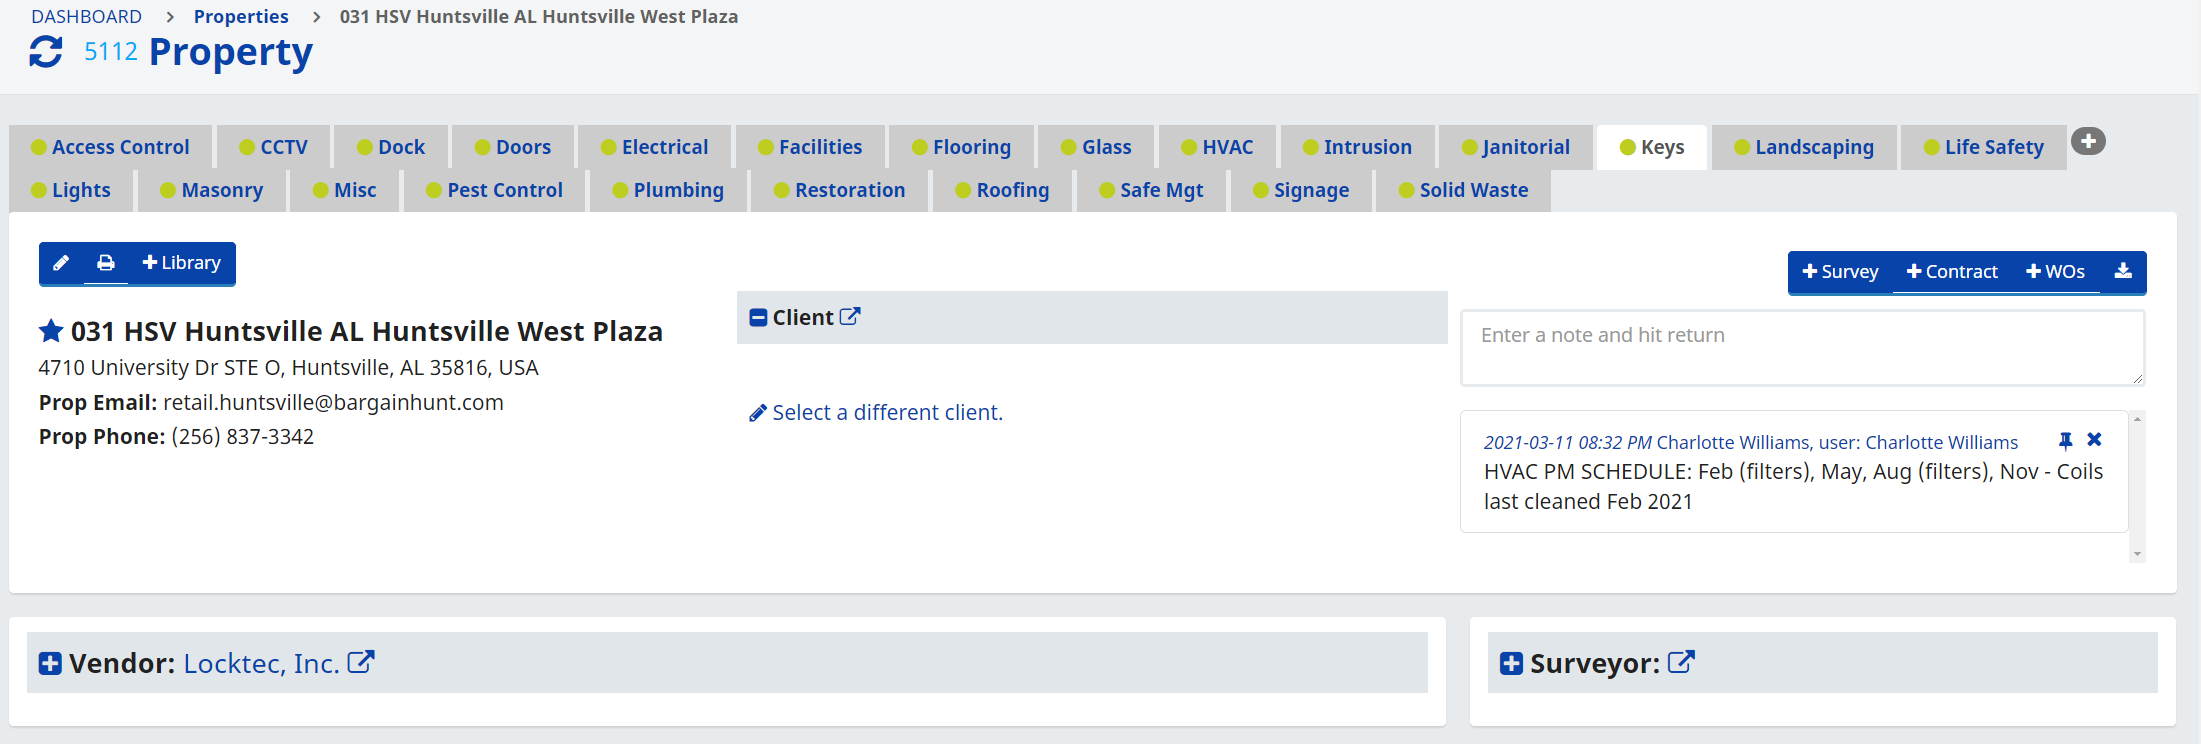
Fixtures
A fixture in Sytewise is the physical asset at a property that everything else revolves around. It is the piece of equipment -- an HVAC unit, a display, a lighting fixture, a security camera -- that gets surveyed, serviced, tracked, and documented over time. Work orders are written to address it, surveyors inspect it, parts are attached to it, and its condition history lives with it. If a property is the address, the fixture is what is actually inside that address that you are responsible for managing.. From the Property / Trade you can create fixtures in several ways. Click here to get the read in depth about Creating and Managing Fixtures.
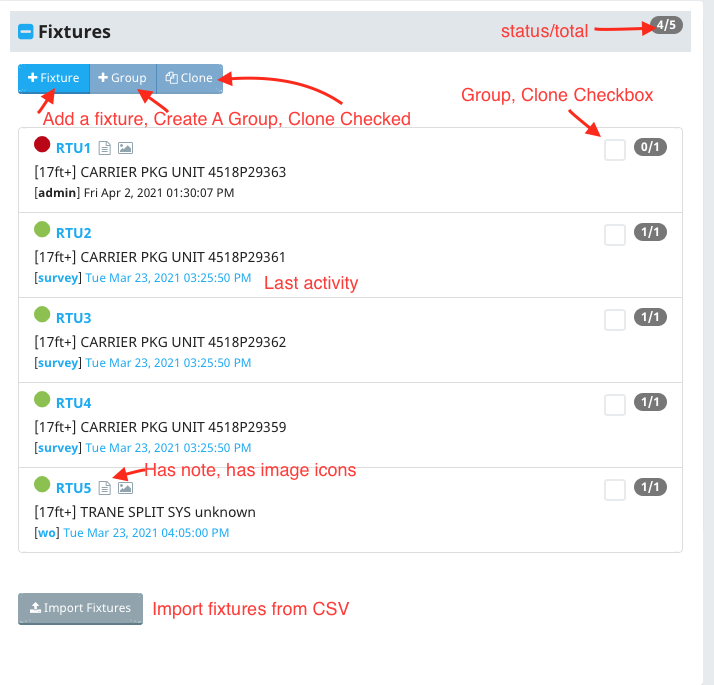
Parts
Parts are Where the Work Gets Done
Parts helps you track the components of your fixtures along with their repairs and updates. They are the pieces of your Fixtures that wear out, need adjustment, get updated, and generally need to be maintained.
Actions can be Parts, Too!
Parts are mostly seen as the physical components of your Fixtures. But don't limit the usefulness of the Sytewise platform to only the physical parts of the system. Actions can be listed as parts also if you have a need or want to track them. Take Annual Fire Panel inspections for example, or Routine Maintenance. If you add Routine Actions to your Fixture, you can select them as a part that needs repair on a Work Order and keep track of their dates of service.
Examples of Actions that can be listed as a Fixture Part could be:
- Quarterly Filter Changes on HVAC Units
- Inspecting your Fire Extinguishers
- Annual Inspection of Backflow and Sprinkler Systems
What are the Good Parts to Add to my Fixture?
Some Fixtures you may want to list all of the parts from the beginning. This can establish what type of equipment you have on site at a particular location. A Solid Waste Dumpster for Example, may have a lock on it, It may be in an enclosure, and that enclosure may have doors, or gates, or even a roof. Listing all of these items up front lets you easily access what type of equipment you have at that location.
Other Fixtures may be best served by only listing the parts that need and/or have been repaired. This can make it easy to see what work has been done on a Fixture and keep track of updated parts and warranty information. An HVAC unit is a good example of a Fixture with a lot of Parts. You may be tempted to add the Compressor part numbers and other common features that you want to track. The information can be helpful, but it can also make it less apparent what, if any parts have been replaced.
A good rule of thumb on when to add a part to a Fixture, if a part is an element of structure that isn't likely to change, and you will need to be able to recall and track, make it a part. If a part is something that can be updated, like firmware, or changed when it wears out, like a compressor on an HVAC system, wait until you actually need to change it to add it to the Fixture. This allows you to see at a glance what the permanent elements of your Fixture are while quickly establishing which parts have been serviced or replaced.
Clients
Clients are the people or entities that own the properties or locations that you manage with Sytewise. Clients will be part of the contracts you create and can be associated with all or just some of the properties you manage.
Adding Photos to Fixtures
Fixtures are any fixed property asset that requires maintenance or repair. Fixtures are located within a Property / Trade that is managed by the Sytewise Management Platform. All fixtures have a GPS location or a coordinate location on a floorpan.
To add a photo to a fixture you need to be on the fixture page and click the "Upload Files" button in the right side of the Fixture Page Header.

This will open a Modal window on screen that allows you to drag and drop up to 10 files. You can also use the browse button to find files on your computer to upload. Here is the upload window.
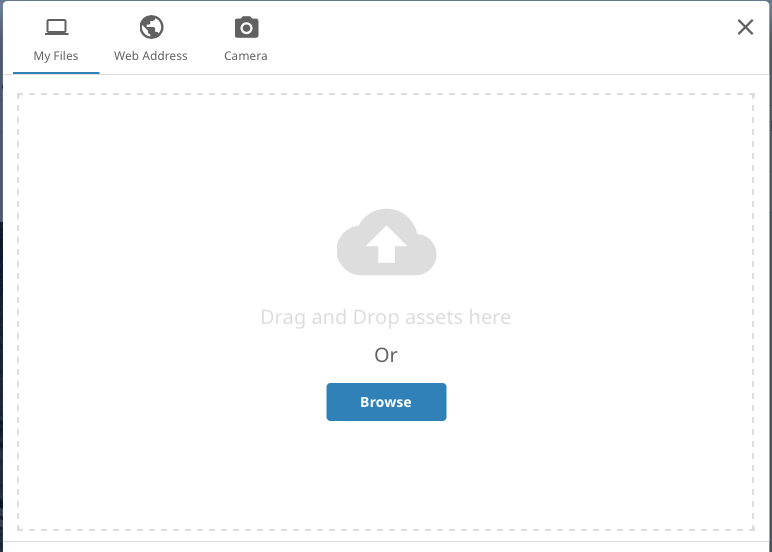
You can choose to add files from a web URL or your computer's camera.
You can only upload image files that are PNG, GIF, or JPG and PDF files. Images of any dimension larger than 400 x 400 pixels can be uploaded as long as they are less than 10MB in size.
Work Orders in Sytewise
A work order is the record of work -- requested, assigned, completed, and documented. Whether you're managing a retail portfolio's HVAC maintenance schedule or tracking a multi-site AV system service call, work orders are how Sytewise connects the people doing the work to the properties and systems they're responsible for.
This article covers creating a work order, understanding its fields and status, managing work orders across your portfolio, and how the vendor portal connects vendors to the work you assign them.
For recurring and scheduled work, see Building an Annual Workflow with Reminders. For attaching checklists to work orders, see Using Checklists with Work Orders.
What Is a Work Order?
A work order is a task record tied to a specific property and trade. It captures what needs to be done, who is doing it, when it's due, and what happened when the work was completed. Every work order lives within the Property / Trade structure -- meaning it belongs to a specific service category at a specific location.
For property managers, work orders are how you dispatch and track vendors across your portfolio -- HVAC calls, plumbing repairs, electrical inspections, landscaping, and any other service that touches your properties.
For AV integrators, work orders are how you track service calls, installations, and maintenance visits on the AV systems inside a property. Each work order connects to the fixtures -- the individual components of a system -- giving you a documented history of every service event at that location.
In both cases, the work order is the connective tissue between your property records, your vendors, and the documented history of what's been done.
Creating a Work Order
Work orders are created from the Property Page, within the trade tab for the relevant service category. Open the property, select the trade tab that applies to the work, and click Create a New Work Order. The form opens with the property and trade already filled in.
This approach is intentional -- anchoring the work order to a property and trade from the start keeps your records organized and ensures the right vendor pool, fixture list, and checklist options load automatically.
The Work Order Form
The creation form is organized into two columns. The left side handles the logistics of the job -- dates, vendor, contract, and costs. The right side handles fixtures, the description, and who receives the notification email.
[Screenshot: Work order creation form -- full view]
Left Column
Status: Complete A checkbox at the top of the form. Check this only if you are creating a historical record for work that has already been done. A work order marked complete at creation will not accrue overdue status regardless of its due date.
Subject / Title A short label for the work order -- what this job is, in plain language. This appears in list views, emails, and reports, so make it descriptive enough to recognize at a glance. Maximum 80 characters.
Order Date The date the work order is being created. Pre-filled with today's date.
Include a Work Start Date? A checkbox that reveals an additional date field when checked. Use this when the vendor isn't expected to start immediately and you want to document a scheduled start date separately from the due date.
Due Date The date by which the work should be completed. Used in overdue tracking, reporting, and reminder workflows. Required.
Vendor The vendor assigned to complete the work. The system suggests the preferred vendor for the selected property and trade combination if one has been configured. You can search and select any vendor in your account. See Vendors in Sytewise for how preferred vendors are set up.
Select a Contract Appears only when one or more contracts exist for the property. Linking a contract connects the work order to that contract record and can pull in associated pricing terms. Optional.
Reference No. A free-text field for a purchase order number, account number, or any external reference identifier you need to associate with this work. Appears in the work order list as Acc/Inv No. Optional, maximum 60 characters.
Line Items An expandable section for documenting the cost breakdown of the job. Each line item has a description, quantity, and unit amount -- the system calculates line totals and a running total automatically. Line items appear in the work order email sent to the vendor and in any attached bill records.
Right Column
Fixtures One or more fixtures the work order relates to. The fixture list loads automatically based on the property and trade. Each fixture displays a colored status indicator reflecting the current condition of its parts -- a green circle means all parts are functioning normally, yellow or orange means some parts need attention, and red means all parts are offline. These indicators give you a quick read on which fixtures in the property are already showing issues before you even open a work order.
Select individual fixtures, or use the All badge to select everything at once. Fixtures marked Already in a WO are currently assigned to another open work order -- you can still select them if the work applies to both.
To review or update the condition of parts within a specific fixture before creating a work order, open the fixture page for that fixture. Changes to part conditions there update the fixture's status indicator, which then reflects on the property page and in the fixture selection list here.
Linking fixtures creates a permanent entry on each fixture's service history. That history is what makes your system documentation credible over time and what speeds up future service calls on the same equipment.
Description What needs to be done. Write this as if the vendor is reading it cold -- include the specific location within the property, the nature of the problem or task, and any context that reduces the chance of a callback. A well-written description is one of the highest-leverage things you can do in a work order. See Descriptions Can Save You Time and Money.
Include Management Details in WO Emails? Controls whether management contact information -- site title, address, and phone -- is included in the email sent to the vendor. Uncheck this if you prefer to keep management details out of vendor communications for a particular job.
WO Email Addresses Two sections load dynamically based on the vendor and admin users in your account. Under Vendor Contacts, select which contacts on file for the assigned vendor should receive the work order email. Under Admins to Receive the WO Emails, check any admin users who should receive a copy.
Checklists A checklist template can be attached at creation time. This section loads eligible checklists for the property and vendor. See Using Checklists with Work Orders for the full workflow.
AV integrators: Linking fixtures at work order creation is strongly recommended. A work order tied to specific fixtures builds the service history that makes your system documentation credible and your future service calls faster. Before creating the work order, check the fixture status indicators on the trade tab -- red or yellow circles tell you exactly where the issues are. Use the description to call out the specific rack location, system, or component involved.
Property managers: Linking a work order to the correct trade, adding a reference number, and writing a clear description gives you the reporting foundation to track vendor performance and cost history by property over time. The fixture status indicators are also useful here -- a trade tab full of yellow and red circles is a quick visual summary of service needs across a property.
Saving and Sending
Click Save to create the work order. The system generates a unique work order number.
Saving does not automatically send a notification to the vendor. To notify them, open the work order after saving and click Send Work Order. This gives you the opportunity to review before it goes out and to confirm which contacts are receiving it. The vendor receives an email with the work order details, description, line items, and a direct link to the vendor portal.
If the vendor needs immediate access before you send the email, the work order detail page includes a Vendor Link button that generates a direct URL you can share manually.
See WO, Survey Email Preferences to configure notification defaults.
Managing Work Orders
Finding Work Orders
The WOs item in the left menu opens the full work order list -- every work order across your account. The list is searchable and filterable:
- Date Range -- filter by a specific window, toggling between order date and due/completion date
- Status -- All, Incomplete Only, Overdue Only, or Complete Only
- Type -- filter between Work Orders, Invoices, or both [VERIFY: confirm how invoice-type records are created and whether this filter applies to all account types]
- By User -- filter to work orders created by or assigned to a specific admin
- WO ID Search -- jump directly to a work order by its ID number
Results can be downloaded as a CSV -- either the full account list or the filtered results.
Work orders also surface contextually throughout the system: on a Property Page within the relevant trade tab, on a Fixture Page showing every WO ever linked to that fixture, and on a Vendor Profile Page showing every WO ever assigned to that vendor.
[Screenshot: Work order list -- filtered view]
Work Order Status
Status reflects where a work order stands in its lifecycle.
Incomplete is the default state for any new work order. The work has been assigned but not yet finished.
Complete means the work is done. A work order can be marked complete by an admin from the detail page, or automatically when a vendor submits their completion through the vendor portal.
Overdue is not a separate status but a display state. Any incomplete work order whose due date has passed shows as overdue in list views and reports. It resolves automatically once the work order is marked complete.
Rejected is set by the vendor through the vendor portal when they cannot accept the assigned work. A rejected work order is flagged visually and requires admin follow-up -- reassignment, rescheduling, or cancellation.
Keeping status current matters for two reasons: it gives you an accurate picture of what's open across your portfolio, and it's how vendors communicate progress back through the vendor portal.
Editing a Work Order
Open any work order by clicking its number or subject from any list. All fields can be edited from the work order detail page.
Account superusers have two additional options not available to standard users: Reopen Work Order, which reverses a completion and returns a work order to incomplete status, and Close Without Changes, which marks a work order complete without requiring vendor documentation. Both are intentionally restricted -- use them deliberately.
Deleting a work order is also restricted to superusers and only available on incomplete work orders. Deleting a work order detaches any linked checklists -- the checklists themselves are preserved and can be reattached elsewhere. See Using Checklists with Work Orders for details.
Work Order History
Every work order maintains a permanent record of what happened -- vendor notes, checklist completions, status changes, and any documentation attached. That history is tied to both the property and every linked fixture, and it doesn't go away when the work order is closed.
Work Orders and the Vendor Portal
When a work order is assigned to a vendor, that vendor accesses it through the Sytewise Vendor Portal -- a separate login environment where vendors see only the work assigned to them.
From the vendor portal, a vendor can:
- View the work order details, description, and line items
- Add notes to the work order record
- Enter their account or invoice number and actual fee for the job
- Document the condition of each linked fixture and part -- marking each as OK, Needs Service, or Repair Complete, with optional notes and photos per component
- Complete any attached checklist items
- Submit the work order as complete
- Reject the work order with a written reason if they cannot accept the assignment
[Screenshot: Work order as seen in the vendor portal]
This two-way connection is what makes Sytewise more than a task list. The vendor portal eliminates the phone and email back-and-forth of status checks -- the work order is the communication record, and both sides work from the same document.
For a full walkthrough of the vendor portal experience, see Work Orders in the Vendor Portal.
- Work Orders in the Vendor Portal -- what your vendors see and can do
- Using Checklists with Work Orders -- attaching and completing checklists
- Building an Annual Workflow with Reminders -- managing recurring and scheduled work
- WO, Survey Email Preferences -- configuring notifications
- Email Log -- confirming work order emails were delivered
- Descriptions Can Save You Time and Money -- writing descriptions that reduce callbacks
- Vendors in Sytewise -- setting preferred vendors per property and trade
Why Property / Trade?
The Sytewise Property Management System is property centric, meaning all activity recorded and stored is associated with a property. Properties can have multiple Trades. These trades represent the industries that install, maintain, repair and replace the fixtures on each property.
For example, a property may have several trades: Grease Traps, Lights, and Roofing; just to name a few. Each trade has it's subset of Fixtures, Contracts, Insurance, Preferred Vendors and associated Work Orders.
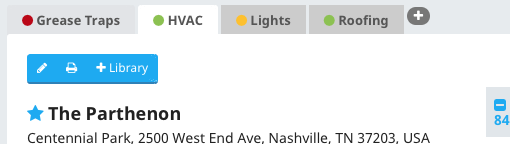
Depending on your Sytewise account profile the trades available to you may differ from those in the example above.
Adding a trade is as simple as clicking the [+] icon next to the trade tabs, selecting the new trade (if any are available to your account) and choosing a vendor. The default vendor for the property is already chosen for you.

Survey
A survey is an action request for a Surveyor to look at and document the status of fixtures on a property or part of a system. A surveyor can be anyone that is able to determine the operational status of a fixture.
Surveyors can Add Images, Edit Fixture Details like Model and Serial Numbers, or decide the Fixture does not exist on site. Fixtures that are inherited from Property Templates my not exist at every location, and therefore need to be removed during the survey.
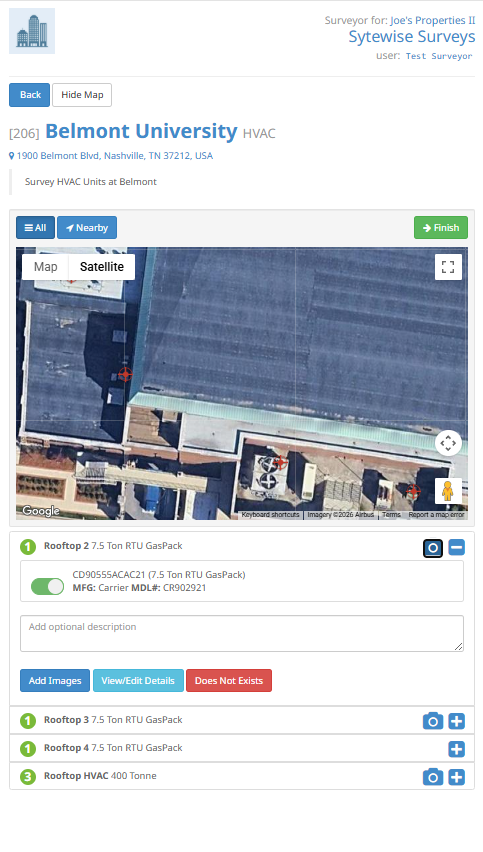
Tenants
Tenants are those that occupy the properties and spaces that you manage. They can be your actual tenants if you manage multi family properties or commercial shopping centers. They can also be the GM's of your local stores if you manage real estate for a multi-site commercial entity.
Users
Users is anyone that uses the Administration portal of the software. The can be a property manager or a project manager. Anyone that has log in credentials to view or add data in the system. A super-user can create other users in the system.
Contracts
Contracts are agreements between Clients, Vendors, and Properties. Contracts keep your scheduled work on track and terms of the agreement available to you, no matter where you are.
Contacts
Contacts are people associated with Vendors, Clients, or Properties. Keeping their contact information with you at all times in the context of their company or property is very useful, and in an emergency can keep an emergency from turning into a disaster.
The Sytewise Information Funnel
Sytewise is built around a hierarchy. Every piece of information in the system belongs somewhere. every work order, every checklist, every service record is in a structure that flows from the broadest context down to the most specific detail. Understanding that structure is the key to understanding why the system works the way it does, and how to get the most out of it.
The hierarchy has five levels, each one contained within the one above it.
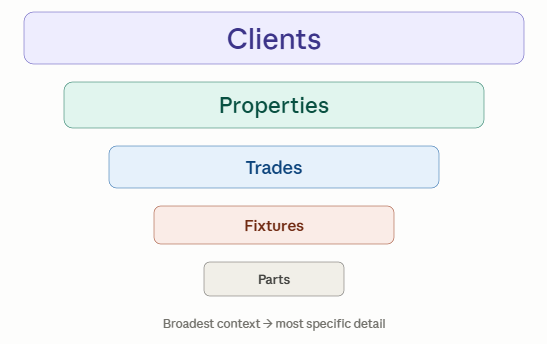
Clients sit at the top of the funnel. A client is the organization that owns or is responsible for the properties you manage. Everything below a client belongs to them.
Properties are the physical locations — buildings, sites, addresses — where work happens. Every property belongs to a client, and every trade, fixture, and work order ultimately traces back to a property.
Trades are the service categories within a property — HVAC, plumbing, electrical, AV systems, and so on. A trade is where you assign your preferred vendor, track your fixtures by type, and create work orders for a specific kind of work.
Fixtures are the individual assets and equipment tracked within a trade. Each fixture has its own record, its own service history, its own checklist archive, and its own parts list. The fixture is where the long-term value of the system accumulates — every job, every inspection, every replacement documented over time.
Parts are the component-level details inside a fixture — the serialized items, sub-assemblies, and consumables that make up the equipment itself. Parts are the most specific level of the funnel, and the most powerful for service documentation when populated accurately.
The funnel matters because it explains how Sytewise finds and organizes information. When you create a work order, you're working at the Trade level. When you attach fixtures to that work order, you're connecting it to the Fixture level. When a vendor documents parts replaced during the job, the record lands at the Parts level. Every piece of information knows exactly where it belongs — and that means you can always find it again.
The funnel also explains why setup order matters. Clients and properties need to exist before trades. Trades need to exist before fixtures. Fixtures need to exist before parts. Working top-down through the funnel when you set up a new location is the fastest path to a fully operational property record.
Hopefully you have as many clients as you want. Each of them can have several properties. Every property will employ vendors across several trades. Every trade will have several fixtures at each property. And every fixture is composed of its several parts.
At each level of the funnel, there are people who need information and people who can give you information about your assets.
Clients need information about their properties — how assets are performing, what work has been done, and what it cost.
Vendors need information about the property, the fixture, and the parts — enough context to arrive prepared, do the work right, and document what they found.
Tenants have helpful information about your property and need information about the work vendors are doing — closing the loop between the people who use the spaces and the people who maintain them.
Sytewise is the place to store everything — with an interface designed to support your daily tasks and surface the intelligence you need when you need it.
WO, Survey Email Preferences
When you create a Work Order or Survey, you have an option to send the vendor or surveyor an email of the order. This email has a link to the work to be done. Once The Survey or Work Order is complete, either work finished or rejected in the case of Work Orders, the status of that order is updated in the system along with all the fixtures, parts and properties are updated.
But what if you want to be notified of that completion? You can set email preferences for each Sytewise user that dictate when they are sent a message of the update.
To Set Your Global Email Preferences for Work Order or Survey Notification
Global settings are for every instance of a Work Order or Survey. For settings specific to any one property see below.
- Go to the user's page you wish to setup Users > User
- Under the section Global Email Preferences check your choices
- Receive All Work Order Responses - You will receive all Work Order submissions from vendors, no matter the property.
- Receive All Work Order Rejections - You will only receive Work Orders vendors reject.
- Receive All Survey Responses - Every survey submitted for any of your properties will be sent to your email address.
- Click Save to keep your choices.
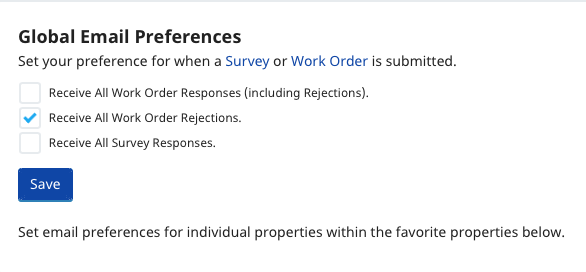
To Set Your Email Preference for Individual Properties
- You must create favorite properties to add email notices to.
- To add a property to your favorites
- start typing the name of the property in the text box provided.
- Select the property from the list of search results (be sure to spell it correctly)
- Hit return.
- To add a property to your favorites
- Any favorite property can have Work Orders or Survey responses sent to you.
- If you have set WOs or Surveys to be globally sent you cannot add individual properties to your email preference.
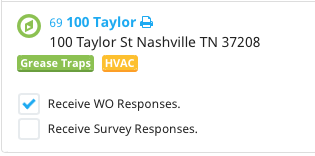
Favorite Properties
Your Dashboard and Properties pages in the Sytewise Admin show a list of your favorite properties. This is a convenient list for quick reference. Otherwise you can search for properties by name, by state, or by other user's favorites at the top of the property list.
To make a property your favorite
- Find the property you want to make your favorite and go to the property page.
- Find the star to the left of the property name
- Click the star.
Make a property your favorite from your User page.
- Go to your user page
- Find the list of favorite properties on the right.
- Start typing the name of the property in the search box
- Select with your arrow keys of your mouse the property you wish to add.
- Hit return.
Reference: The Sytewise User Interface
A rundown of the Sytewise user interface from the main admin screen through the menus and pages.
Sytewise User Interface
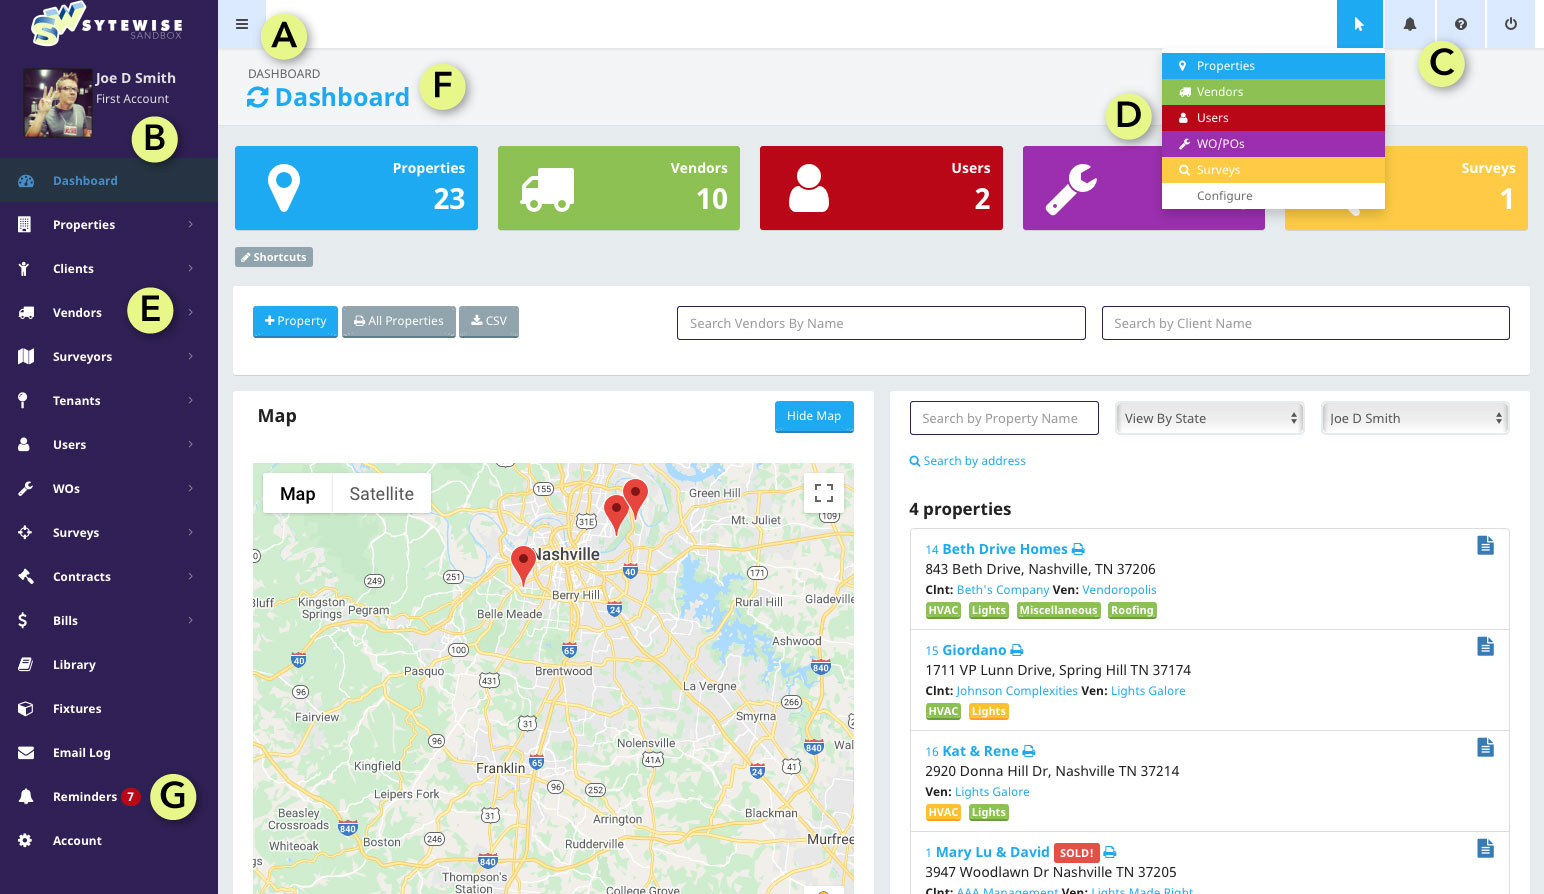
Once you are logged in the Sytewise interface will have the following components always available to you.
A. Menu Collapse
Click this "hamburger" icon to the right of the Sytewise Logo to collapse the main menu bar to the left. This is convenient when you need more screen real estate in the main window area.
B. Account Block
At the top of the main menu bar on the left is your account block. This area contains the Photo you uploaded for your user profile (the username and password you logged in with). Clicking the Username or the Photo takes you to your user profile page. If you have super user privileges you can click the Account name under the user's name to go to the account settings.
C. Quick Tools Navigation
At the upper right of the top of every page you will find a series of 4 icons. These are quick links to useful tools in the Sytewise system.
- Shortcuts Arrow: Clicking this opens a dropdown with quick links to the shortcuts
- Reminder Bell: This drops down the reminder tool. Reminders are one-time or recurring events that remind you on a particular day to do something in Sytewise. Reminders can be attached to many of the items within Sytewise. Just go to that page and start making a reminder.
- Help Icon: Clicking this question mark icon takes you to the Sytewise help site. (this site)
- Logout Icon: Clicking this icon will log you out of Sytewise. You are automatically logged out after an hour.
D. Shortcuts
You can set shortcuts for yourself in your user profile. They are in the shortcut quick tools dropdown and are shown on your dashboard (as seen in the image above).
E. Main Menu Navigation
On the left of the screen in the dark band is the Main Menu. Here are links to every section within the system and their details. Some links have more detail pages in them and require one click to reveal those detail pages. Properties > New Property, Properties > Property Search for example.
F. Page Header
Each page has a header with a breadcrumb for knowing the context of your current page, a page title and a refresh icon. You can click any of the upward links in the breadcrumb to go back to that page. The refresh Icon is helpful if you need to start your entries.
G. Reminders Indicator
Next to the Reminders Main Menu item there will occur a number in a red circle. This is the un-attended-to reminders number. If this number appears (it will not if there are zero reminders to attend), you can click "Reminders" in the Main Menu to see what is in your reminders queue.
The Dashboard
The initial page once you log in is your property management dashboard.
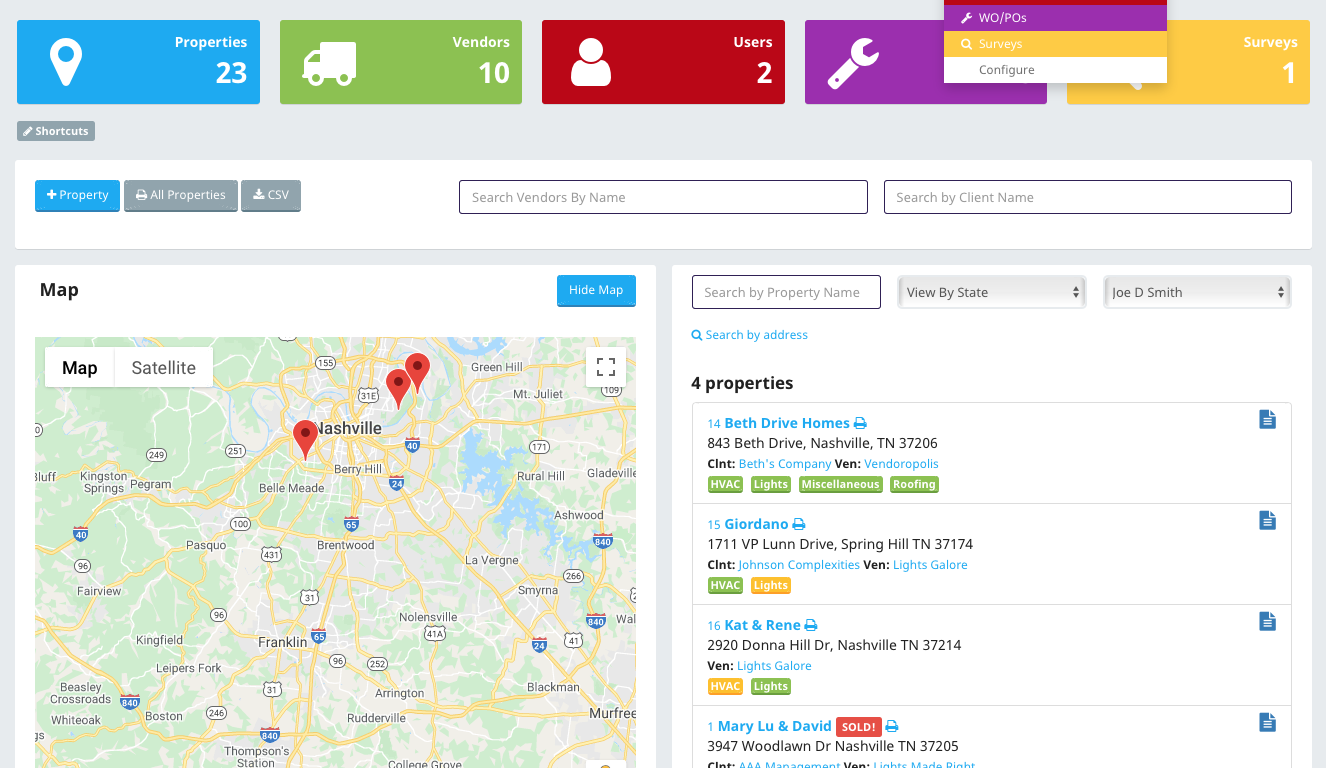
Shortcuts
The top contains your shortcuts. These are summary color blocks that are also links to important sections of the Sytewise system.
To edit your shortcuts
- Go to your user profile page by clicking your photo
- Or click the shortcuts button below the blocks
- Or click the "Configure" item in the shortcuts dropdown
- Find the shortcuts section and select up to 5 by checking the checkbox next to the shortcut.
Special Dashboard Tools
Just below the shortcuts is a set of buttons and search boxes that have particular functions. These choices are changing as Sytewise continues to improve it's toolset but the basics will remain the same.
Creating a new property
You can create a new property from the Main Menu on the left at anytime. Go to Properties > New Property. The dashboard and property pages also have a one click button that take you to the new property page.
Printing and Downloading All Properties
Sytewise lets users maintain a "Favorite Properties" list that is what is displayed in the Properties Summary on the dashboard and properties page. If you want to print or download a CSV of all the properties in the account click the associated button.
Quick Searches
On the dashboard there are quick search fields for going straight to a vendor or client profile page. Simply start typing the name of a vendor or client in the field, select the name from the list (arrow keys or with your mouse) and hit return. This will take you to the appropriate page.
Property Summary Map and List
The main part of the dashboard and property pages is the map and list of your favorite properties. You can add favorite properties in your User Profile or by visiting a property page and click the star next to the property name.
Clicking on a map marker reveals the property name (as a link to that property) and highlights the property in the list to the right. You can scale and move the map around with your mouse. You can also switch views and even go to street level view in every map on Sytewise. Sytewise maps are generated from Googles maps interface and will reflect their user interface and data.
Search by Name
Clicking in the "Search by Property Name" field and start typing will dropdown a list of properties in your account that match by name. Clicking (or using the arrow keys) to a name in the list and hitting return will go to that property page.
Narrowing or Expanding the Summary List
The list of properties (and their corresponding map locations) can be changed using the View By State and User dropdown choices. Simply choose any of the options in the lists and the list changes to only include those. Choosing a state will show all the properties located in that state. Choose a user will show you that user's favorite properties. This can be useful for management to check on the status of an employee's properties.
The Property List

The Property Name Line has the Sytewise internal property ID first, then the given name for the property. Clicking either of these will take you to the first created trade for that property. Finally, there is a printer icon which takes you to that property's printable page. The address is always on the second line.
Client and Vendors Line lists the client (which is for every trade on this property) and the default vendor for the first trade created for the property. To see who the vendor is for each trade go to the trade for that property.
Blue Contract Icon to the left allows you to reveal any contracts for the property. Clicking it will load a list of contracts under the property trades.
Property Trades are listed under the client and vendor line. Clicking "Load Trade Statuses" will change the color of each trade button on the list to the current status of that trade. Green: all fixtures in good order. Yellow: at least one fixture is out of order. Red: all fixtures and parts in that trade are in need of attention.
Additional Reading: WELCOME TO YOUR DASHBOARD
Property Page (part 1)
The property page in the Sytewise system is the central hub for all things property management. The page contains all pertinent information about a property with direct links to everything you need to know, if it isn't already represented on the page. There is, in fact so much to cover on the property page we created two pages just for the overview. Reminder: more detailed information about the use and best practice of Sytewise is contained in other chapters on this help site. Read about the bottom half of the property page.
 FYI Anytime you see this icon clicking it expands more information related to the title next to this button.
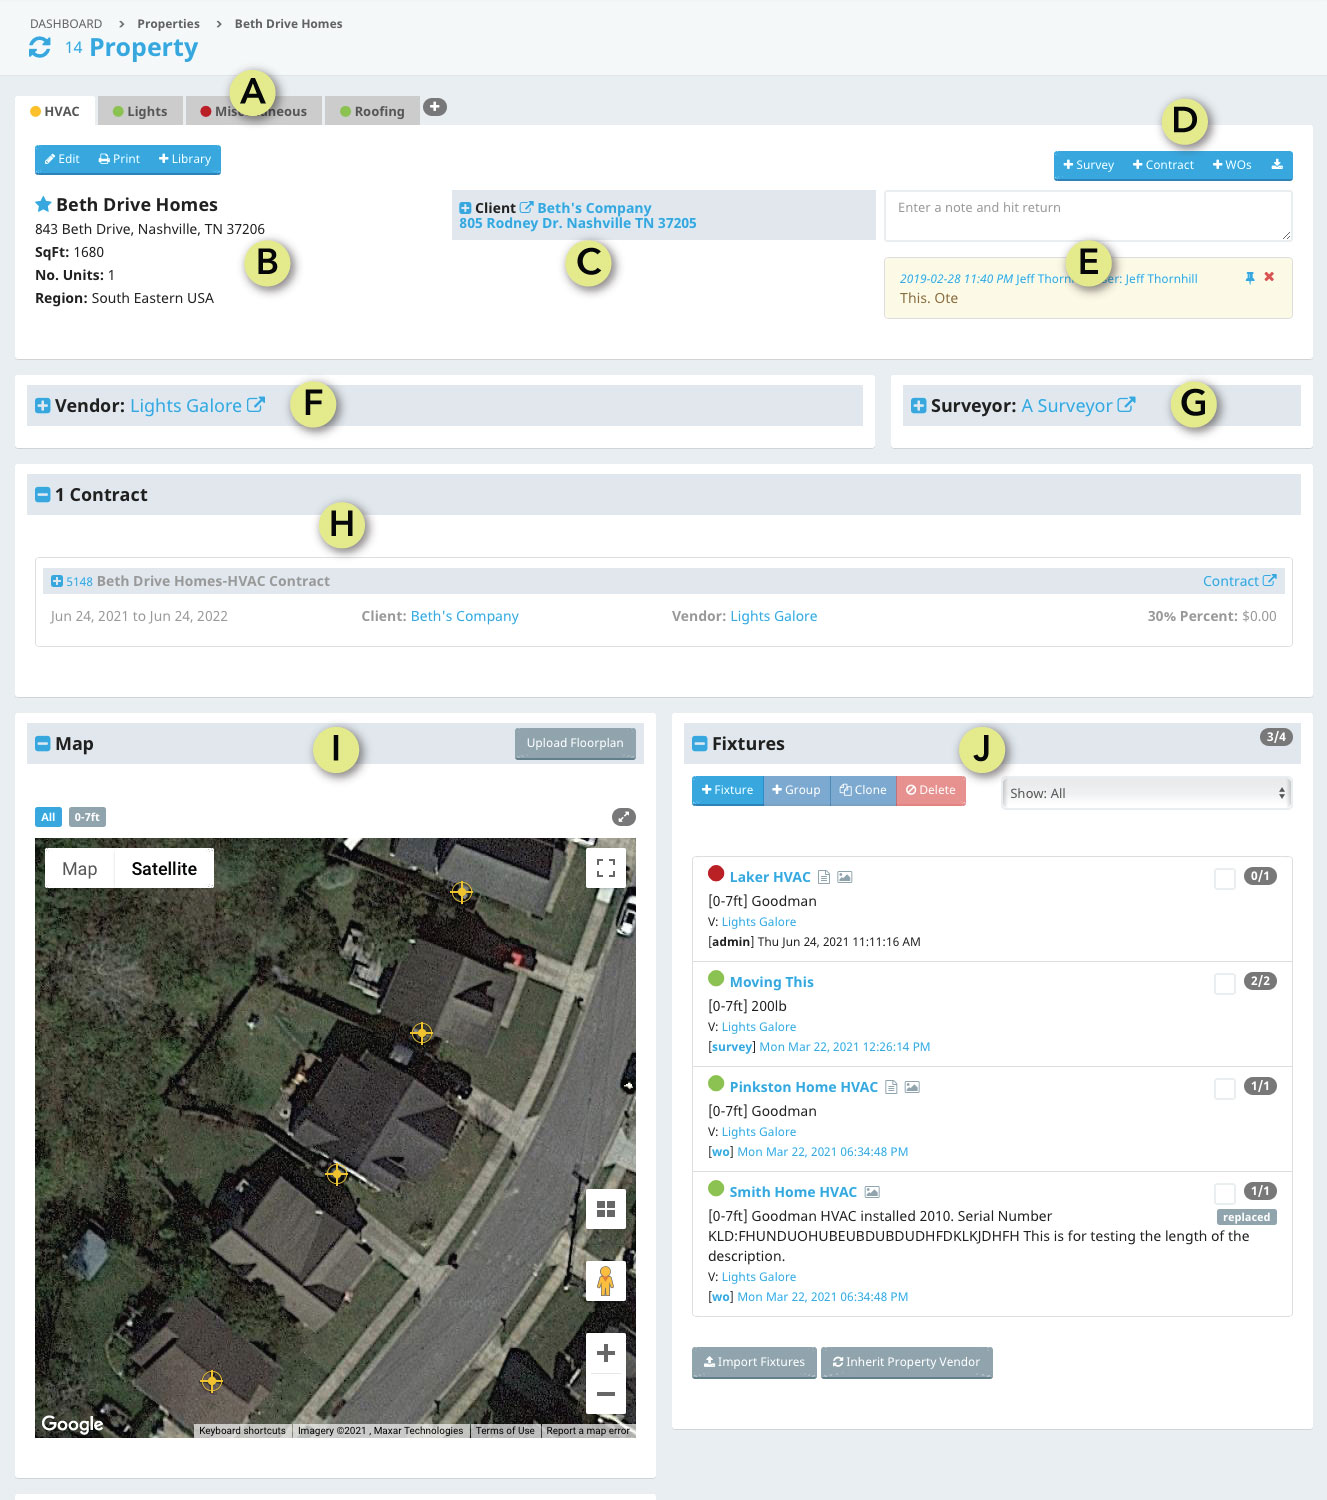
A. Trade Tabs
Each property has at least one trade. Your account has a set number of trades it can create, contact Sytewise to add or change that list of available trades. Adding a trade is as simple as clicking the "+" button at the far right of the trade tabs.
Switch between trades by clicking the tab. The colored dot indicates the status of that trade's fixtures. Green: all good. Yellow: at least one issue. Red: all parts and fixtures have issues.
B. Property Settings
The left third of the property info section is for specifics about the whole property, including any trades. Clicking the "Edit" button will open a form to change these settings.
NOTE: The property address is not editable. It was set when the property was created in Sytewise and is based on Geolocation technology for properly formatted addresses. It also includes the specific GPS location of the property marker.
C. Property Client
Each property can optionally be assigned a client. To see the client's contacts and other information expand the information box by clicking the "+" next to the client name.
D. Add Buttons
On the top right side of the property info section you will find a group of buttons for creating new Work Orders, Contracts and Surveys.
The download icon will download all the fixture data in a CSV format.
E. Notes
The right side of the property info section includes a notes tool. Simply type a note in the field and hit return to create a new note. Clicking the red "X" will delete the note. Clicking the blue thumbtack will pin the note to the top of all notes.
Each note is timestamped and indicates the username who created it.
F. Vendor Section
The vendor for the selected trade is listed in the title with a link to that vendor's page. Clicking the "+" button shows the vendor's contact details including any staff or other contacts you've created for that vendor.
To change vendors for the selected trade you can select a vendor by name or by distance from the property. Selected vendors are chosen when creating work orders or contracts for the selected trade.
- Select a vendor by name
- Starting typing a vendor's name in the vendor name field. From the list of found vendors click or arrow-key to the name and hit return.
- This will change the vendor for the selected trade.
- Select a vendor by distance
- Choose a distance from the dropdown list of distances and click "Find".
- This will produce a list of vendors within the distance selected sorted closest to furthest
- Click the "Select" button next to your vendor of choice to change the vendor for the selected trade.
Alternate vendors can be added to a trade. This is useful of your trade vendor is not available for particular work orders. Add alternate vendors the same way you select the primary vendor by name.
G. Surveyor Section
Surveys are a way of evaluating your properties with a visit from a particular type of vendor or employee. They are given a portal in which they can evaluate the status of your fixtures and parts and report on them directly into the Sytewise system.
Selecting a Surveyor works exactly like selecting a vendor by name but from your list of surveyors.
H. Contracts Section
This section gives a summary of any contracts associated with the property / trade. It includes links to related vendors, clients and the contract itself. Clicking the "+" next to the contract name reveals more details about the contract. A contract with a gray background has expired.
I. Fixture Map Section
Sytewise enables you to show fixtures for any Property / Trade on a GPS map or overlaid on a floorpan. By default fixtures are placed on the GPS map, and when you create a new fixture it is placed in the same GPS location as the property.
Custom markers indicate the fixture position on the map or floorpan. Yellow markers are for fixtures at ground level up to 7ft. Blue are from 8 to 16ft and Red and 17ft and higher.
To use a floorpan instead of the GPS map you click "Upload Floorpan". Follow the on screen instruction to upload an image. A floorpan must be at least 790 pixels and no more than 2200 pixels in either dimension. Once uploaded any existing markers will be placed in the upper left corner of the floorpan.
A Floorpan can be converted back to GPS, you will lose any marker position data if you do so.
The GPS map is embedded from Google's mapping API and operates like a typical interactive map with size, scroll, satellite and street views.
J. Fixtures List Section
The list of fixtures for the selected trade includes a lot of useful at-a-glance information and functions.

Status and Name: The colored dot indicates the fixture's status. Green: all parts good, Yellow, At least one part needs service, Red: all parts need service. See the gray numeric indicator to the right for the total good parts / total parts in the fixture. Clicking the name or the status dot takes you to the fixture page.
Note and Image Icons will appear to the right of the name if there is either of those associated with the fixture. Mousing over the note icon will summarize the most recent note.
[Height group] The fixture's height group is indicated in the brackets.
The Vendor for the fixture is indicated after "V:". and is a link to that vendor. A fixture can have an independently assigned vendor, otherwise it is assigned the default vendor for its Property / Trade.
If you set a separate vendor for a fixture and then go back to the Property / Trade and change default vendor this will change the specific vendor for each fixture.
The last line of the fixture listing is the most recent activity on that fixture as a one line log.
Read more about the property page.
Property Page (part 2)
The bottom half of the property page includes related information and links related to the selected Property / Trade. This article covers these parts of the property page. Read more about the top portion of the property page.
The property page includes a Tenants Section, A Work Orders Section, A Surveys Section and a section for Files and Insurance.
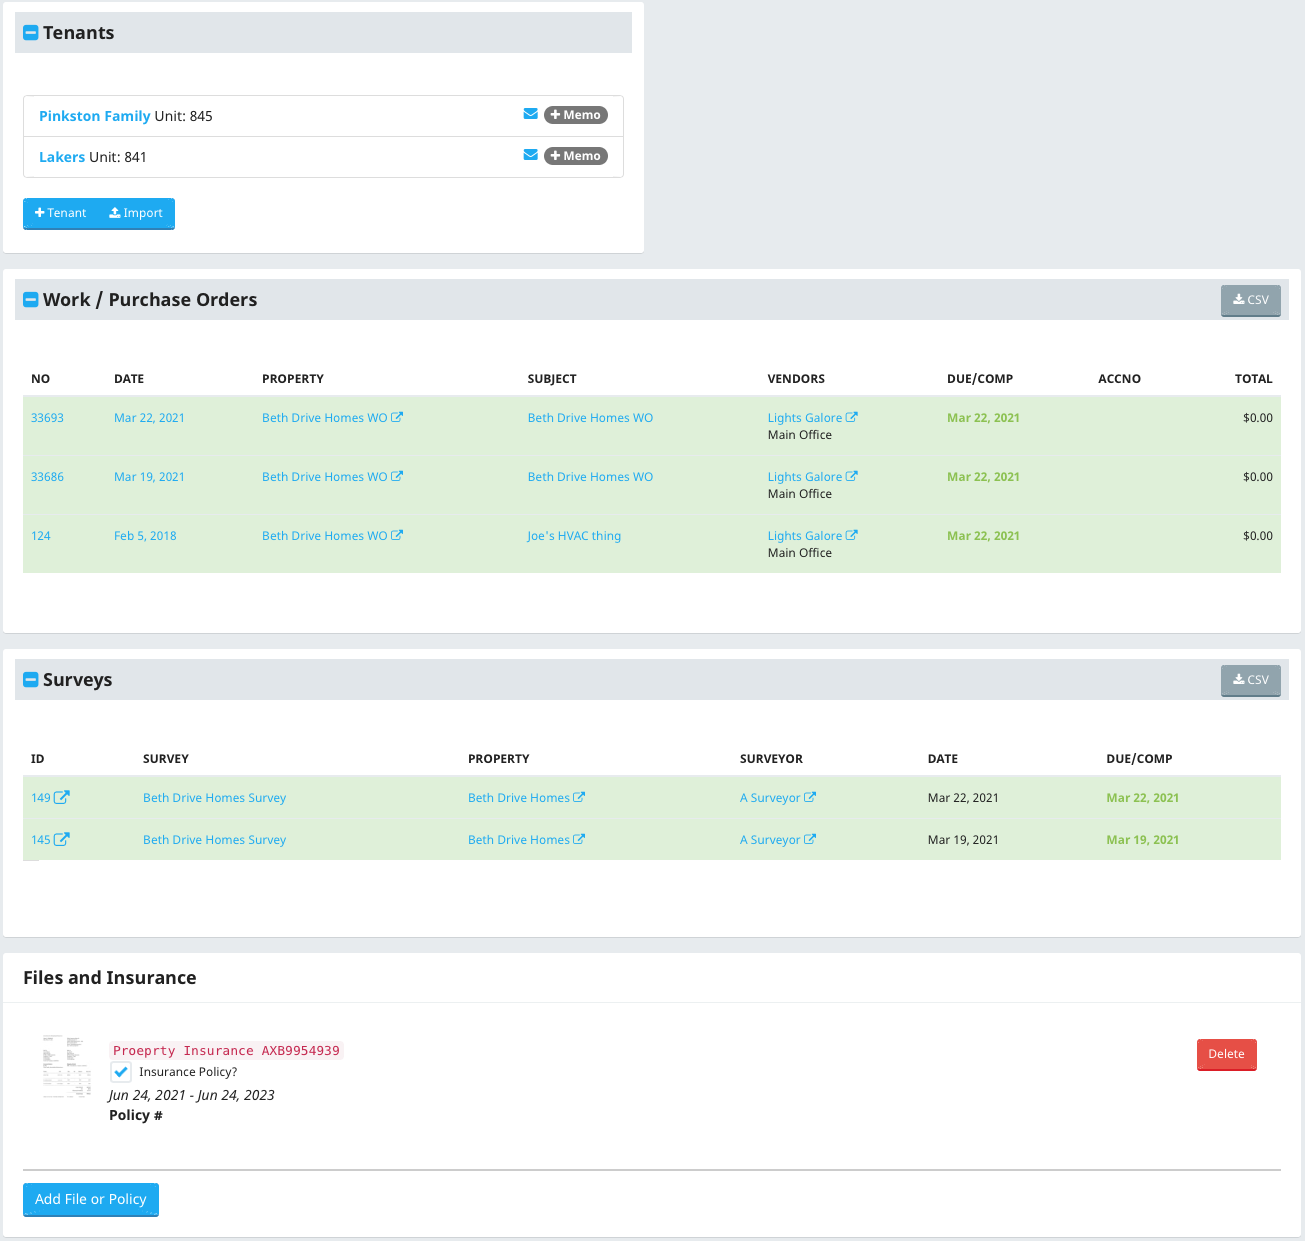
The Tenants Section
Each Sytewise property can have a number of tenants. They are trade independent so they are available no matter what trade you select. A tenant portal is available for tenants to respond to memos and send messages to admins.
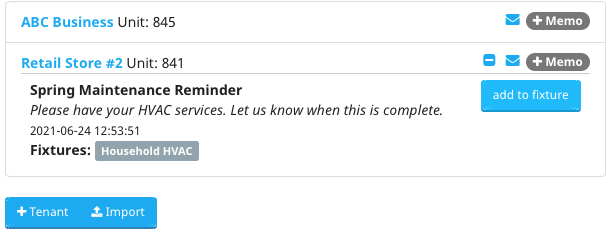
Sytewise's tenant portal is a way to communicate with tenants in a convenient way that associates property and fixture information from the Sytewise Property / Trade specifically.
To create a memo
Click the "+Memo" button. In the popup window you can set a subject (which will be the email subject as well), a message and select fixtures to include in the memo from the fixture list. This sends the tenant a memo email with a link to the tenant portal. You can view any memos and their responses clicking the chat icon.
Once a memo has been created and it is associated with a fixture clicking the "Add to Fixture" button adds a note and any images in the memo to the associated fixture.
To add a tenant
Click the "+Tenant" button and fill out the popup form. If you want tenants to access the Tenant Portal create a username and password.
Once you have tenants you can click their name to go to their profile page and edit their information.
Clicking the envelope icon opens your email client with a new message to the tenant.
Work Orders and Surveys Section
All Work Orders and Surveys are listed in their respective sections. These are sorted by date with most recent at the top. A white background listing is active but incomplete. Green is completed and red is past due.
Clicking the number, date or title of the Work Order or Survey takes you to their respective details. You can also go directly to vendor's or surveyor's page from the list.
Files and Insurance
At the bottom of a Property / Trade page, as well as several other contexts within Sytewise, you can upload files. These files can be image (gif, jpg or png) or PDF files.
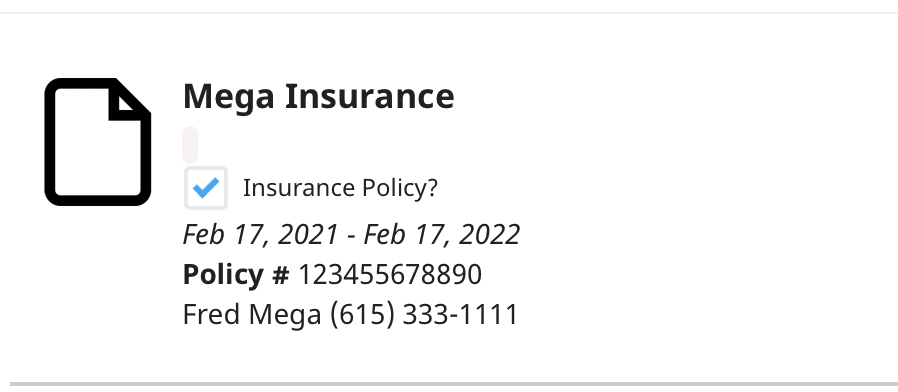
Once you've uploaded a file you can designate that file as an insurance policy. Doing so will add the insurance effective dates and policy specific information. Expired policies are indicated with a red background.
Fixture Page
Fixtures are where Sytewise's power comes in full display. A property manager manages fixed assets (Fixtures) and their detailed parts by entering critical information for fixtures and the maintainable parts of any fixture. Simply as a reference this is a substantial resource. But when coupled with Sytewise's Work Orders not only do you have reference you have history and performance.
The Fixture Page Sections
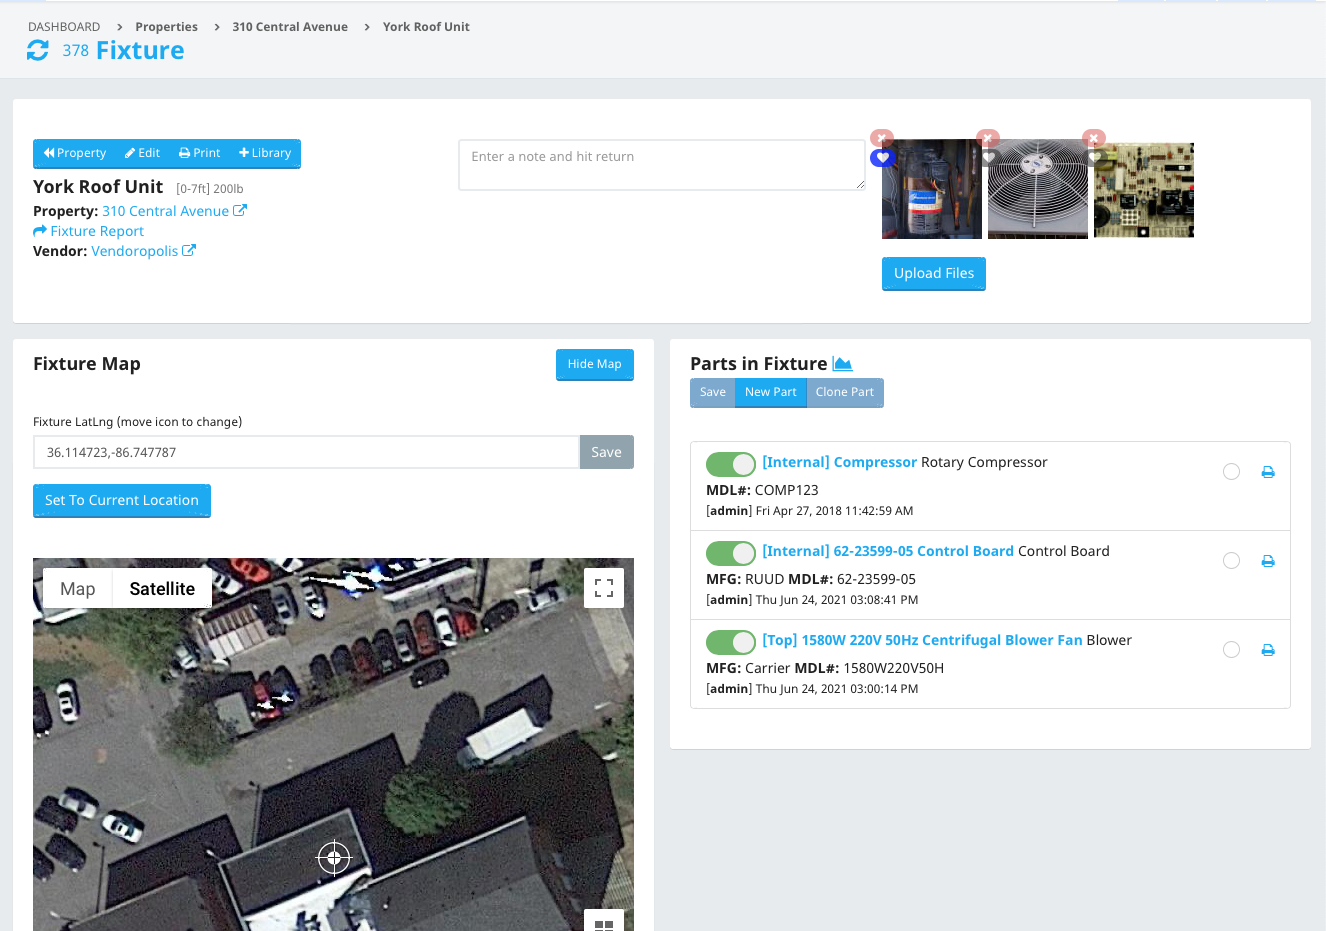
Fixture Details Section
Fixture Details
This section includes editable detail fields for your fixture including the title, description, installation notes and the default vendor among other characteristics.
The middle portion is for notes.
Enter a note and hit return to save it. You can delete or pin saved notes.
The right portion is for uploaded files.
You can upload images (gif, jpg, and png) and PDF files. When you've uploaded a file a thumbnail appears. Clicking the middle of the thumbnail opens images in a popover modal with the original filename at the bottom. Clicking a PDF opens the file in a new browser window from which you can save the file to your local computer.
Click the "Heart" icon in the upper right of any thumbnail to make it the primary image that shows up on the printed summary of the fixture and places it as the first file in the thumbnail grid of files.
Fixture Map
The Fixture Map is where the map or floorpan marker is located in context. Fixtures are on either GPS or Floorplan maps.
For GPS Property / Trades Markers
The marker is located by GPS coordinates. The fixture selected will be the larger marker in the center of the map. To relocate the marker click and drag the marker to it's new location. If you have trouble grabbing the marker place your mouse over it's edge and wait a couple seconds. If a "Move Me" label appears, move the marker to your desired location on the map.
Once the marker is at the desired location find the red "Save" button above the map. It will show the new coordinates of your marker. Click save.
For Floor Plan Markers
When the Property / Trade has an uploaded Floor Plan you can move and save the markers in the same way. Just find the larger marker and click and drag it. (The other, smaller makers are not "draggable). Make sure you save the new location before leaving the page.
The Parts List
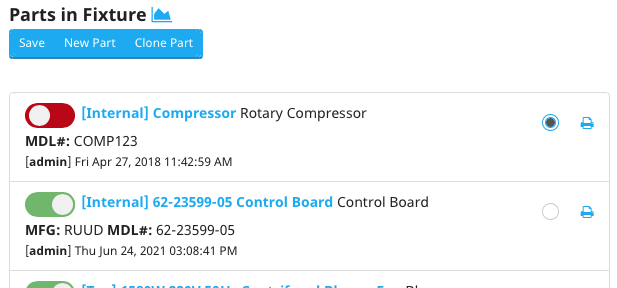
The parts list is an at a glance view of all the parts in a fixture with tools for managing the list. Each part lists a summary of the data for that part including
- [The Position] in brackets. Position is a short text field that let's you reference how to differentiate similar parts. Uses include "Top", "Southwest", "A", "Internal" etc.
- Part Number is the next field, or the name of the part. Both position and Partno are links to open the detail part editor.
- Description is on the end of the first line.
- Manufacturer and Model Number are on the second line.
- Recent Activity is on the bottom
Managing, Editing Parts
Status Change
A part can have one of two status's. On or Off. "Good" or "Bad", "In Service" or "Out of Service". You can change this status by clicking the Red or Green status toggle and clicking the "Save" button above the list. This will be logged as an Admin change to the status of that part and fixture status.
Surveys and Work Orders are the most common way part status's get changed although an admin has the authority to make those changes within the Sytewise master system.
To Clone A Part
- Select the part to clone by checking the radio choice on the right side of the part listed. It's to the left of the print icon.
- Click "Clone Part" at the top of the list to open the clone part modal window.
- Give it a Position and a new part number if necessary.
- Save.
- This will create an exact clone of the part with all the details.
- Open the new part to edit any differences.
To Delete A Part, open the edit modal and click "Delete This Part"
Part Details
If the fields made available to you in the parts details are not enough for the information you wish to add to your parts, Sytewise gives you a simple tool for adding a table of data for your parts.
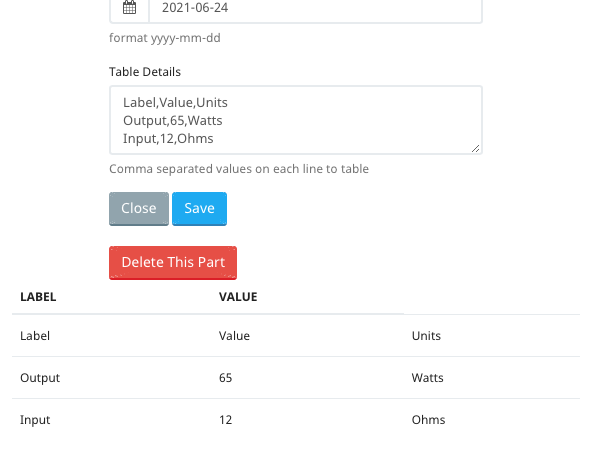
To add a detail table to a part do the following:
- Open a part detail editor by clicking the part name or position
- Find the field labeled "Table Details"
- Enter comma separated text to the field.
- For example enter: Label, Value, Units for three columns
- Add a line break (return) to start a new row and enter the same number of comma separated values.
- To preview your table click outside the edit field or tab to escape the field.
- The new table will appear below the buttons.
- Feel free to make changes and click out of the field to continue editing
- Once you are done adding your table don't forget to click "Save"
Work Orders in the Vendor Portal
Sytewise offers a Vendor Portal to all accounts where vendors can interact with Work Orders and their account information. When you create a vendor they are given credentials for logging into the portal. When you create a new Work Order it is registered in the system and added to the vendor's portal account. If you send an email version of the Work Order to the vendor the email contains a link to the Work Order in the portal with an option to login.
The Work Order Options
Simple Completion Option
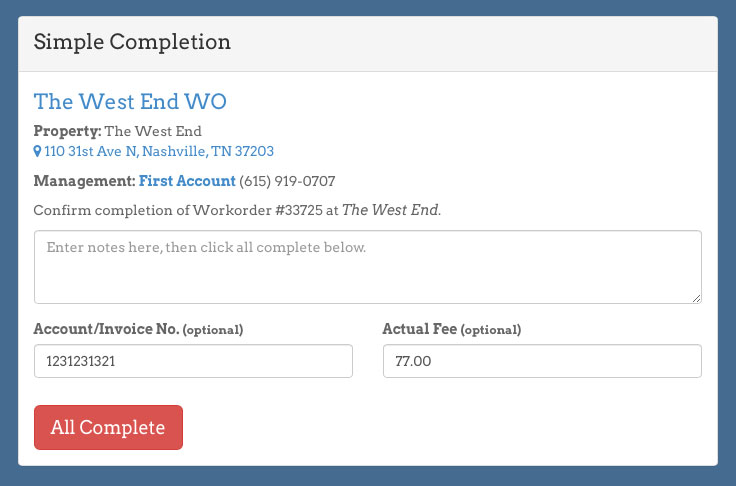
If the vendor is able to complete the work with no issues or changes they can simply click the "All Complete" button. They can optionally add a note and update (if available) the Account or Invoice Number and the final cost. The fixtures and parts are updated, Sytewise logs the activity and you get notified. Done!
Detailed Completion Option
Vendors may need to enter some extra details with the work they perform (or cannot). This when they use the Detailed Completion option.
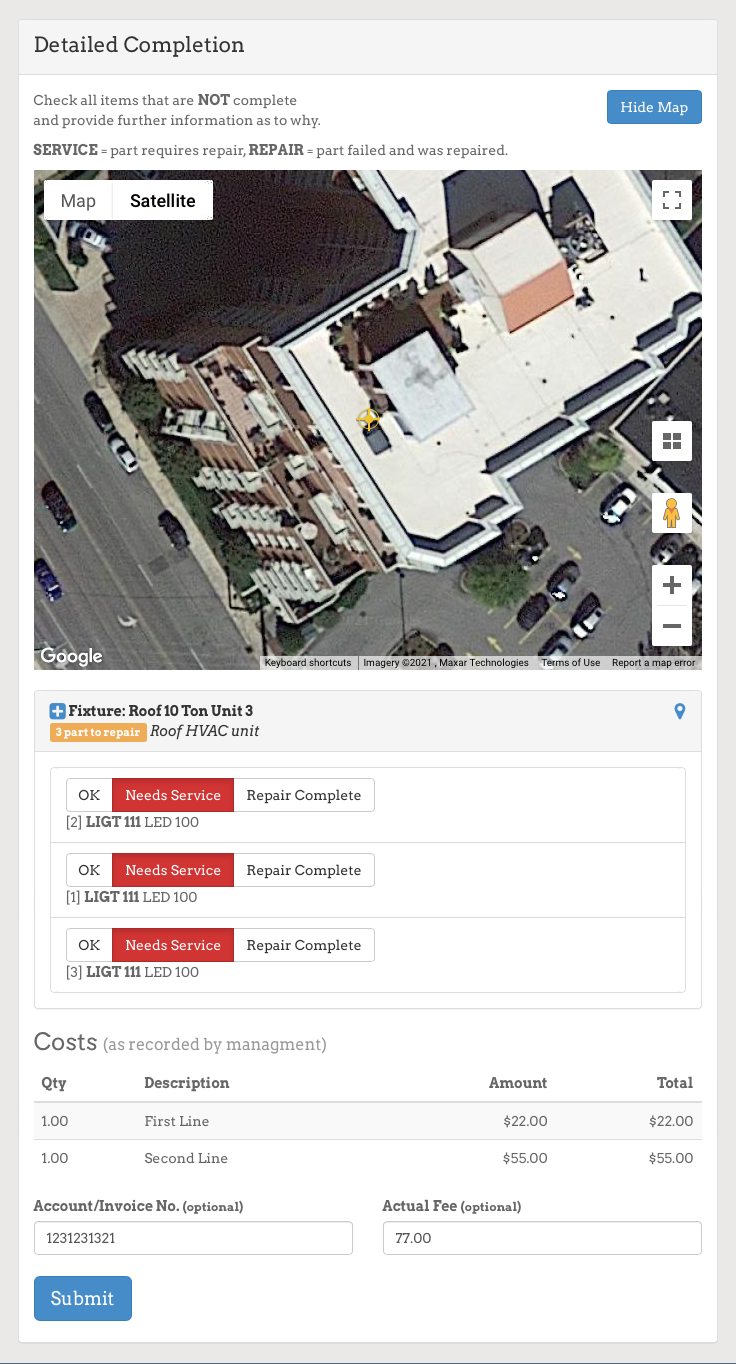
The fixtures in question will be shown on a map or floor plan. Expanding the fixture details using the "+" button next to the fixture name reveals all the parts and each three choices for each.
- OK: They find the part to need no service and they did not perform any. In this case they check "OK"
- Needs Service: the vendor can chose this if they find the part faulty but are not performing any repairs
- Repair Complete: This is most typically what a vendor checks. The part needed service and they performed a repair or replacement therefore the part repair is complete.
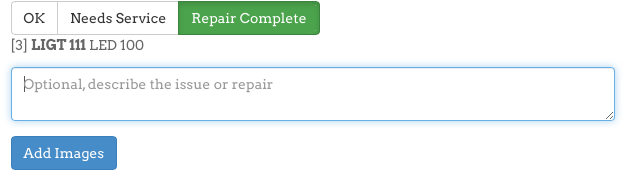
If a part is changed to Repair Complete or Needs Service a note field and image uploader is provided. Vendors can enter notes and upload as many as 6 images. These entries will be a part of the Work Order but also integrated into the fixture on Systwise.
Just like the simple completion version, the detailed version allows the vendor to enter or update costs and account numbers. Once submitted the Work Order's data is integrated into the Sytewise account.
Reject Work Order
A vendor is given the opportunity to reject any submitted Work Order. This will notify the account managers as set in their preferences and show the Work Order Rejected in the system.
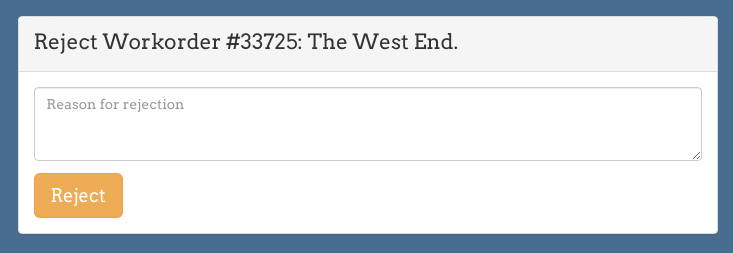
Adding and Managing Clients
Clients are an integral part of property management if the relationship with the property manager is on behalf of an owner. This would be the client. Clients are also integrated into the contract system as there is a relationship between the the vendor and the client and sometimes the Sytewise account holder (the property manager).
To create a new client
Go to Clients > Clients and expand the section "Create a New Client". A form will appear that looks something like this:
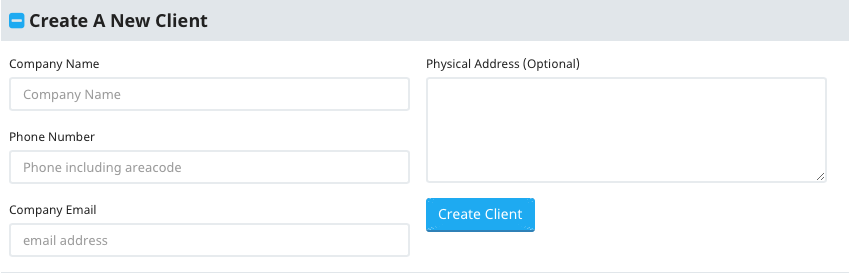
Clients must have a name, a contact phone number and a valid email address at a minimum. Remember to choose unique names so you can differentiate between entities like clients.
The Client Profile Page
The client profile page allows many contextual links and tools.
Contracts
The relationships between a property manager, the owner (client) and a vendor often requires contractual definitions. Sytewise contracts are available for any property / trade where required.
Creating A Contract
From the property / trade you wish to add a contract, click the +Contract button found in the top right of the page header. This will open the new contract modal window.
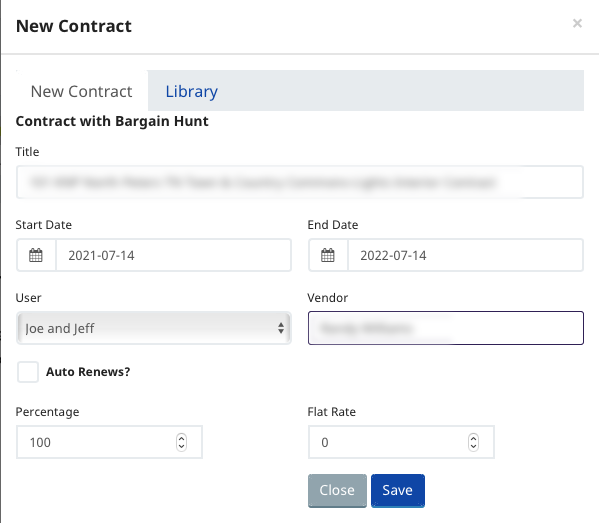
A title is created based on the Property / Trade. You can change the title to anything you want, just be sure to make it unique and identifiable. See this article on naming.
The start date is today by default but you can change it to whatever suits your needs. The end date is set to one year from today by default but feel free to change that.
The user is assigned for reference and can be used to track the responsible person for the contract. It is by default the user who is logged in.
The vendor is set to the default vendor for the property / trade. This can be changed.
Percentage and flat rate are basic cost references for calculating fees. Sytewise can create custom contract calculations and terms forms. Simply contact us to arrange for an estimate.
Email Log
Sytewise notification system utilizes a transactional email service. When a Work Order or Survey is issued an email is sent to the vendor or surveyor. Upon completion (or rejection) or the order a new message is sent to administrators who've opted in for property update emails.
Every Work Order and Survey has a log of all emails sent regarding that action. The log shows the status of that message, if it was sent successfully or not.
The Email log is a summary of all emailing acting in one place. You can narrow it down to Work Orders or Surveys and see the list in descending order by date time. These same logs are also available within each Survey or Work Order record.
Creating a Checklist Template
Think of a checklist template as the master recipe for a recurring task. You write it once, and from that point on, anyone on your team can follow the same steps every time, at every property without reinventing the wheel. Whether you're building a seasonal HVAC inspection, a roof walkthrough after a storm, or a move-out cleaning verification, templates keep the work consistent and the records clean.
This article walks you through building a template from scratch and explains every option available when setting up each item.
Getting There
Click + New Checklist to open the template panel and get started.
Step 1 — Set Up the Template
The top portion of the panel is the template's identity card — it tells the system what this checklist is, who it belongs to, and how often it should run.
Checklist Title (required)
Give your checklist a name that leaves no room for confusion. Rooftop HVAC Quarterly Inspection will serve you much better than HVAC Check six months from now when you're looking at a list of forty templates.
Minimum 2 characters.
Trade
Assign this checklist to a specific trade — Electrical, Plumbing, HVAC, General Maintenance, and so on, or leave it at Any Trade if the checklist isn't tied to a specific type of work. This determines which work orders and vendors the checklist can be linked to when it's assigned in the field.
Default Start Interval
When this template gets assigned to a fixture, how far out should the first due date land? Enter a number and pick the unit:
|
Unit |
Maximum |
|
Days |
150 |
|
Weeks |
52 |
|
Months |
12 |
Setting this to 3 Months means every new assignment of this template automatically lands 3 months out on the calendar. You can always adjust individual assignments. This is just the sensible default so you're not starting from zero every time.
Instructions (optional)
Got something important to say before the technician even looks at item one? Put it here. The rich-text editor supports bold, italic, lists, tables, and links so you can include safety warnings, required tools, reference documents, or a note like "Do not attempt this inspection during active rainfall." Instructions entered here appear at the very top of the checklist when it's opened in the field.
Step 2 — Save the Template
Click Save Checklist. The record is created and the Checklist Items section appears below. Now for the fun part.
Step 3 — Add Checklist Items
Each item is one task, one inspection point, or one step in the process. Click Add Item to expand the form and fill in the details.
Item Fields Explained
Item Title (required)
Action-oriented titles age better than vague ones.
Check condenser coil for debris and clean if needed is clear, useful, actionable. Condenser coil is technically correct, completely unhelpful.
Minimum 2 characters.
Description (optional)
This is your chance to elaborate. Step-by-step instructions, acceptable tolerance ranges, reference measurements, specific product numbers, safety reminders — anything the person doing this task needs to know goes here. The rich-text editor gives you full formatting including tables, which is handy for things like pressure reading charts or torque spec tables.
Example — Electrical Panel Inspection: Title: Inspect all breakers for heat damage or corrosion Description: Use a non-contact thermometer. Any reading above 140°F on a breaker at normal load warrants flagging. Document the breaker number and reading in the notes field.
Checkboxes (optional)
Some steps aren't one thing — they're five things that all need to happen. Rather than creating five separate items, you can load a single item with a set of sub-checkboxes. Type each one on its own line and the system turns them into individual checkboxes in the field.
Example — Filter Replacement item:
Old filter removed and disposed of properly
New filter installed in correct airflow direction
Filter size and rating logged
Access panel secured
Thermostat reset to schedule
A few things to know:
- Blank lines are ignored
- Duplicates are removed automatically (the system is forgiving if you're copy-pasting from a document)
- Checkboxes can't be used on PPE Detection steps — more on those below
Completion Requirements
Must Complete This Item
The red star treatment. When this is checked, the field technician cannot submit the checklist without addressing this item — no skipping, no sneaking past it. Uncheck only for items that are genuinely optional in every situation, like Photograph optional secondary access panel.
Required items show a red star (✱) in the item list so you can see at a glance which items are locked in.
Default: checked — because most items on a maintenance checklist probably matter.
Zip File Required
When you've attached a zip resource to this item (a wiring diagram, installation manual, or spec sheet — more on that below), checking this box means the technician must download and acknowledge that file before the item can be marked complete. It's the system's way of saying "you actually have to look at this, not just scroll past it."
Notes
Three options. Pick the one that fits the item:
|
Option |
What happens |
|
Note Allowed |
A notes field appears but it's optional. Staff can comment if there's something worth recording. |
|
No Note Allowed |
No notes field. Clean and simple — the item is pass/fail and a comment section would just add noise. |
|
Note Required |
Staff must type something before moving on. Perfect for items where a reading, measurement, or observation has to be on record. |
Example — Note Required use case: Item: Record static pressure reading across the air handler With Note Required enabled, the technician has to enter the actual reading before they can check the box. The number lives in the record forever.
Example — No Note Allowed use case: Item: Confirm unit is powered off before beginning work This is a safety confirmation. There's no measurement to record and no variation — it's either done or it isn't.
Signature Required
When this is checked, the person completing the item has to provide a digital signature before it can be marked done. Use this for safety-critical sign-offs, supervisor confirmations, or any step where accountability needs to be unambiguous.
Example: Supervisor sign-off: all work completed and tested before leaving site
Signature items show a signature icon in the item list.
Images
Two controls work together here:
Max Images Allowed — A dropdown from 0 to 9.
- 0 means no photos on this item at all
- 1–9 sets the ceiling for how many photos can be attached
Image Required — When checked, at least one photo must be uploaded before the item is complete. Only available when Max Images is 1 or higher.
Example — Image Required use case: Item: Photograph equipment nameplate showing model and serial number Set Max Images to 1, check Image Required. The record now always has the nameplate photo attached. No photo, no sign-off.
Example — Max Images without Required: Item: Document any visible damage or wear Set Max to 5, leave Image Required unchecked. If there's nothing to photograph, the technician moves on. If there are five things to document, they can capture all of them.
Illustrations (optional)
These are reference materials you attach to the item — not photos taken in the field. Think wiring schematics, product installation diagrams, floor plan excerpts showing equipment locations, or any visual aid that helps the technician do the work correctly.
- Images open in a full-screen viewer
- PDFs open in a new tab
- Multiple illustrations can be attached to a single item
- Technicians can see them; they can't delete or replace them
Click Upload Illustration to attach files via the media uploader.
Example: Attach the manufacturer's maintenance diagram to a Clean and inspect burner assembly item so the technician has the correct exploded view right there in the checklist without having to hunt for it.
Zip File Resource (optional)
Need to deliver a whole folder of materials to the technician for a specific step? Attach a zip archive. One zip per item, up to 3 GB.
This is the right tool for: firmware update packages, multi-document installation kits, collections of reference PDFs, or software tools needed to complete the task.
Click Upload Zip to attach. If Zip File Required is also checked, staff must download it before the item can be completed.
Can Annotate Images
(Available on accounts with the Annotation module)
Checking this gives field staff the ability to draw directly on photos and illustrations — circling problem areas, adding labels, marking specific locations. The annotations become part of the permanent record.
Example: A roof inspection item where the technician photographs a cracked flashing and then circles the crack and labels it "Active moisture intrusion — NW corner drain" before submitting.
PPE Detection
(Available on accounts with the optional Detection Module)
This one's a bit different. Instead of a standard task item, PPE Detection turns this step into an automated safety verification — the system actually analyzes a photo to confirm the right protective gear is being worn before the step can be cleared.
When enabled:
- The standard form is replaced with the PPE verification panel
- The item becomes required automatically
- The technician must upload a photo, and the system checks it for the selected equipment
Select the gear to verify:
|
Code |
Equipment |
|
VEST |
Safety vest |
|
HELMET |
Hard hat |
|
GLOVE |
Gloves |
|
PERSON |
Person present in frame |
|
BOOTS |
Safety boots |
|
GLASS |
Safety glasses |
Example: For a rooftop electrical inspection checklist, add a PPE Detection step as item one — Confirm PPE before beginning work — and select VEST, HELMET, and GLASS. The technician snaps a selfie in their gear, the system verifies the equipment is present, and only then can they proceed to item two. No gear, no green light.
Managing Items
Reordering
Each item has up and down arrows. Click to shift an item one position. The first item has no up arrow; the last has no down arrow. Build your checklist in the logical sequence a technician would actually follow — don't make them jump around.
Editing an Item
Click anywhere on an item row to expand its edit form. Opening one item automatically collapses the one you were looking at, so the list stays readable.
Deleting an Item
Open the item's edit form and click Delete Item. Permanent — so give it a moment's thought before clicking.
Item Status Icons at a Glance
The item list shows a row of small icons for each item so you can read the configuration without opening it:
|
Icon |
What it means |
|
✱ Red star |
Item is required |
|
Signature |
Signature required |
|
Paintbrush (blue) |
Has an illustration attached |
|
Paint tool |
Annotation enabled |
|
Image |
Photos allowed |
|
Image + red slash |
No photos allowed |
|
Image + checkmark |
Photo required |
|
Comment bubble |
Notes allowed |
|
Comment + red slash |
No notes allowed |
|
Comment + checkmark |
Notes required |
|
Archive icon |
Zip file attached |
A quick scan down the icon column tells you a lot about how a checklist is structured — which items are high-accountability, which are documentation-heavy, and which are straight pass/fail.
Duplicating a Checklist
Built a solid template and need a close variation of it? Open the template and expand the Duplicate section at the bottom of the panel. Give the copy a new name — the system helpfully pre-fills it as [Original Name] COPY — and click Duplicate.
Everything comes along for the ride: all items, all illustrations, all zip files. Edit the copy freely without touching the original.
What Happens Next
A template on its own just sits in the library. The action happens when you assign it to a specific fixture on a property — at that point, a live instance is created with its own due date, completion record, and history. The template stays pristine and reusable. The instance is the real-world paperwork.
Head to the Checklists tab on any property to put your new template to work.
Fixture Checklists: From Assignment to Archive
Checklists are how work gets done, tracked, and proven. Once you've built a template (see the article on creating checklist templates), it's time to put it to work on an actual fixture. This article walks you through assigning a checklist, managing it through completion, and downloading the evidence when the job is done.
Assigning a Checklist to a Fixture
A two-step form appears.
Step 1: Pick your template. The dropdown shows only the templates that match the fixture's trade or are set to "Any Trade," so the list stays relevant. Select your template and click Next.
Step 2: Configure the assignment. Now the fun part:
- Checklist Name is auto filled with the fixture name and template name combined. You can rename it if a more specific name will be better, or add a date to make sure repetitive work is easily found by date.
- Completion Due Date is pre-calculated based on the template's default interval. Adjust it to match the actual deadline.
- Choose A Vendor is optional. If someone needs to do this work, type at least three characters to search and select from your vendor list.
- Vendor Emails appear as checkboxes once you select a vendor. These are the contacts from the vendor's profile who will receive the checklist notification. Check the ones that should get the email. If you're not assigning a vendor yet, leave it blank.
- Instructions pulls in from the template but can be edited here for this specific assignment.
- Upload ZIP Resource is available if you need to attach reference files (like specs or drawings) for the vendor to download when they open the checklist.
Click Create to save the checklist and send notifications to any selected vendor emails.
Checklists and Work Orders
The most common way vendor email recipients are handled is through the work order, not the checklist assignment directly.
When a work order is created for a property and vendor, the Linked Checklists section on the work order page shows any fixture checklists that match the same vendor and property/trade. You can add them to the work order by selecting from the dropdown and clicking Link Checklist. The work order email that goes out automatically includes links to those checklists, so the vendor gets everything they need in one place without you having to send checklist notifications separately.
This means that when you're assigning a checklist to a fixture, you may intentionally leave the vendor email checkboxes unchecked because the work order will handle getting the link to the right people. The direct vendor email option on the checklist is there for cases where you're assigning a checklist outside of a work order and need to notify someone right away.
Making a Checklist Visible to the Public
On any active checklist, you'll see a checkbox labeled Visible on the public site. Toggle this on and the checklist gets a public URL that doesn't require a Sytewise login.
That link can be shared with a vendor or field tech who needs to complete the checklist on a phone or tablet. They see a clean, mobile-friendly version with only the checklist, not the rest of the admin. The link is also included in the notification email that goes out when you assign the checklist.
Watching Progress
Checklists live in three states: Not Started, In Progress, and Complete. A progress bar on the checklist header shows where things stand at a glance.
While a checklist is in progress, each task card shows the vendor what they need to do. Depending on how the template was built, a task might ask for:
- A written note (allowed, required, or not available at all)
- One or more uploaded photos or files
- Simple checkboxes to tick off
- A signature with a typed full name
- A zip file upload (for submitting documents or reports)
Required items must be completed before that step can be marked done. Optional items are there if the vendor needs them.
The vendor taps Mark As Complete on each task when they finish it. The checklist automatically moves to Complete once all required steps are done.
Editing an Active Checklist
Even after a checklist has started, you can make changes. Click Edit on the checklist header to update:
- The checklist name
- The assigned vendor
- The due date
- The instructions
- The attached ZIP resource
Vendor email recipients can be updated here as well. Useful when the original contact changed or you need to loop someone new in.
When It's Complete: Reviewing the Work
A completed checklist shows everything the vendor submitted:
- Notes entered for each step
- Images uploaded (click any thumbnail to enlarge)
- Checkbox responses
- Zip files submitted
- Signatures with the signer's name and timestamp
Click Check All Media to see every photo and file in one view. If any images are worth adding to the fixture's permanent record, use the Add Media to Fixture checkboxes to copy them over.
Downloading All Attachments
When a completed checklist has photos or uploaded files, the Download Assets button appears. Click it and Sytewise bundles everything into a single ZIP file and downloads it to your machine. One click, all the proof.
Deleting a Checklist
The Delete This Checklist button is available at any stage. Deleting is permanent, so Sytewise will ask you to confirm before anything disappears. If the checklist is linked to a work order, you can remove that link separately from the work order page using the delete icon in the Linked Checklists table.
Finding Checklists Across Properties
The main Checklists page (in your navigation) has a search tool for fixture checklists. Filter by status (Incomplete or Complete), property, trade, and date range, then click Find Checklists. Results can be downloaded as a CSV using the download icon at the top of the results table.
Using Checklists with Work Orders
Checklists and work orders are designed to work together. Understanding when to attach a checklist to a work order versus sending it directly to a vendor will help you get better tracking, cleaner records, and less manual follow-up.
How Checklists Connect to Work Orders
When you create a new work order, Sytewise checks for any fixture checklists that match the work order's vendor and property/trade. If eligible checklists exist, they appear at the bottom of the WO creation form and you can select them to include. After the work order is saved, the vendor email that goes out automatically includes direct links to every checklist attached to that WO. The vendor opens one email and has everything they need: the scope of work and the task checklists to complete.
You can also attach checklists to an existing work order. On the work order detail page, the Linked Checklists section shows what's currently attached and provides a dropdown to add more. Only checklists that match the work order's vendor and property/trade will appear in that list.
Tip: A checklist linked to a work order shows up in the WO email automatically. You don't need to send it separately. The vendor gets the checklist link right alongside the work order details.
When to Attach a Checklist to a Work Order
If the work described in the checklist is tied to a purchase order or vendor invoice, attaching the checklist to the work order is the right call. The work order creates the paper trail: who was assigned, when the work was due, what fixtures were involved, and what the vendor was expected to complete. The checklist becomes part of that record, not a standalone item floating outside of it.
Tip: When the work needs to be tracked against a PO or vendor payment, always attach the checklist to the work order. It keeps the accountability in one place and gives you a complete picture of what was scoped versus what was actually completed.
When to Send a Checklist Directly to a Vendor
Sometimes you need to get instructions to someone without generating a work order. If the task is for internal staff, or the vendor relationship doesn't involve a formal PO, or you just need to send a one-off checklist quickly, you can assign a checklist directly to a vendor from the fixture detail page. Sytewise sends the checklist notification email right away with a direct link, no work order required.
Tip: Use direct send when the task doesn't need a work order behind it. A vendor checklist for an informal inspection, a staff task list for routine rounds, or any instruction that doesn't generate an invoice is a good candidate for direct send.
Vendor Reassignment Carries Through Automatically
If you reassign a work order to a different vendor, Sytewise automatically updates the vendor on every checklist linked to that work order, as long as those checklists haven't been completed yet. You don't need to go into each checklist and update the vendor manually.
Tip: If a vendor change happens mid-job, reassign the work order and the open checklists follow automatically. Completed checklists are left as-is since that work was already done by the original vendor.
Deleting a Work Order Releases Its Checklists
When a work order is deleted, Sytewise detaches all linked checklists from it. The checklists themselves are not deleted. They go back to being unlinked fixture checklists, available to attach to a different work order if the work is being re-issued under a new PO or to a new vendor.
Tip: If a work order needs to be cancelled and reissued instead of being reassigned, delete the original WO and the checklists will free up automatically. Then create the new work order and attach them fresh. No need to recreate the checklists from scratch.
Removing a Single Checklist from a Work Order
You don't have to remove the whole work order to unlink a checklist. On the work order detail page, the Linked Checklists table has a delete icon next to each checklist. Clicking it removes the link between that checklist and the work order, setting the checklist free to be attached elsewhere. The checklist itself, and all progress on it, is preserved.
Summary: Attached vs. Direct
|
Situation |
Best Approach |
|
Work tied to a PO or vendor invoice |
Attach to work order |
|
Multiple fixtures, one vendor, one job |
Attach to work order |
|
Informal task, no PO involved |
Send directly from fixture |
|
Instructions to internal staff, no WO |
Send directly from fixture |
|
Quick one-off inspection checklist |
Send directly from fixture |
Adding Parts to Fixtures
A fixture in Sytewise is more than a name on a list. It's a container for the actual equipment that makes a space work: the controllers, panels, processors, cameras, access points, HVAC units, or whatever physical components live inside that fixture's scope. Parts are how you get that equipment into the record, and tracking parts is how the record becomes genuinely useful over time.
This article covers every way to add parts to a fixture, how to use the library system to make repetitive builds fast, and why the investment in building out accurate part records pays off every time something breaks, gets replaced, or needs to be reported on.
Why Track Parts at All
Before getting into the how, it's worth saying a word about the why, because this is the step many teams skip and later wish they hadn't.
When a fixture has documented parts, every work order that touches that fixture tells a more complete story. The technician arriving on-site sees exactly what's installed, where each component is located, the part number, manufacturer, model, and installation date. No guesswork, no calling around to figure out what brand of controller is in the rack.
Status tracking at the part level is where things get even more useful. Each part carries a green or red status. Green means operational. Red means it's a problem. When parts go red, the fixture's overall status reflects it, which feeds into survey reports, work order triggers, and dashboard counts. Over time, the history of which parts went red and when becomes a maintenance record. That record tells you which components fail most often, which fixtures need the most attention, and whether a pattern of failure suggests a systemic issue rather than random bad luck.
For AV integrators, the parts record is essentially the as-built documentation for the installation, structured in a way that survives vendor transitions, staff turnover, and the general amnesia that tends to accumulate over years of managing a complex system.
Finding the Parts Section on a Fixture
Open any fixture from the property detail page or from the Fixtures list. The fixture detail page shows a map or floor plan on the left and a column of cards on the right. The Parts in Fixture card is where all part management lives.
The card has a small toolbar at the top with buttons for Save, Clone, Library, and New Part, plus quick-action buttons for Check All and All Green. The part list loads below. Each part appears as a row with its part number, position, description, and a status indicator.
Adding a Part by Hand
Click New Part to open the part entry modal. The modal has two tabs: New Part and Add From Library. New Part is the one you want for entering a component from scratch.
Required Fields
Part No (Serial No) is required and must be unique within the fixture. This is the identifier you'll use to track this specific component. Use the actual part number, serial number, or a structured internal identifier, whatever makes sense for your workflow. Just make it meaningful because it's what you'll be searching and reporting on.
Description is required and is the plain-language name for this part. "Left Audio Processor," "Rack Controller Unit 2," "East HVAC Compressor." Keep it descriptive enough that someone unfamiliar with the installation understands what they're looking at.
Optional Fields That Are Worth Filling In
Position is a short field (up to 12 characters) for noting where this part lives within the fixture. "Rack 1," "Left Wall," "Bay 3," or coordinates if you're working with a structured grid. Position makes the parts list readable at a glance and helps anyone walking into the space orient themselves quickly.
Manufacturer and Model Number round out the identification of the part. These fields are what connect a part record to a real-world product, which matters when you need to reorder, file a warranty claim, or find a compatible replacement.
Installed Date defaults to today but should reflect the actual installation date if you're backfilling records. This is the starting point for warranty tracking and age-based maintenance planning.
Warranty Expire Date and Warranty Description are there if you want to track coverage. A fixture with expiring warranties worth thousands of dollars is worth flagging before those dates pass.
Table Details is a flexible free-text field that displays as a structured table on the part record. Format it as one item per line with comma-separated label and value pairs. Use it for firmware versions, configuration details, IP addresses, calibration values, or any structured technical data that doesn't have a dedicated field. It's flexible by design and useful for capturing the specifics that matter for your particular type of equipment.
Click Save and the part is added to the fixture. Its status is set to green (operational) by default and a creation entry is written to the part history log.
Cloning a Part
You can clone any part already created in your account. This may come in handy if you have redundant parts, especially ones with a lot of detail. Cloning parts places the cloned part within the original Fixture. To copy a part (or a select set of parts) into another fixture look into create a Library of that part (or parts) to reuse elsewhere.
To Clone a Part:
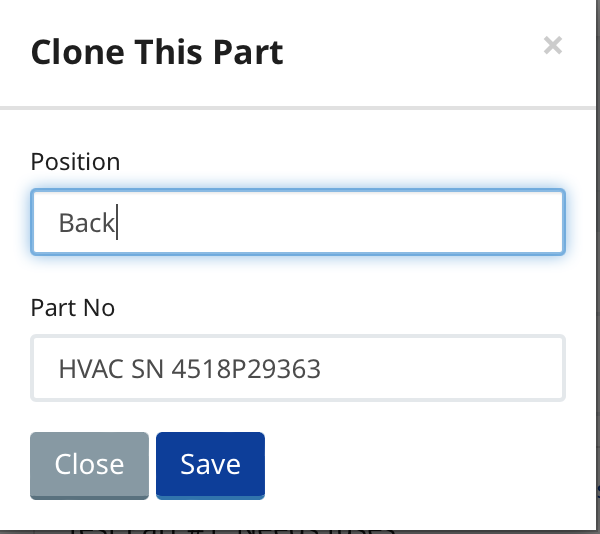
This is the right tool when you're documenting a row of identical display panels, a bank of matching controllers, or any configuration where the components share the same specs but need individual identifiers. Clone the first, give each copy a unique part number and position, and you've built out the full inventory in a fraction of the time it would take to enter each record separately.
Adding Parts from the Library
The Library is where the real portfolio-scale efficiency lives.
What the Library Is
A library item is a saved snapshot of a part record, stored at the account level and available to any fixture across any property in your portfolio. It captures every field: part number, description, manufacturer, model, position, all technical specifications, and any structured detail data. You create a library item once and apply it to as many fixtures as you need, each time generating a fresh part record with the stored specifications and whatever installation date you set for that specific deployment.
This is the feature that transforms the difference between managing five identical fixtures and managing five hundred of them. The specs are defined once. Every fixture that uses that component type gets its part records from the same source.
Saving a Part to the Library
Before you can use the library, you need to save something to it. In any fixture, select one or more parts by checking their checkboxes. Click the Library button in the toolbar. The modal asks for a Library Title, up to 24 characters. Give it a name that will make sense when you're searching for it from a completely different fixture six months from now. "Samsung SB-1 Controller v2.3" is more useful than "Controller."
Click Save and the part is stored in the library with its complete field data serialized and ready to redeploy.
Applying a Library Item to a Fixture
On any fixture, click New Part and switch to the Add From Library tab. A list of all saved library items in your account appears as radio buttons. Select the one you want, set the Parts Install Date for this specific installation, and click Add From Library.
A new part record is created with all the stored specifications from the library item and the installation date you specified. The part is independent from the library item from that point forward. Changes to the library item don't affect parts already deployed from it, and changes to the deployed part don't affect the library item or other fixtures that used it.
Where the Library Shines
Consider a portfolio of retail locations, each with the same model of HVAC unit, or a chain of venues all running the same AV platform. The first time you document that equipment at one location, you build the parts records carefully: correct part numbers, model numbers, firmware versions, all technical details accurate and complete. You save those parts to the library.
At every subsequent location, you open the fixture, click New Part, switch to Add From Library, select the part, set the install date, and move on. The record is as complete and accurate as the first one without any additional data entry. Multiply that across dozens or hundreds of locations and the time savings are substantial. More importantly, the consistency is perfect. Every location's records describe the same equipment in the same way, which makes cross-portfolio reporting and maintenance planning dramatically cleaner.
The library also serves as an institutional knowledge base. If a particular component type has specific technical details that a new team member wouldn't know off the top of their head, those details live in the library item and deploy with every new installation automatically.
Managing Part Status
Parts are either Status “On” or “Off”
![]()
![]()
You change part status directly in the parts list on the fixture page. Each part has a colored status indicator (green circle for operational, red for problem). Toggle the checkbox next to any part to flip its status. You can change multiple parts at once and then click Save to write all the changes to the database in a single operation.
Surveys and Work Orders can affect changes to parts statuses as well.
Two quick-action buttons at the top of the parts section make bulk updates easier:
All Green sets every part in the fixture to operational status at once. Useful after a service call where everything was repaired or replaced.
Check All selects all parts, which is the first step if you want to perform any bulk action on the whole set.
When parts go red, the fixture's overall status score recalculates automatically. A fixture with three working parts out of five shows a different health status than one where all five are green. Those status calculations feed into property reports, survey summaries, and the dashboard fixture counts, which means part-level accuracy translates directly into portfolio-level visibility.
Part History
Every part carries a log of changes. In the edit modal for any part, a Show Part Log link at the bottom expands a table showing every recorded event for that part: when it was created, when its status changed, when its part number was updated, and who made each change. Each entry includes the date and the admin user responsible.
This history is also available as a dedicated print view from the part detail page, showing the 100 most recent log entries alongside the part's full specifications.
The history is what turns a part record into a maintenance document. A part that has gone red three times in eighteen months is telling you something. A part that's been green since installation day is telling you something different. You can't have that conversation without the log.
Reference Articles
If your account has the Reference module enabled, parts can be linked to reference articles stored in the system. Reference articles are technical documents, installation guides, configuration references, or any documentation relevant to a specific component type. They link at the model number level and appear on the part detail page and in the fixture print report.
For AV integrators managing complex equipment, linking reference articles to part records means the technical documentation travels with the equipment record rather than sitting in a folder somewhere that only one person knows about.
A Note on the Display Grid Module
If your account uses the Display Grid module for managing LED display systems and media walls, the part form includes additional fields for controller and cabinet components: firmware versions, FPGA and Valens revisions, resolution, grid location coordinates, IP addresses, and LED batch codes. These fields support a structured hierarchy where cabinet panels are linked to their parent controller, and the whole configuration can be built using the grid builder tool or imported from CSV files exported from the display manufacturer's software.
The library system is particularly valuable for Display installations because the technical specifications for a given display configuration are extensive and consistent across deployments. Save the controller and cabinet specs to the library once and every subsequent installation of the same display system starts with a complete, accurate part record.
Creating and Managing Fixtures
A fixture is the unit of work in Sytewise. Properties hold trades, trades hold fixtures, and fixtures are where the actual equipment lives: the lights, the HVAC units, the AV systems, the access points, the cameras, or whatever physical asset you're tracking and maintaining. Getting fixtures built accurately is what makes work orders, surveys, checklists, and reports meaningful. This article covers every way to create a fixture, how to delete one, and what to think about before you do.
Finding the New Fixture Form
Fixtures are created from the property detail page. Open the property, navigate to the trade where the fixture belongs, and look for the New Fixture button in the fixtures section. The modal that opens has two tabs: New Fixture for building one from scratch and Add From Library for deploying a saved template. There is also a separate Import option for bulk creation from a CSV file, and a Clone option for copying an existing fixture within the same property.
Creating a Fixture by Hand
The New Fixture tab has four fields.
Fixture Name is required and should be short and specific. The form even suggests the format: "Pole Light 1" or similar. This name appears in the fixture list, in work orders, in surveys, and in reports. A name that makes sense in isolation, without needing the surrounding context to interpret it, is worth the extra thought up front.
Description is also required and gives you room to add more detail. Where the name is a label, the description is a sentence. "Northwest corner LED pole light on Circuit 4" tells the next technician something useful.
Type is a dropdown populated from the fixture types configured in your account. Fixture types represent categories or classifications for your equipment, such as height classes for outdoor lighting or equipment categories for AV systems. If the type you need isn't in the list, it needs to be added by an account administrator before you can use it.
Vendor is pre-filled with the default vendor for this property/trade combination. If a different vendor is responsible for this specific fixture, search by name and select the right one.
Click Save and you land on the fixture detail page. From there you can add parts, position the fixture on the map or floor plan, add images, and assign it to a group. The fixture starts with zero parts, a blank status, and its position set to the property's center coordinates. Repositioning it right away is a good habit before the list gets long.
Positioning a Fixture
Every fixture needs a position on the property map so it can be identified visually alongside its neighbors.
GPS-based based trades use Google Maps. The fixture marker starts at the property's center point and can be dragged to the correct location. Click and hold the marker on the map and move it to where the fixture actually lives. The coordinates update automatically when you drop it.
Floor plan based trades use an uploaded image of the building or site layout instead of a map. The fixture marker appears on that image and is dragged into position the same way. This mode is common for interior spaces where GPS coordinates don't distinguish one room from another.
Which mode a trade uses is set at the trade level on the property. All fixtures within a trade share the same positioning system.
Creating a Fixture from the Library
If a fixture you need to add is the same as or very similar to one you've already built and documented elsewhere, the library saves you from rebuilding it from scratch.
Click New Fixture and switch to the Add From Library tab. A list of saved fixture library items appears as radio buttons. Each item represents a complete fixture snapshot including all its parts, specifications, and technical detail. Select the one that matches what you're installing, set the Parts Install Date (which becomes the installation date recorded on every part created from the template), and click Add From Library.
The system creates the fixture and all its parts in one operation. Every part field from the library item, part number, description, manufacturer, model number, firmware versions, and all technical detail fields, is copied to the new fixture. The install date you entered is applied to each part record.
The Include Groups checkbox is worth knowing about. If the library item was part of a group when it was saved, checking this box recreates that group association on the new fixture. Leave it unchecked if you want the fixture to start ungrouped and organize it later.
After creation you land on the fixture detail page with a fully built part inventory already in place. The main thing to do immediately is position the fixture on the map, since it will be sitting at the property center point until you move it.
Saving a Fixture to the Library
To save a fixture to the library, go to the fixture detail page and click the Library button in the parts section. Enter a library title up to 24 characters and click Save. Everything is captured: the fixture definition, every part record with its full specifications, wiring diagrams, and group associations. That snapshot becomes available immediately on the Add From Library tab for any fixture on any property in your account.
The library title is what you'll be selecting from a list later, so make it descriptive. "Standard 20ft LED Pole w/ Driver" or "Samsung 3x4 ION Wall v2.1" will serve you better than something generic.
Cloning a Fixture
Cloning creates an exact copy of an existing fixture within the same property. It's the right tool when you have multiple identical or nearly identical fixtures at the same location and don't want to enter the same specifications repeatedly.
Select the fixture you want to clone from the property fixture list (the checkbox next to the fixture row), then click Clone. A small modal asks for the new fixture name. That's it. Everything else, description, type, vendor, all parts with their full specifications, and group memberships, copies from the original.
Cloned parts are initially marked with "CLONE" in the part number, signaling that they need to be updated with the actual serial or part numbers for the specific units being documented. The fixture drops at the property center point, so reposition it on the map as soon as it's created.
Clone is different from the library in one important way: cloning works within a single property in the moment, while the library persists configurations for use across properties and over time. For adding the second of two identical fixtures on the same site, clone is faster. For deploying the same fixture configuration across twenty properties, the library is the right tool.
Importing Fixtures from a CSV File
When you have a large number of fixtures to add to a property at once, the import tool lets you upload them all from a spreadsheet.
The import modal accepts a CSV file with one fixture per row. The columns, in order, are:
- Fixture Title (required, minimum three characters)
- Fixture Description (defaults to the fixture title if left empty)
- Total Parts in Fixture (required, between 1 and 50)
- Part Number (defaults to the fixture title if left empty)
- Part Description (defaults to the part number if left empty)
- Part Position (optional)
- Part Manufacturer (optional)
- Part Model Number (optional)
- Fixture Height in Feet (required, as a whole number)
A sample CSV file is available to download directly from the import modal so you can see the exact format before building your file. The import also has a checkbox for "First row is a header row, so ignore it" in case your spreadsheet includes column headers.
After you upload the file, Sytewise shows you a summary table of what it parsed. Any rows with errors are highlighted so you can correct them before committing. If everything looks good, click Finish Import to create all the fixtures at once. All imported fixtures start at the property center point and will need to be repositioned.
The import is best suited for properties with a large number of uniform fixtures where the basic data (name, type, part number) is already organized in a spreadsheet. It creates one part per fixture based on the single row of part data provided. For fixtures with multiple parts or complex specifications, adding parts individually after import gives you more control.
Fixture Groups
Fixtures can be organized into groups within a property. Groups are useful for representing physical clusters of equipment: a bank of lights on a single circuit, the displays on one wall of a venue, or the HVAC units serving a specific zone.
To add fixtures to a group, select them using the checkboxes in the fixture list and open the group modal. You can either create a new group name or add the selected fixtures to an existing group. A fixture can only be in one group at a time.
Group names are stored in lowercase with spaces and dashes converted to underscores. Keep them short and descriptive since they appear as labels on the property map.
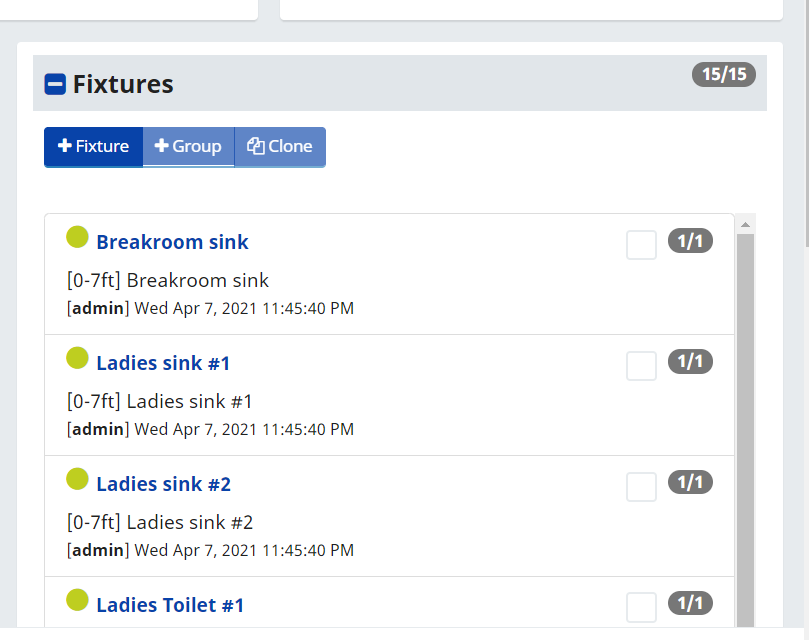
Select the checkbox next to each fixture that you would like in the Group.
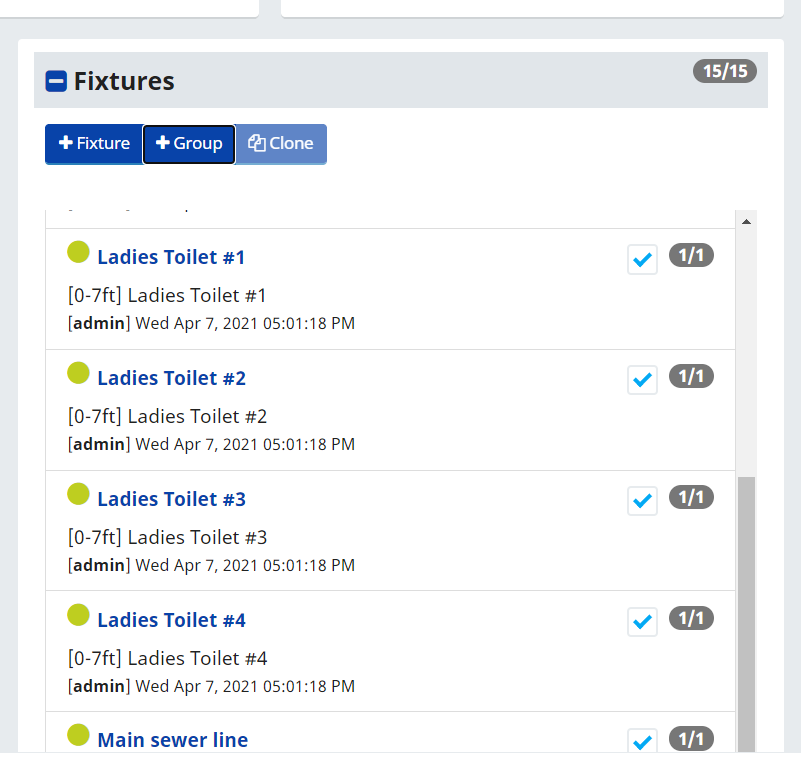
Once you select a Fixture you will notice that the +Group button become active. Select the Group button and type in the Name of the Group for the list of Fixtures you have selected.
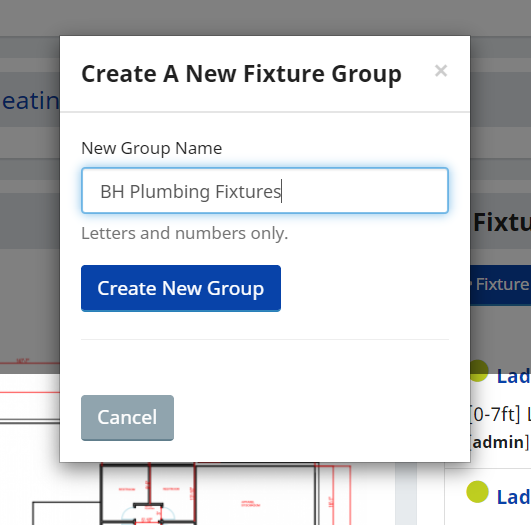
Click Save. Now you can view just the items in that group by selecting it from the Group Selection pull down menu and the presence of a Group title just beneath the Selection box.
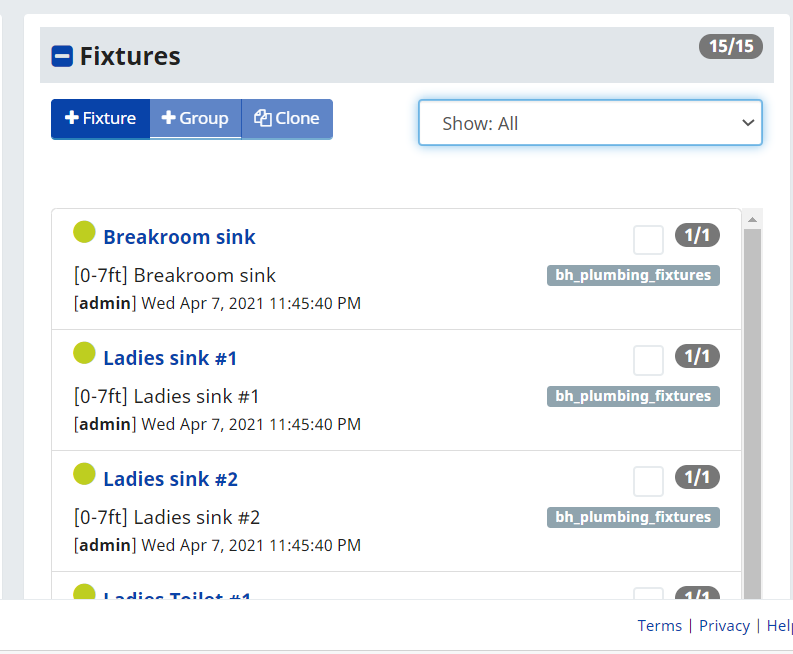
Deleting a Fixture
Deleting a fixture is done from the fixture list on the property detail page. Select the fixtures you want to remove using their checkboxes and click the delete action. Sytewise uses soft deletion, meaning the fixture record is marked inactive rather than permanently erased. The fixture disappears from the active list but its history, logs, and associated records remain in the database.
A few things to know before deleting:
Parts are not deleted. The parts inside a deleted fixture become orphaned in the database. They don't disappear, but they're no longer accessible through the fixture's detail page. If the part records contain important documentation or history, consider whether the fixture should actually be deleted or simply left inactive.
Work orders and checklists are not automatically cleaned up. Any open work orders or checklists that referenced the fixture remain in the system but lose their connection to an active fixture record. Close out or reassign those items before deleting the fixture if clean records matter.
Group memberships are cleaned up. When a fixture is deleted, its group association is also marked inactive, so it won't leave behind a ghost entry in the group.
There is no built-in undelete. The soft-delete approach means recovery is technically possible at the database level, but there is no UI to restore a deleted fixture. Delete if you are confident that you're done with the fixture, such as being replaced or abandoned.
The practical guidance: if a fixture is being replaced, update its parts to reflect the new equipment rather than deleting it. The fixture record and its history are more valuable than a clean list. Delete when a fixture genuinely no longer exists at the property, not just because it was serviced or upgraded.
Additional Reading: ADDING PARTS TO FIXTURES, CHECKLIST TEMPLATE, PROPERTY PAGE
Creating and Managing Displays in Sytewise
Overview
If you are installing or documenting a multi-panel LED display, Sytewise has a purpose-built toolset to capture everything from grid layout and network groups to per-panel firmware data and cable routing diagrams. The workflow starts with Cabinet Presets, moves through a visual grid builder inside the fixture record, and finishes with wiring diagram documentation. For Samsung installations, there is a direct import path using Samsung SBox CSV exports that gets you to a fully documented fixture record in a fraction of the time.
This guide walks you through the whole process.
Display Grids is an additional module in Sytewise, developed for AV Integrators and Facility Managers. If you need this feature in your account, contact Sytewise and we'll add it to your profile.
Cabinet Presets
Before you build your first grid, spend a few minutes setting up Cabinet Presets. Think of presets as reusable panel profiles -- you store the technical specs for a cabinet model once, and then apply them with a single click every time you build a grid using that panel. Every cabinet in the grid inherits those values automatically, though you can always edit individual panels afterward.
Tip: If your team regularly works with a handful of panel models, getting those presets built before installation day will save you real time on the job site.
Getting to Cabinet Presets
Creating a New Preset
Click Add a New Cabinet Preset. A form appears on the left side of the page. Fill in the following fields:
Cabinet Preset Name (required): Give this something you will immediately recognize in the grid builder dropdown. Including the manufacturer and model works well -- for example, "Absen A2715 2.5mm" or "Leyard LVA146 1.46mm."
Cabinet Resolution (required): The native pixel dimensions of one cabinet, entered as width x height. A cabinet with 384 columns and 216 rows would be entered as 384x216. The grid builder uses this value to calculate proportional sizing and total pixel output for the display.
Part No / Serial No: The manufacturer part number for this cabinet model. When the preset is applied, this populates the part number field on every cabinet record in the grid.
Description: A short plain-language note about the panel. Useful for anyone looking at the fixture record later who needs a quick reminder of what they are looking at.
Manufacturer Name: The panel manufacturer.
Model Number: The manufacturer model number for this cabinet.
The next four fields are the firmware and hardware configuration values. They are optional on the preset, but if your team maintains consistent firmware versions across a panel family, storing them here means they carry through to every grid you build with that preset automatically:
CFPGA: The FPGA firmware version for the cabinet receiving card or module. This identifies the programmable logic firmware layer and is used to verify consistency across panels.
FW: The main cabinet firmware version running on the receiving card, distinct from the FPGA layer.
Valens: The Valens chipset firmware version, relevant for panels using Valens-based signal distribution. Not applicable to every manufacturer.
OSD: The on-screen display firmware version or configuration string.
Click Create Preset when you are done. The preset appears immediately in the list on the right.
Tip: You can create as many presets as you need. One per panel model your team regularly deploys is a practical starting point. Deleting a preset later does not affect any grids that were already built from it -- those cabinet records already have the values baked in.
Editing and Deleting Presets
Click the pencil icon on any preset to open its edit form. All fields are editable. Click Update Preset to save your changes. Click the trash icon to delete a preset, and confirm when prompted.
Getting to the Grid Builder
Display grids live inside fixture records, which live inside properties. To reach the grid builder:
- Open the property that contains the display you are working on.
- Select the fixture for that display.
Once you are on the fixture page, look for these three action buttons:
Import Samsung Panels -- Starts the Samsung SBox CSV import workflow, which builds a complete grid from files exported directly by the Samsung SBox controller. See the Samsung section at the end of this guide for details.
Create Grid (appears when no grid exists yet) or Edit Grid (appears after a grid has been saved) -- Opens the interactive grid builder where you configure, visualize, and save the full cabinet array.
Add Wiring Diagrams -- Opens the diagram canvas for documenting signal, control, and power cable routing. This button is available after a grid has been created.
Creating a New Grid
Click Create Grid. A full-width editor panel opens at the top of the fixture page and walks you through three steps.
Tip: Grids up to 10 cabinets wide display fully within the standard view. For displays wider than 10 cabinets, the grid area adds horizontal scroll bars so you can navigate the full layout on any device -- including a handheld wireless device on the job site. No need to lug a laptop if you are working on a large installation.
Step 1: Build the Grid
This step defines the physical structure of the display.
Controller Name: Enter a name for the controller driving this display. This becomes the label on the controller record in the parts list -- something like "Main SBox" or "LED Controller A" works well.
Cabinet Preset: If you have presets defined, a dropdown appears here. Select the preset for the panel model you are installing. This applies the resolution, manufacturer, model, and firmware values to every cabinet in the grid. The default option is Standard Cabinet 650x480, which is a useful starting point if you plan to set resolution manually in the next step.
Cab/Panel Prefix: A short alphabetic prefix used to label each cabinet. The system combines the prefix with row and column coordinates to generate part numbers -- for example, prefix "C" produces C-0-0, C-0-1, C-1-0, and so on. Only alpha characters are accepted. The default is "C" and that works for most installations.
Columns x Rows: The physical layout of the display entered as columns first, then rows. A display four cabinets wide and three tall would be entered as 4x3. Think of it as the landscape footprint of the display as viewed from the front.
Click Build Grid. The cabinet array appears as a proportionally sized visual grid. Each box represents one physical cabinet, labeled with its auto-generated part number and current pixel dimensions. The grid scales to fit no matter how large the display is, and scroll bars appear automatically on wide displays.
Step 2: Set Cabinet Resolution
After building the grid, the editor moves you to the resolution step. For a standard display where every cabinet is the same model, your preset has likely already handled this. For mixed-resolution displays or any non-standard configuration, this is where you make individual assignments.
To select cabinets, click individual boxes on the grid. A number appears on each selected cabinet showing the selection order. Along the top edge of the grid you will see small column selector icons, and along the left edge you will see row selector icons. Clicking a column selector selects every cabinet in that column in one click. Same for rows. On a 12-wide display, that single click saves you a lot of individual tapping.
Once you have selected the cabinets you want to adjust, enter the new resolution in the width x height field and click the checkmark button. The selected cabinets update and the grid redraws to show the new proportions. Use the clear selection button to deselect everything and start a new selection group.
Click Next when your resolution assignments are correct.
Step 3: Assign Groups and Omit Panels
This step maps cabinets to their network groups and handles any gaps in the physical layout.
Assigning groups: Select a set of cabinets using the same click or column/row selector approach from Step 2. Enter the IP address or group name for those cabinets in the field and click Set Group. The selected cabinets immediately color-code to that group and a brief confirmation message appears. Repeat for each group in the installation. Most displays have one group per SBox output port or per network subnet, but there is no limit on the number of groups you can define.
Omitting panels: Some displays have an irregular shape -- an L-configuration, a cutout for a camera housing, or a deliberate gap in the panel arrangement. Select the cabinets that represent those empty positions and click the omit button (the ban icon). Omitted cabinets are marked distinctly in the grid view and excluded from the grid layout while still holding their position. This lets you accurately document any non-rectangular configuration without faking the grid dimensions.
Tip: The color-coding by group makes it easy to do a visual sanity check before saving. If a cabinet shows the wrong color, select it and reassign the group before you move on.
Step 4: Save
Click Save Grid. Sytewise creates a controller part record and individual cabinet part records for every non-omitted position in the grid. The editor closes and the fixture page refreshes, now showing the Edit Grid and Add Wiring Diagrams buttons along with a visual representation of the completed grid.
Editing an Existing Grid
Click Edit Grid on the fixture page to reopen the grid editor. The saved grid loads and you have two targeted editing options.
Editing Resolution
Click Edit Resolution. The grid loads in an editable state with the column and row selectors active. Select the cabinets you need to change, enter the new dimensions, and click the checkmark. When you are done, click Save Resolution. The parts database updates immediately and the grid redraws.
Editing Groups
Click Edit Groups. The saved grid loads with all existing group color-coding visible so you can see what is currently assigned. Select the cabinets you want to reassign, enter the new IP or group name, and click Set Group. When all assignments look right, click Save Groups.
Exporting and Importing Cabinet Data
After a grid is saved, Sytewise provides a CSV-based workflow for loading site-specific data into the cabinet records in bulk. Serial numbers, firmware versions, warranty dates, model numbers, IP assignments -- anything that is easier to fill in on a spreadsheet than clicking through individual cabinet records gets handled here. This is the manufacturer-agnostic path. Samsung users have an additional option covered in the next section.
Exporting the Cabinet CSV
From the fixture page with an existing grid, open the Edit Grid panel and click Download. Sytewise generates cabinets_data.csv and your browser downloads it automatically. Open it in Excel or any spreadsheet application.
The file contains one row per cabinet. Three columns are locked and must not be modified:
ID_No_Change: The internal Sytewise part ID used to match each row back to the right database record on import. Do not touch this one.
res_No_Change: The resolution on record for this cabinet.
loc_No_Change: The stored position coordinates.
Every other column is editable: partno_serialno, description, ip_group, cabid, warr_desc, warrantytime, mfg, modelno, cfw, cfpga, valens, osd, coord, and batchcode.
Fill in the site-specific data across all rows and save the file as CSV when finished.
Tip: This is a natural handoff point between the installation team and the project documentation team. A technician captures serial numbers and firmware versions during installation, fills in the spreadsheet, and hands it back. One import and the fixture record is fully populated as-built.
Importing the Updated CSV
Use the CSV upload control in the Edit Grid panel. Select your completed file and click Upload. Sytewise processes each row, matches records by the ID_No_Change value, and updates the cabinet fields in the database. A success message confirms how many records were updated, and the parts list and grid view refresh automatically.
Wiring Diagrams
After a grid is saved, click Add Wiring Diagrams on the fixture page. A drawing canvas opens as a modal overlay with the display grid as a visual reference layer underneath. You can create multiple named diagrams per fixture, each on its own canvas.
The drawing tools let you add lines, shapes, and annotations over the cabinet grid to document how cables are physically routed. The most common uses are:
Video Signal: The path from the media player or video processor through the SBox controller to each cabinet, including daisy-chain or star topology routing.
Control Signal: Network or control data paths, switch connections, IP addressing, and any serial control runs.
Power: Power distribution layout, panel circuit assignments, PDU connections, and cable entry points.
Keeping signal, control, and power on separate named canvases rather than combining everything into one diagram makes the documentation much easier to read during a service call at two in the morning.
Tip: Wiring diagrams are accessible to anyone with access to the fixture record, including field technicians doing maintenance or repair. A well-documented diagram can save hours of troubleshooting when the original installer is not available.
Samsung Panel Import
For Samsung LED installations, Sytewise supports a direct import path using the CSV exports from the Samsung SBox controller. An AV technician typically runs this import during installation. Once in the system, the fixture record is available to everyone doing ongoing repair and maintenance -- no need to rebuild it later.
Click Import Samsung Panels on the fixture page. A two-panel import interface appears.
Upload Samsung SBox CSV: The left panel accepts a drag-and-drop or file-select upload of the SBox CSV file exported from the Samsung controller. Drop your SBox file here or click Select A File. The system reads the controller data and establishes the grid structure and controller record.
Upload Cabinet CSV: The right panel accepts the accompanying cabinet CSV containing individual panel specifications -- serial numbers, cfw, cfpga, Valens, OSD settings, batch codes, warranty information, model numbers, IP group assignments, and coordinates. Drop the cabinet file or click Select A File.
Sytewise processes both files together and creates the complete fixture record: the controller part, all cabinet parts, and the visual grid.
Tip: The Samsung import does in two file uploads what would otherwise take a manual grid build plus a full cabinet CSV import. Once it is done, the fixture behaves exactly like any other saved grid -- you can edit resolution and groups, re-import an updated CSV, and add wiring diagrams the same way.
Note: Samsung panels are the one case where the SBox CSV drives the initial grid creation. For every other manufacturer, build the grid manually using the Create Grid workflow, then use the CSV export/import workflow to populate the site-specific cabinet data.
Getting Help
If something is not behaving the way you expect, or you run into an error not covered here, reach out to your Sytewise account administrator. When you contact them, mention which step you were on and what you were trying to do when the issue occurred. A screenshot is worth a thousand words if you can grab one.
Additional Reading: ADDING PARTS TO FIXTURES, CREATING AND MANAGING FIXTURES
Vendor Forms: Compliance, Certification, and Credentials
Every vendor who works on your properties brings something with them beyond tools and a truck. They bring qualifications, certifications, safety training, signed agreements, and sometimes a history you need to verify before they set foot on a job site. The Vendor Forms feature gives you a structured way to collect, store, and search all of that information in the same system where you track their work orders, insurance certificates, and service history.
Forms live in the Vendor Portal where vendors fill them out and submit them. The admin side is where you manage which vendors see which forms, review what's been submitted, and search across all submissions when you need to find something specific.
This article covers how the assignment system works, what you can do with it, and how to use it for a range of real-world documentation needs.
What Vendor Forms Are
A vendor form in Sytewise is a structured data collection tool presented to vendors through their portal. It can contain any combination of text fields, dropdowns, checkboxes, file uploads, and digital signatures. When a vendor fills one out and submits it, the answers are stored permanently and searchable from the admin portal.
Forms are built by the Sytewise team. Your job as an admin is deciding which forms your vendors need to complete and under what circumstances. The system gives you precise control over that, with three distinct levels of assignment.
The Three Levels of Form Availability
Understanding how forms reach vendors is the key to using the system well.
Level 1: Platform-Wide Forms
Some forms are made available by Sytewise across all accounts. These appear in every vendor's portal regardless of any action on your part. They typically cover foundational things that any professional vendor relationship might require: basic safety acknowledgments, standard terms of service, or platform-wide credential declarations.
You can see which forms fall into this category from your Forms page. They are displayed in blue and labeled "All Vendors See These Forms."
Level 2: Account-Wide Forms
Your account can designate certain forms as required for every vendor in your roster. When a form is assigned at the account level, it appears in the portal for all of your vendors, not just the ones you specifically targeted. This is the right level for policies and requirements that apply to your entire operation regardless of the specific job or client.
Examples where account-wide assignment makes sense:
- A master vendor agreement that all contractors must sign before working with your company
- A background check authorization form required by your organization's policy
- An emergency contact and incident notification form you need on file for everyone
Account-wide forms also appear in blue with the "All Vendors See These Forms" label, alongside the platform-wide forms.
Level 3: Vendor-Specific Forms
The most targeted level. You assign a form to one specific vendor, and only that vendor sees it. This is where the real flexibility comes in. It lets you apply requirements selectively based on who the vendor is, which client they're working for, or what kind of work they're being asked to perform.
Vendor-specific forms appear in green and are labeled "You Assign These Forms."
The distinction between account-wide and vendor-specific is the core of the system. Not every form needs to go to every vendor. A security clearance form for a client with government contracts only needs to go to the vendors working that client's properties. A specialized chemical handling certification only applies to certain trades. A site-specific safety briefing is only relevant to vendors assigned to that client. Vendor-specific assignment lets you apply the right forms to the right people without cluttering the portal for vendors who don't need them.
Managing Forms from the Admin Forms Page
The Forms List
The left panel shows all forms currently in play for your account, organized by assignment level. Each form displays with a color-coded badge:
- Blue for platform-wide and account-wide forms (all your vendors see these)
- Green for forms you have assigned to specific vendors
Clicking on any form in the list loads its detail on the right panel, including a list of submissions with the vendor name, submission date, and the answers they provided. You can expand any submission to read the full response.
Assigning a Form to a Specific Vendor
To assign a form to a specific vendor from the Forms page, select the form from the list and use the assignment controls in the detail panel. The change takes effect immediately and the form appears in that vendor's portal the next time they log in.
The other path to per-vendor assignment is from the vendor's own profile page. Open any vendor, find the HSE Forms section on their profile, and you will see the full list of forms with toggles showing which are currently active for that vendor. Turn any form on or off directly from there. This is the most efficient path when you are onboarding a vendor and want to set up all their required forms in one place.
How Vendors Complete Forms
When a vendor logs into their portal, any forms assigned to them appear in the HSE Forms section of their navigation. Each form card shows the form name and how many times it has been submitted.
Vendors fill out the form directly in the portal. Depending on how the form is built, they may be entering text, selecting options from a dropdown, checking checkboxes, uploading files, or providing a digital signature. When they hit Submit, the answers are captured and stored under their vendor record.
Once-Only Forms
Some forms are designed to collect information that replaces itself each time it is updated. A vendor agreement is a good example: you want the most current signed version on file, not a stack of historical copies cluttering the submissions list. Forms with this behavior are called "once-only" forms.
When a vendor submits a once-only form, their previous submission for that form is marked as replaced. The new submission becomes the current record. This keeps credential and certification forms clean without losing the fact that a new submission was made.
Forms that are not once-only accumulate submissions over time. This is the right behavior for incident reports, safety meeting logs, or any form where multiple submissions represent separate events rather than updates to a single record.
Searching Submissions
The Search Form Submissions section at the top of the Forms page is one of the most operationally useful tools in the system. You can search across every form submission in your account by keyword, and narrow the results by form type and property.
How to search:
- Type a search term into the search field and click the plus button to add it as a tag. You can add up to four terms.
- Optionally select a specific form from the "Search What Form?" dropdown to limit results to one form type.
- Optionally enter a property name in the property filter to find submissions associated with work orders at a specific location.
- Click Search Forms.
The results show each matching submission with the vendor name, the form it came from, the property it was associated with (if any), the submission date, and the specific answers that matched your search terms.
This is powerful when you need to find things you would not naturally remember to look for. If a vendor claims they have a certain certification and you want to verify what was submitted, search their company name and the certification type. If you need to pull every submission mentioning a specific chemical or procedure, search that term across all forms at once. If an incident occurred at a property and you need to find all documentation submitted in connection with it, filter by that property.
Practical Use Cases
The forms system is flexible enough to handle a wide range of vendor documentation needs. Here are examples that show the range.
Vendor Onboarding and Prequalification
A prequalification form sent to all new vendors before they are approved for assignments. Fields include trade certifications held, years of experience, number of licensed technicians, references, and a signature acknowledging they have read and accepted your vendor code of conduct.
Assign it at the account level so every vendor in your roster completes it. Mark it as once-only since the signed acceptance needs to reflect the most current version of your terms. When you onboard a new vendor, the form is already waiting in their portal.
Background Check Authorization
Some clients require background checks for all personnel entering their facilities. Rather than managing this outside the system, a background check authorization form lets vendors complete the required consent and provide the necessary information, then upload the actual check results as a file attachment.
Assign this form specifically to vendors approved to work that client's properties, not to your entire vendor roster. Use vendor-specific assignment for each vendor in scope.
Site-Specific Safety Briefing Acknowledgment
A client with a specific on-site hazard, a secure facility, or a detailed safety protocol needs vendors to confirm they have read and understood site-specific procedures before entering. A safety briefing form with checkboxes for each key requirement and a signature field at the end captures that acknowledgment formally.
Assign this form to each vendor dispatched to that client's properties. The submission becomes your documentation that the briefing was received and acknowledged.
Certification and License Verification
AV integrators often need manufacturers' certifications or specialized training before working on proprietary systems. An annual certification renewal form with a file upload for the certificate, fields for the certifying body and license number, an expiration date field, and a signature field creates a clean record that replaces itself each time a renewed certificate is submitted.
Mark this as once-only. When a vendor's certification expires and they renew, the new submission replaces the old one and you always have the current credentials on file. Use the search function to find any vendor whose submitted certification mentions a specific manufacturer or platform.
Work Authorization for Restricted Clients
Some clients require formal approval before any vendor performs work on their behalf. A work authorization form with fields for the project name, scope of work, authorization date, and a signature from a named client representative gives you a signed record for every job.
Assign this form individually to vendors only when they are being dispatched to that specific client's properties, not as a standing assignment across the whole account.
Incident and Injury Reporting
When something happens on site, documentation needs to happen quickly and consistently. An incident report form captures the essential information while it is fresh: who was involved, what happened, where on the property, what time, what immediate actions were taken, who witnessed it, and whether medical attention was sought.
For injuries, separate forms handle different severity levels: a First Aid Report for minor injuries treated on site, a Medical Aid Report when professional medical attention was needed, and a Lost Time Report for injuries resulting in absence from work.
These forms are assigned at the account level because any vendor could have an incident at any property. Vendors submit immediately following the event. The admin team can search for the submission by property or vendor name and has a complete documented record that supports any follow-up process.
A Near Miss Report form captures events that did not result in injury but had the potential to. These are often the most actionable reports because they identify hazards before someone gets hurt. Making near miss reporting simple and expected is good safety culture, and Sytewise makes it easy to build that expectation into every vendor relationship.
Safety Program Submission
Some clients or jurisdictions require vendors to demonstrate that they have a formal Health, Safety and Environment program in place before being approved for work. An HS&E Program Submission form asks the vendor to document their safety program: whether they have a written policy, who is responsible for safety in their organization, what training their workers receive, whether they carry specific certifications, and what their incident rate history looks like. A file upload field lets them attach their written program documentation.
This is naturally a once-only form, updated when the vendor's program is renewed or revised. Assign it to vendors working clients or jurisdictions with this requirement.
Keeping Submissions Organized
Use descriptive form names. Know which forms are which and why each one exists. When a vendor asks why they are seeing a particular form in their portal, you should have a clear answer.
Tie forms to work orders when relevant. When a vendor submits an incident report related to a specific work order, note the connection. The search tool can find submissions associated with work orders at specific properties, which means your documentation lives in context rather than as a free-floating record.
Review incident-type submissions promptly. An injury report sitting in the submissions list unread is not the same as a reviewed, responded-to record. Set up a workflow where incident-type submissions trigger a notification and a review. Global email preferences on the admin user profile can be configured to alert specific users when submissions come in.
Track certification expiration dates. Once-only forms for certifications tell you the current state but not when they expire. Build a reminder workflow for vendors whose certifications have time limits. A reminder set sixty days before a known expiration date gives you time to follow up before the vendor becomes uncertifiable for work that requires it.
A Note on Form Creation
Forms in Sytewise are built and managed by the Sytewise team. If you need a form that does not currently exist in the system, contact Sytewise with the details of what you need and they will create it for your account. Custom forms are available and the system is flexible enough to accommodate a wide range of field types and structures.
Additional Reading: Setting Up Vendors in Sytewise, WO and Survey Email Preferences, Setting Up Admin Users
Reference Articles
A technician arrives at a property to service a piece of equipment they have never worked on before. The work order is in their phone. The fixture is in front of them. What they need next is the manual, the wiring diagram, the firmware update procedure, and maybe a quick video showing the service sequence for this specific model. In most operations, finding all of that means a phone call, an email chain, or a search through a shared drive that nobody has organized in two years.
Reference articles in Sytewise solve that problem by putting the documentation exactly where the technician is already looking. Write the article once, link it to the model number, and every fixture across your entire portfolio that contains that equipment surfaces the article automatically. The technician on site opens their fixture record and the documentation is right there, whether it is their first time with that equipment or their fiftieth.
This article covers how to create and build a reference article, how to link it to your fixtures by model number, and how that single article becomes a tool for both field support and portfolio-level planning.
Getting to Reference Articles
To find an existing article, type at least three characters of the title or model number in the search field and select from the autocomplete results.
The Reference module must be enabled on your account. If you do not see Reference in your navigation, contact Sytewise to have it added.
Creating a New Reference Article
Click Create A Reference Article. Sytewise creates a blank article record and opens the article editor immediately. The article is titled "New Article" by default. The first thing you should do is give it a real name.
Setting the Title
At the top of the editor, click the title to make it editable and type the name of the article. Be specific. "Samsung IF Series LED Display" or "Lennox KGA 12.5 Ton RTU Service Guide" will be easy to find and understand in a list. "Display Docs" will not.
The title is also what appears when a technician sees the article linked from their fixture or part record, so it should be clear enough to identify the content at a glance.
Setting the Model Number
Each reference article can be associated with a specific model number. This is not just a label. It is the key that connects the article to every part in your portfolio that shares that model number. Enter the model number exactly as it appears in your parts records. Capitalization and spacing matter because the system uses exact matching when it searches for parts to link.
Setting the model number before you link parts saves a significant amount of manual work, especially on large portfolios where the same equipment is installed across dozens or hundreds of locations.
Building the Article Content
The article is built from sections. Each section is a distinct block of content, and sections can be reordered by dragging them after they are created. Click any of the section type buttons at the bottom of the editor to add one.
Text
The Text section is a rich text editor. It supports headings, bold and italic formatting, bulleted and numbered lists, tables, and links. Use it for:
- Installation and commissioning procedures
- Service and maintenance instructions
- Configuration settings and recommended values
- Troubleshooting guides with step-by-step resolution sequences
- Warranty information and contact details for the manufacturer
- Safety notes and precautions specific to this equipment
- A brief product overview for team members who are new to the model
You can add multiple Text sections to organize long content into logical blocks. A well-structured article might have separate Text sections for Overview, Installation, Maintenance, and Troubleshooting, each with its own content.
Images
The Images section accepts photo uploads. Use it for product photos, labeled diagrams, before and after photos, and reference photos showing correct and incorrect configurations side by side. Images are stored in Cloudinary and displayed inline in the article. A technician looking at the article on a phone sees the images at full quality without any download step.
Downloads
The Downloads section lets you attach files for technicians to save to their device. This is where spec sheets, installation manuals, firmware update files, calibration tools, and multi-page PDF documentation live. Files attached here appear as named download links in the article. Each file can be given a descriptive title so the technician knows what they are downloading before they click.
YouTube
The YouTube section accepts a YouTube URL and embeds the video directly in the article. Manufacturer training videos, installation walkthroughs, maintenance demonstration videos, and product overview clips are all fair game. If the manufacturer has published a service video for this equipment, link it here and it plays inline without leaving Sytewise.
Embed
The Embed section accepts raw HTML embed code for anything that is not a YouTube video. Use it for Vimeo videos, interactive product documentation, embedded spec comparison tools, or any iframe-based external content the manufacturer or distributor makes available.
Linking the Article to Fixtures
An article sitting in the library does nothing on its own. Its value comes from being linked to the actual parts in your portfolio that contain the equipment it covers. There are two ways to create those links.
Link by Model Number (the fast path)
This is the most important feature in the reference module. Click the Link Modno button at the top of the article page. A modal window opens showing all parts in your account whose model number matches the model number you entered on this article. Each matching part is listed with its fixture name, property name, and the model number that triggered the match.
Check the parts you want to link and click to confirm. The article is now connected to every selected part. Those parts, their fixtures, and the properties they live on now surface this article automatically whenever someone accesses that fixture's detail page, print report, or linked documentation.
If you manage fifty retail locations with the same HVAC unit, every one of those units shows up in the model number search. Select all fifty, click link, and the article is connected to the entire fleet in one operation. Every technician who opens any of those fixtures from that point forward sees the article without you having to do anything else.
The Linked Parts table at the bottom of the article page shows the current list of all parts connected to this article: part number, fixture name, and property name. This table is also a useful view of how widely a given equipment model is deployed across your portfolio.
Linking Individual Parts
Parts can also be linked from the part detail page itself. When you need to connect a specific part to an article and that part's model number does not match the standard model number due to a variant, an import discrepancy, or a legacy naming convention, link it individually from the part record rather than the model number search.
Making an Article Public
Each reference article has a unique public URL. This URL works without any Sytewise login.
The Public toggle at the top of the article page controls whether the article is accessible at that URL. When public is on, anyone with the link can read the article: technicians in the field, vendors, clients, or anyone else you share the URL with. When public is off, the article content is still linked to parts and visible within the admin portal, but the public URL returns nothing.
Public articles are useful when you want to share documentation with people who do not have Sytewise accounts. A vendor assigned to a work order on a specific fixture can be given the public URL to the reference article for that fixture type, and they have the documentation before they arrive on site without needing portal access.
Linking Related Articles
Reference articles can be linked to other reference articles in your library. This creates a Related Articles section at the bottom of each article that makes navigation natural when documentation is spread across multiple records.
Use this when the equipment documented in one article connects meaningfully to another: a controller article linked to the cabinet article it drives, an HVAC unit article linked to the article covering its specific thermostat model, an LED display article linked to the article covering the media player in the same system.
The Field Support Value: One Article, Every Technician
The moment an article is linked to a model number and that link is applied to your parts, something changes about how your operation works. Documentation stops living in email threads, shared drives, and the institutional memory of whoever has been at the company the longest. It starts living exactly where the work happens.
A new technician on their first solo service call opens the fixture record, sees the reference article linked to the equipment, and has the installation diagram, the maintenance procedure, the firmware version to look for, and the manufacturer's service video all in one place. They do not need to call the office. They do not need to guess. The knowledge transfers automatically.
For a portfolio of identical installations, this effect multiplies with every location. You write the article once for a display model, a compressor type, a control system, or any other equipment your team regularly works on. From that point on, any technician at any location working on that equipment type has the same documentation. The article is the institutional memory that does not leave when someone does.
The more complete the article, the more value it delivers on each use. A well-built reference article for a piece of equipment that appears at forty locations pays back the time spent building it on the first service call that saves a trip, avoids a callback, or prevents a configuration error.
Portfolio Planning Value: See What You Have
The Linked Parts table on a reference article is more than a list of connections. It is an inventory report.
Open the reference article for a specific HVAC model and the linked parts table shows every installation of that model in your portfolio: the part number, the fixture name, and the property it lives on. That list is your complete picture of how widely that specific equipment is deployed. Open the article for a specific display panel model and you see every property where that panel is installed.
That visibility has direct operational and financial value.
Replacement planning. If a manufacturer discontinues a model or issues an end-of-life notice, the linked parts table tells you immediately how many units are in the field and where they are. You can plan replacements before the equipment fails rather than responding to individual outages one at a time.
Recall and advisory response. When a manufacturer issues a safety recall or service advisory for a specific model, the linked parts table gives you the affected inventory in seconds. You know exactly which properties to contact, which vendors to dispatch, and how large the scope of work is before you make a single phone call.
Warranty and contract management. All parts linked to an article carry installation dates. Sorting the linked parts list by install date shows you which units are oldest and likely approaching end of warranty or end of useful life. That information feeds capital planning conversations with clients and helps you prioritize where maintenance investment will be most impactful.
Fleet consistency. For clients who care about portfolio-wide consistency, the linked parts table shows at a glance whether every installation uses the same model and whether any locations received different equipment. Inconsistencies that would otherwise require a manual audit surface immediately.
Client conversations. A reference article linked to every installation of a client's primary equipment type becomes a ready-made basis for a portfolio review conversation. The documentation covers what is installed. The linked parts show where it is installed. The install dates show how old each unit is. That combination, pulled from a single article page, is a professional starting point for any discussion about maintenance contracts, upgrade cycles, or replacement timelines.
A Practical Workflow
The most effective way to use reference articles is to build them for products with large numbers of installations in the field first.
When you document a new equipment type in your portfolio for the first time, create the reference article at the same time. Give it a title and model number. Add the manufacturer documentation, a text section with service notes your team has learned, training videos, and the best possible phone number for support, if one exists. Then link it to the parts you just created. That article is now the foundation for every future installation of that equipment across the entire portfolio.
Modify articles with updates to software, or notes from seasoned technicians and all of that history compounds to help support technicians on future visits.
Additional Reading: Adding Parts to Fixtures, Creating and Managing Fixtures, Descriptions Save You Time and Money
Surveys and Surveyors
A survey is a property status report for all fixtures in a particular trade.
Surveys and Surveyors: Your Eyes in the Field
Not every property visit ends with a work order. Sometimes you just need a trained set of eyes to go look at things, document what they find, and bring that information back before anyone decides what to fix, replace, or leave alone. That is exactly what the survey system is built for.
Think of a survey as a property status report for the fixtures in a particular trade. An admin creates the survey, a surveyor receives an email notification and heads out to the property, and their findings come back as a structured, photographed, documented record through the Surveyor Portal. Surveyors occupy their own distinct role in Sytewise, separate from vendors, with their own portal, their own permissions, and their own workflow. They are not there to fix anything. They are there to tell you what needs fixing.
What a Surveyor Is and Isn't
A surveyor in Sytewise is not a vendor. They don't receive work orders, they don't invoice for completed jobs, and they don't track costs. A surveyor is an observer and auditor. They go to a property, walk through the fixtures and systems in scope, document the condition of what they find, and submit a report that the admin team uses to make decisions.
That distinction matters because it changes how you use them. Vendors execute work. Surveyors assess it. Both are essential, and in many workflows they work in sequence: the surveyor goes first to determine what's actually happening out in the field, the admin reviews the findings and creates a work order for whatever needs to be done, and the vendor does the work. The surveyor's report becomes the factual basis for the scope of work rather than an assumption made from the office.
Surveyors can be third-party inspection companies, internal facilities staff assigned to walk properties, AV technicians auditing an installed system before a service contract is signed, or any other person or organization whose job is to observe and report rather than repair and bill.
Setting Up a Surveyor
Surveyors are managed from the Surveyors page in the left navigation bar of the Admin Portal. Each surveyor record is a company-level entry with a login account attached to it for accessing the survey portal.
Creating a Surveyor
To Create a Surveyor
- Go to Surveyors
- Open the “Create A New Surveyor” section.
- Fill out every field in the form unless labeled optional
- The login password must be at least 5 characters and unique to the Sytewise system for all surveyors and vendors. If you enter a username that is already taken you will be asked to enter another.
- Make sure to write down the password you enter. Passwords are not retrievable but they are resettable.
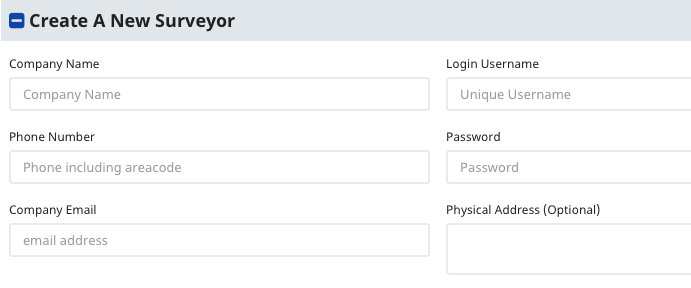
If you're adding a large number of surveyors at once, the Import Surveyors section on the Surveyors page accepts a CSV file. Required columns are company name, email, phone, username, and password. Address and description are optional. A sample file is available to download directly from the import section to show the expected format.
Surveyor Permissions
This is where surveyors get interesting. Two permission flags control what a surveyor can do beyond the baseline of completing assigned surveys.
Can Edit allows the surveyor to modify fixture and part details while completing a survey. When this is enabled, the surveyor isn't just observing and noting problems — they can update the actual fixture and part records in the system as they go. This is the right flag for a trusted technician who is simultaneously auditing a system and correcting the data to match what's actually installed. An AV integrator doing a commissioning walkthrough, for example, might need to update firmware versions, correct model numbers, or adjust part status as they verify each component. Can Edit makes that possible without requiring admin access.
Can Create allows the surveyor to initiate surveys themselves instead of waiting for an admin to assign one. When this flag is enabled, the surveyor logs into their portal and can start a new survey for any property and trade they're associated with. This is the right flag for surveyors who operate with a high degree of autonomy, doing regular rounds without needing an admin to kick off each visit. The survey they create is flagged in the system as surveyor-created, so the admin team knows it originated in the field rather than from the office.
Both flags are off by default. Turn them on intentionally, based on the level of trust and responsibility you're extending to that surveyor.
A Flag option on the surveyor record adds a red indicator for administrative attention. Use it however makes sense for your workflow: to mark a surveyor whose insurance is pending, one whose work quality needs a second look, or simply to surface a record that needs follow-up.
Adding a Surveyor Contact
Each surveyor can company can have several contacts, each with their own login id for the Survey Portal. Add contact details to the Surveyor Company Profile. You can also add Log In IDs on the Surveyor Company profile page.
Creating a Survey
Surveys are created from the property detail page. Navigate to the property, find the trade you want to survey, and click New Survey. The creation form is straightforward.
Due Date is required and must be a future date. This is the deadline by which the surveyor needs to complete and submit their findings.
Surveyor is selected via an autocomplete search. Type part of the surveyor's company name and select from the results. Only active surveyors appear.
Special Instructions is an optional text field for anything the surveyor needs to know before arriving: access codes, contacts to call on-site, specific systems to prioritize, areas that are off-limits, or the particular questions you need answered. Whatever context helps the surveyor do their job well belongs here.
The property and trade are set by where you initiated the survey from and aren't selected in the form itself.
After creation you land on the survey detail page. The survey exists but no email has been sent yet. Take a moment to review the details, then click Send Survey when you're ready to notify the surveyor.
The Survey Email and Surveyor Portal
When you click Send Survey, Sytewise sends an email to the surveyor's address on file. The email includes the survey ID, the property name and address, the due date, any special instructions you added, and a login button linking directly to the survey portal.
The surveyor portal lives at a separate URL from the admin system. The surveyor logs in with the username and password set up on their record and sees a dashboard of surveys assigned to them, organized by completion status.
When a surveyor opens an assigned survey and begins working on it, the survey is marked In Progress. This matters because Sytewise prevents two surveyors from simultaneously working on surveys for the same property and trade combination. If a survey is in progress, any other surveys for that property/trade show an alert to the admin that the property is currently being worked. The surveyor can release the in-progress lock if they need to step away and return later, and an admin can see the in-progress status from the survey detail page.
What a Surveyor Does During a Survey
The survey submission process is where the field work becomes structured data.
The surveyor works through the fixtures at the property, selecting each one from the fixture inventory. For each fixture, they select the specific part they're documenting and record what they found.
For each part they can record:
Status: On (working) or Off (not working). This directly updates the part's status in Sytewise and feeds into the fixture's overall health score.
Notes: Free-text observations about that part's condition. These notes are stored with a source of "survey" so they're clearly distinguished from admin-entered notes, and they appear in the fixture's note history permanently.
Images: Photos uploaded directly from the surveyor's device, attached to the fixture record. Images are stored in Cloudinary and appear in the survey results, the fixture detail page, and the fixture print report. A photo of a burned-out component, a cracked housing, a missing part, or an improperly installed fixture is worth considerably more than a note that tries to describe it.
If the surveyor has Can Edit permission, they can also update fixture and part details during the survey: correcting descriptions, adjusting model numbers, or updating any field that should reflect what's actually present at the location rather than what was originally entered in the system.
A surveyor can document as many fixtures and parts as needed within a single survey. When they're done, they submit the survey and it's marked complete. Submitted surveys are read-only from the surveyor's side.
When a Surveyor Creates Their Own Survey
If the surveyor has Can Create permission, they can initiate surveys from the portal without waiting for an admin assignment. They select the property and trade, set a due date, add any notes relevant to what they're going to look at, and begin. Surveys created this way are marked in the admin system with a note indicating they were created by the surveyor rather than assigned from the admin side, so you always know the origin.
Reading Survey Results
A completed survey tells you a lot. The survey detail page organizes the findings into clear sections.
Submitted Fixtures shows every fixture the surveyor documented, with each part they reported on listed underneath it. Each part row shows the status badge (On or Off), the part number, position, and description, the notes the surveyor entered, and any images uploaded.
Fixture Updates captures any fixture-level notes added during the survey, with timestamps and the surveyor's name attached.
Part Updates shows any part-level changes made during the survey, relevant when the surveyor has Can Edit permission and updated records while they worked.
Email Log at the bottom shows the delivery record for every email sent in connection with this survey, including success or failure status. If a surveyor claims they never received the notification, this is where you verify.
The survey print view generates a clean, professional document with all of this information formatted for sharing or archiving. It includes the property and surveyor header, due and completion dates, all findings with images, and the complete email log.
Surveys in the Work Order Chain
Surveys and work orders aren't the same thing, but they work together in a chain that produces better outcomes than either one alone.
The survey is the assessment. It answers the question: what is actually going on out there? A surveyor walking through a portfolio of properties and documenting which fixtures have parts marked Off, which systems have components missing or degraded, and which locations have conditions that need attention gives the admin team a factual inventory of what needs to be done.
The work order is the authorization. Once the survey results are in and reviewed, the admin team knows exactly what to scope. The work order references the trade, the vendor, and the specific fixtures that need attention. The surveyor's notes and photos inform the instructions. The vendor arrives knowing what they're walking into because the assessment came first.
This sequence is particularly valuable for large portfolios where assumptions about property conditions tend to be optimistic, for new client onboarding where you're documenting starting conditions before any maintenance work begins, and for post-service verification where a second surveyor visit confirms that the work was actually done and done correctly.
Survey results do not automatically create work orders. That decision belongs to the admin team, who reviews the findings and determines which issues warrant vendor dispatch. That review step is intentional. Not every Off part on a surveyor's report needs a work order immediately. Some are known issues already in the queue. Some are cosmetic. Some need more information before a scope can be written. The human review between survey result and work order creation is where that judgment lives.
Recurring Surveys as Part of an Annual Workflow
Surveys are most powerful when they're scheduled, not reactive. A quarterly survey of a property's HVAC fixtures, an annual audit of an AV system before a contract renewal, a monthly walkthrough of high-traffic common areas, these are the recurring assessments that build a real operational record over time.
The Reminders system handles this. Create a reminder attached to a survey with Replicate this Survey checked, set the recurrence to whatever frequency makes sense for that property and trade, and Sytewise will prompt you to create a new survey on schedule. Each new survey gets the same surveyor, the same instructions, and the same scope as the original. You confirm, send it, and the workflow continues without anyone having to remember to set it up.
Over time, the pattern of survey results across recurring visits becomes a genuine maintenance history. Which fixtures reliably pass every survey. Which ones consistently show parts going Off between visits. Which properties have improving conditions and which ones are trending the other direction. That history is the basis for smarter maintenance decisions, better vendor conversations, and more honest conversations with clients about what it actually takes to keep their systems running.
Additional Reading: BUILDING AND ANNUAL WORKFLOW, CREATING AND MANAGING WORK ORDERS
Completing A Survey
A surveyor logs into the Survey Portal with their username and password. The home page once logged in will show a list of incomplete Surveys. Click “Completed” shows a list of all completed surveys by date.
Clicking a completed survey will show the special instructions and when it was completed.
Incomplete Surveys show a map and a list of all fixtures in that trade. If fixtures are in groups the same groupings are available here too. The “Nearby” button lists all fixtures closest to the device with the nearest at the top.
This only works if the fixtures are on a GPS map, not a floorpan map. It will also not work if you don’t allow location service in your browser.
Expanding any fixture with the + button will reveal parts in that fixture.
It is here that the Surveyor indicates any outages by clicking the green slide switch to red. Enter an optional note. Optionally add up to 10 images.
Do this for any fixture with outages. Your entries are saved but not committed to the master database until the survey is finished. Quitting the browser or leaving the survey for more than half an hour will lose all entries and the Surveyor will have to start again. If the Surveyor has Edit permission they can edit fixture or part details in the Survey.
Surveyor Special Permissions
Most surveyors do exactly what the name suggests -- they observe and report. But some surveyors are trusted enough to do more than that, and Sytewise gives you two optional permissions to extend when the situation calls for it.
Create Permission
Create permission lets a surveyor initiate their own surveys directly from the Surveyor Portal without waiting for an admin to set one up first. They can create a survey for any property and trade in the account as long as that trade has at least one fixture. They search for the property, select the trade, and complete the form themselves.
This is the right permission for a surveyor you trust to work independently. If they are already on a property regularly -- doing a recurring lighting check across a large portfolio, walking a monthly condition report, or auditing a system before a contract renewal -- there is no reason to make an admin send a new survey every time. Create permission keeps all of that activity logged inside Sytewise where it is useful, without creating extra work in the office. The survey still shows up in the admin system flagged as surveyor-created, so you always know where it originated.
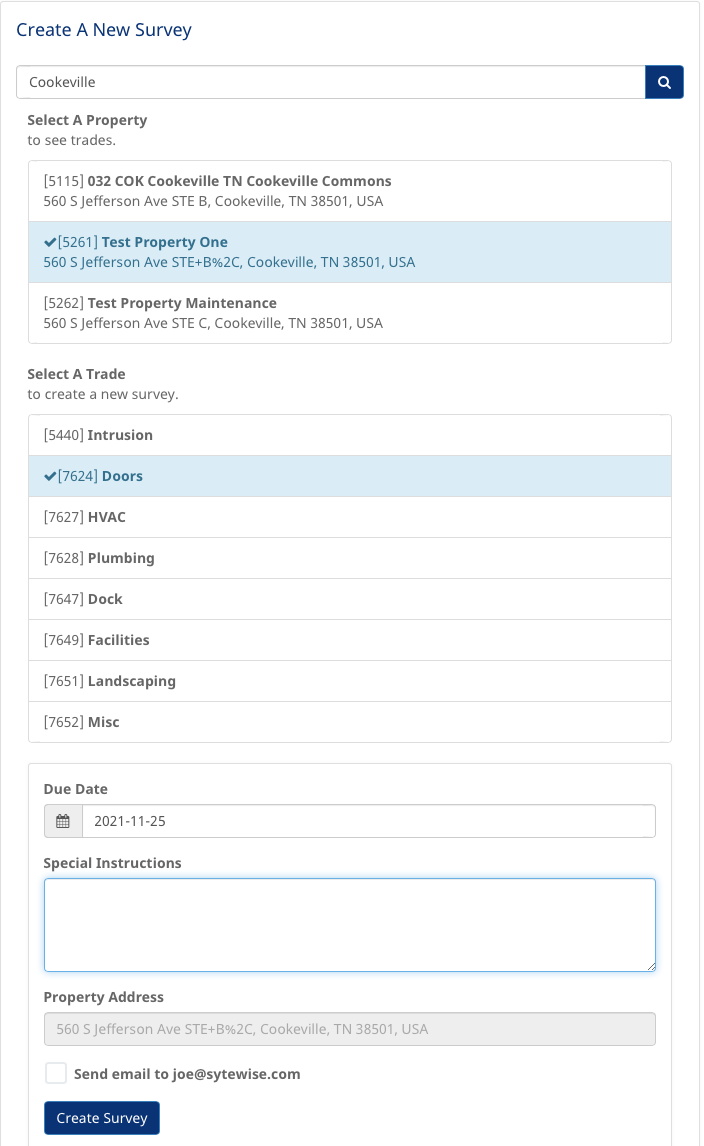
A surveyor can create a survey in the survey portal by searching for a property, selecting a trade and completing the form.
Surveyor Created Surveys
If the surveyor has permission to create surveys here is how to create them.
- Log into the survey portal
- From the home page click “Create A New Survey”
- From any page click the “crosshairs” icon in the footer navigation bar
- In the property text search box enter any part of the property title or address, as long as you enter at least 3 characters.
- Choose a property from the list of found properties.
- Only trades with fixtures will appear below the properties.
- Choose a trade.
- Choose a due date
- Enter any special instructions
- Choose to have an email sent to yourself (the surveyor)
- An email informing of the new survey will be sent to you and any admin who has favorited the property.
- If none, all super admins will receive an email.
Edit Permission
Edit permission lets a surveyor make direct changes to fixture and part records while completing a survey. For a surveyor you trust as a reliable source of field information, this is a powerful option.
With Edit permission a surveyor can update fixture names and descriptions to reflect what is actually installed, correct part details that no longer match what is in the field, and flag any fixture as "This fixture DOES NOT EXIST" if something has been removed or was never there. That flag does not delete the fixture -- it pins a note to the record attributed to the surveyor, and the note appears in the completed survey so the admin team sees it in context, and can enter the data correctly.
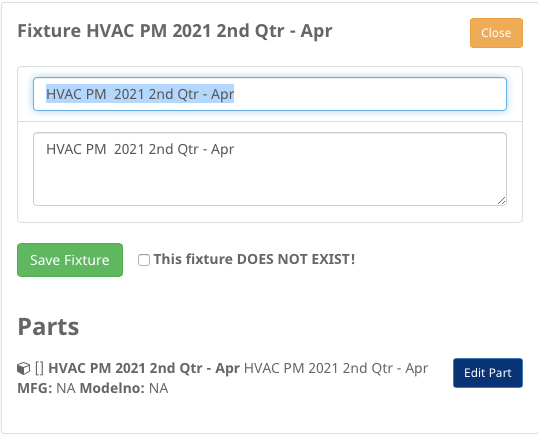
With "Edit" permission a surveyor can impose direct edits on the information in a fixture or part.
Tips and Best Practices
Here are some words of experience on the best way to add and use data in Sytewise.
Naming Fixtures and Parts
Why a Naming Convention is a good Idea
What’s in a Name?
Which HVAC Unit needs a new compressor? Maintenance Systems need to keep track of hundreds of Fixtures and their parts, some of which are identical except for their serial number and location. To make sure your staff can easily find and repair the right equipment, build that information into the name of your fixture.
Naming Your Fixtures
The type of fixtures you manage or maintain and the way that you work with them can make a difference on how you choose to name them. Facility Maintenance organizations that work with static location items may choose to include a Property Name or Location in the Fixture Name. Companies that maintain equipment that is mobile may default to a Service Tag or Item Number. Each Company’s naming strategy will be different and the same company may use a different strategy for different fixture types. Here are some features you may want to include:
- Fixture Type Data: HVAC, Hot Water Heater, Lighting Fixtures,
- Manufacturer Data: Make, Model, Serial Number
- Location Data: Address, Tenant Suite, Property, Ownership
- Instance Data: Pole 6, RTU4, Fire Panel 3, etc..
Describing Your Fixtures
Fixture descriptions can offer a lot of detail to the viewer and even short descriptions can be very helpful. A minimum of details would include the type of fixture and any thing that would help identify it such as its age, capacity or function.
An HVAC unit may be described as “ 2010 RTU6, 25 Ton, Gas Pack, 3Phase “
Naming Fixtures Doesn't Needs to Be Hard
The goal of naming your fixtures is to make them easy to find and identify for your employees, vendors, and inspectors. If you are consistent, even a simple naming convention will add lots of value to your work management system. Here are some ideas to guide you as you come up with a naming structure.
- Straight forward: Maintenance technicians should be able to draw meaning from asset names. Don’t name a HVAC Unit as “NUMBER 6.” HVAC,RTU, or COND is simpler and is more valuable to your employee. JCPENNEY RTU 6 is easily understood.
- Consistent: Keeping your naming convention consistent will improve the data your system can provide you. Make sure to be consistent in length and case. Add leading zeros to your numbers if you think a Fixture type may have more than 10, 100, or 1000. If you have 100 fixtures of the same type, the first fixture should include the numbers 001.
- Unique: Each asset name should be unique to prevent confusion.
- Short as Possible: Don’t include information easily found elsewhere
- Allow for Expansion: Make sure you leave room for the addition of new fixtures of the same type. Names that include numbers should allow for future expansion
- Letters over Numbers: Letters can be much easier to interpret for employees and include information that numbers alone just can’t.
Naming Parts
The same common-sense approach applies to naming parts, with some caveats. Manufacturer Part Numbers are specific and very useful if you are managing your fixtures to the component level. Sytewise has a specific field for the actual part number from the manufacturer and you should use this capability as religiously as possible. Keeping actual manufacture part numbers instead of just the title of the part will pay you back in time and money as the system allows you to communicate with manufactures and suppliers to keep your equipment running smoothly.
Additional Reading: CREATING AND MANAGING FIXTURES, ADDING PARTS TO FIXTURES
Grouping Fixtures
Grouping Fixtures is a powerful tool to allow you to look at subsets of fixtures on a property quickly and easily. Looking at lights and want to see just your Pole Lights? Make a group. Looking at HVAC units and want to see just the HVAC units on top of the Walgreens? Make a group. Groups help categorize and locate your fixtures quickly and efficiently. Also, Groups that are created by the administrator are available to Vendors and Surveyors to locate specific fixtures on the Work Order Map.
What are the best ways to Group Fixtures?
- Fixture Type
- Fixture Location
- Fixture Ownership
- Fixture Maintenance Vendor
- Height off Ground
Fixture Type
Grouping all fixtures by type is a great way to keep track of how many of a specific item you have on a property. Pole Lights, HVAC units by type and tonnage, even landscaping material can be grouped by species if it helps your technicians plan for maintenance. It also can make it easy for technicians to survey a specific type of item.
Fixture Location
Fixture Location is a great way to look at a small group of fixtures when you have a large number at a single property. Say you have four to five hundred light fixtures on a property. Looking at a list of all of them to find your pole lights would be daunting. Group all of your Pole lights together and you can easily display just those fixtures and find your specific fixture quickly. Fixture Location is a great way to name your groups also. Show me all the HVAC units on top of the Kroger Grocery Store. That list shortened from 75 in the whole center to the 8 units that are on the Kroger roof.
Fixture Ownership
Fixture Ownership is a great way to group fixtures if you happen to have more than one ownership entity for a property location and the division of maintenance is based on parcels or areas of the property. If a property is divided into Phases and each phases has different ownership or maintenance entities, this is a great way to group fixtures and easily export those that belong to or maintained by one group over the other.
Fixture Maintenance Vendor
Not all Fixtures of a certain type are maintained by the same vendor. Grouping Fixtures by the Maintenance Contractor that services them makes it easy to keep track of the units associated with the vendor in question.
Fixtures By Height
The height of Fixtures is baked into how Fixtures are entered into our system. It is a great way to know what type of vendor you should send to maintain a specific Fixtures, and what type of equipment they will need to reach it if it is a good distance off the ground.
Any other Category that Makes sense to You
There are any number of ways of categorizing Fixtures that will make sense to you with your Fixtures on your Properties. If you ever need to see a Group of Fixtures as a subset of the whole, then save it as a Group. Any individual Fixture can be a part of several groups. Making Groups is simple and they are easy to recall when you need them.
How To Group Fixtures
Grouping fixtures is an easy. Use the following steps to create a Group:
- Select the Fixture or Fixtures you want to Group using the Square Check Box to the right of the Fixture Name.
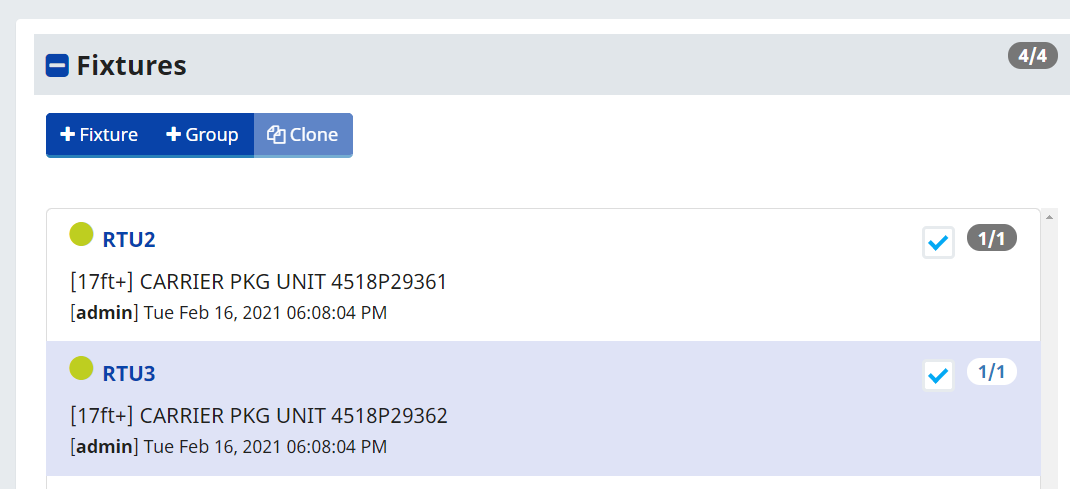
- Click the +Group button at the top of the Fixture List.
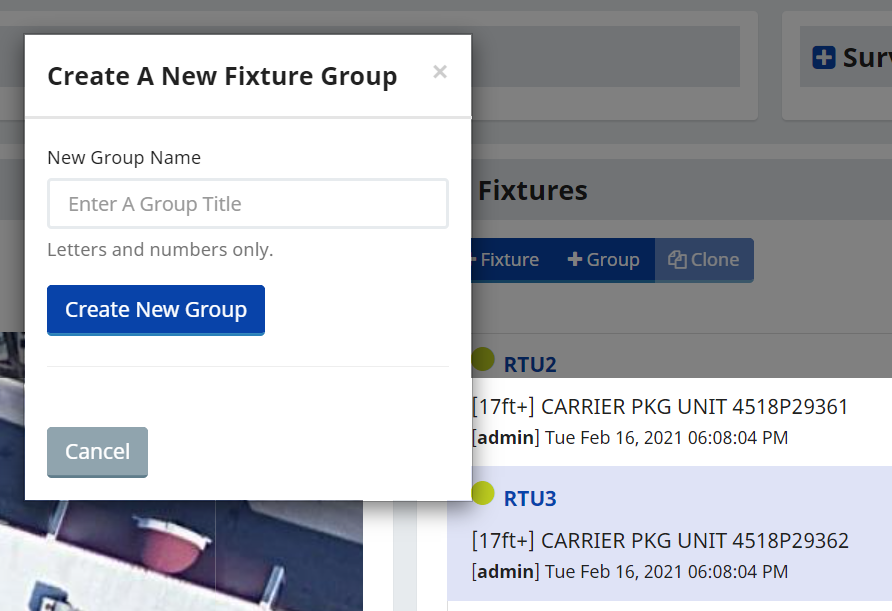
- Enter the Name your new Group and click on the Create New Group button
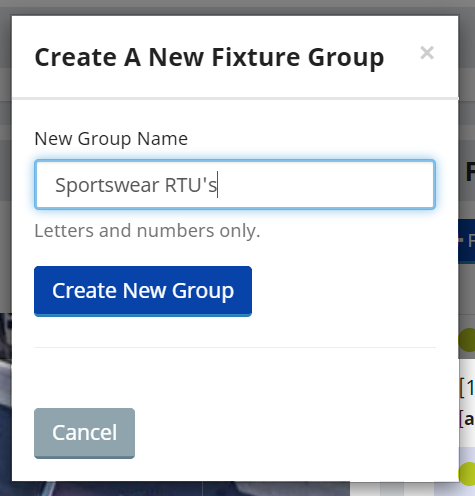
Your new Group is done and already includes any fixtures you selected when making the Group. You only need to select one fixture to create a Group. You can add any other Fixtures you create to existing Groups.
If you Clone a Fixture that is part of a Group, The Clone will also be added to the same group, automatically. It is good practice if you are creating a Fixture that you are going to Clone and add to a Group, go ahead and use your first Fixture to Create the Group. Any Clones will already be a part of the group automatically.
Additional Reading: CREATING AND MANAGING FIXTURES
Descriptions Save You Time and Money
Searching for a specific type of fixture across your portfolio used to take a lot of time and guesswork. Sytewise can help you recall these fixtures in minutes without the guesswork, and fixture descriptions are the biggest part of what makes that possible.
The Detail Work
The more meaningful detail you put into a fixture description, the more visible that fixture becomes across your entire portfolio. Being able to pull up every fixture of a particular manufacturer, type, model, age, or location is not just a convenience -- it changes how you manage your properties. Subsets of fixtures that used to require a spreadsheet, several phone calls, and a fair amount of hoping someone remembered correctly can now be surfaced in a search that takes seconds. That visibility has direct operational value. You catch patterns earlier, plan maintenance more accurately, respond to service bulletins faster, and have honest conversations with clients and vendors based on what is actually installed rather than what you think is installed. Better data means better decisions, and better decisions mean better performing properties.
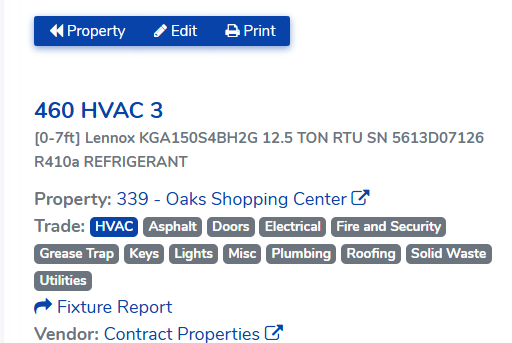
The Payoff
By giving an HVAC unit the description Lennox KGA150SVBH2G 12.5 TON RTU SN 5613D07126 R410a Refrigerant, you can now search your entire portfolio by manufacturer, model number, serial number, tonnage, rooftop versus ground mount, and refrigerant type. Search for Lennox and it appears. Search for 12.5 TON and it appears. Search for R410a and it appears alongside every other unit in your portfolio running that refrigerant. One well-written description makes a single fixture findable six different ways across every property in your account.
That matters when a refrigerant is being phased out and you need to know your full exposure. It matters when a manufacturer issues a service bulletin and you need to know which properties are affected. It matters when you are negotiating a service contract and need an accurate count of what is in scope. And it matters when you are planning capital replacements and want to know how many units of a particular age and type are still in service.
Different fixture types will call for different details. Make, model, and serial number are always a good starting point. Beyond that, think about what characteristics you are most likely to search for across your portfolio and include those. Tonnage and refrigerant type for HVAC. Screen size and resolution for displays. Lamp type and wattage for lighting. The test is simple -- if you might ever want to find every fixture like this one, put that detail in the description.
How to Set Up Fixtures and Parts: A Guide to Choose What Works for You
Every system you manage in Sytewise starts with the same question: how deep do you want to go?
That question isn't rhetorical. The answer shapes how you set up your fixtures and parts, how your maps look, what your vendors see when they arrive on site, and whether your reference articles light up at the equipment level or the system level. Get it right and Sytewise becomes a genuinely powerful service management tool. Get it wrong and you'll spend an afternoon reorganizing things you set up in a hurry.
Let's walk through the options using a real example: a Conference Room AV System. It could just as easily be a building automation system, a lighting control network, or a security system -- the logic is identical. But AV is a good sandbox because most of us have stood in a conference room and counted the pieces.
The system: Conference Room AV
For our example, the system lives in a single conference room and includes five pieces of equipment: a monitor, a DVD player, a projector, an electric screen, and a control system. Five distinct pieces of hardware, one room, one purpose. How should they live in Sytewise?
The answer depends on three questions:
- Do you need to locate each piece of equipment separately on a map or floor plan?
- Do you need to track internal components -- things like a projector lamp -- at the maintenance level?
- Do you want Reference Article support tied to each individual piece of equipment?
Your answers will point you to one of two approaches.
Approach one: The system as a single fixture
If you manage AV systems to the system level -- meaning you dispatch a vendor to service the whole room, you track the system as a unit, and you don't need to pinpoint individual pieces of equipment on a floor plan -- then the cleanest setup is a single fixture.
Create one fixture called "Conference Room AV System."
Then add each piece of equipment as a part of that fixture:
- Monitor (make, model, serial number)
- DVD Player (make, model, serial number)
- Projector (make, model, serial number)
- Electric Screen (make, model, serial number)
- Control System (make, model, serial number)
Each part carries its own make, model, and serial number, so you have full documentation of what's in the room. Warranty lookups, replacement ordering, and service history all live on the fixture record. The entire system gets a single map marker, which is clean and uncluttered.
This approach works beautifully when:
- Your vendors service the system as a whole
- You don't need component-level maintenance tracking (no projector lamp replacement schedules, for example)
- One map pin for the room is all you need
The tradeoff is that Reference Articles in Sytewise are written at the fixture level, not the part level. So if you want a Reference Article for your projector -- installation notes, configuration specs, the vendor's quirks -- the projector needs to be a fixture, not a part. In this approach, your reference articles cover the system as a whole, not the individual pieces. If you install many duplicate systems, write a reference article for the entire system and let it support every location you install.
Approach two: Each piece of equipment as its own fixture
If you need to locate equipment separately on a floor plan, track internal components like a projector lamp, or attach Reference Articles to individual pieces of equipment, then each piece of equipment should be its own fixture.
In this setup your property might be labeled something like "2022 Smith Street - Conference Room" (more on that in a moment), and your fixtures look like this:
- Monitor
- DVD Player
- Projector
- Electric Screen
- Control System
Each fixture gets its own map marker, its own parts list, its own service history, and its own Reference Articles. The projector fixture, for example, can carry a part called "Projector Lamp" with a replacement schedule. The control system fixture can have a Reference Article with programming notes and reboot procedures.
Here is where the map gets interesting. Instead of placing these fixtures on a satellite view, you can use a floor plan image as the map background. That means each fixture marker lands on the actual floor plan of the conference room, showing management and vendors exactly where each piece of equipment lives. That is genuinely useful when a technician is standing in a building they have never been in before.
Group these fixtures together under a fixture group called "Conference Room AV System." Grouping lets you manage all five fixtures as a named system within the property, dispatch work orders against any fixture in the group, and keep the system organized as your portfolio grows.
This approach works beautifully when:
- You need component-level maintenance tracking
- Vendors need to locate specific equipment on a floor plan
- You want Reference Articles written at the equipment level
- You manage multiple systems on the same property and want them organized separately
A note on property naming when you go deep
Here is something worth knowing: in Sytewise, multiple properties can share the same address. That is not a bug -- it is a feature.
If you manage several AV systems at 2022 Smith Street and you want to maintain each one to the component level, you can create a separate Sytewise property for each system:
- 2022 Smith Street - Conference Room AV System
- 2022 Smith Street - Lobby Digital Signage
- 2022 Smith Street - Executive Boardroom AV System
Each property gets its own set of fixtures, its own floor plan, its own vendor assignments, and its own service history. They all share the same physical address, which causes no confusion in the system whatsoever. It is a clean way to separate complex installations at the same site without tangling their records together. If you want all of your Systems as one Property, then add the component for each system to the same property, and use fixture grouping as a way to assign each piece of equipment to the right system.
How to decide
If you find yourself staring at a blank property and wondering which approach to take, here is the honest one-sentence answer: set up fixtures at the level you want to manage them.
You can use both methods across your portfolio, but you should consider how you want to search for equipment. If you need to do portfolio searches for a specific model number that has been discontinued and needs a replacement, make sure you know how to get to each instance of that equipment. To keep your data easily accessible and the most impactful, I recommend standardizing on a method,
If a projector is something you service as part of a room, it is a part. If a projector is something you service on its own schedule, with its own lamp replacement history and its own reference documentation, it is a fixture.
The same logic applies to any system you manage -- HVAC, building automation, security, fire suppression. The platform does not care what the system is. It cares how granular you want to get.
Get that question right and everything else follows naturally.
Work Orders
Work orders are the operational core of Sytewise. They are the records that connect properties, vendors, and the documented history of every job across your portfolio. This chapter covers the full work order workflow: building and managing work orders from the property page, the vendor portal experience where vendors document their work and submit completion, how checklists attach to and travel with work orders through the job lifecycle, and how the Reminders module turns individual work orders into a proactive annual maintenance calendar.