Reference: The Sytewise User Interface
A rundown of the Sytewise user interface from the main admin screen through the menus and pages.
- Sytewise User Interface
- The Dashboard
- Property Page (part 1)
- Property Page (part 2)
- Fixture Page
- Work Orders in the Vendor Portal
- Adding and Managing Clients
- Contracts
- Email Log
- Creating a Checklist Template
- Fixture Checklists: From Assignment to Archive
- Using Checklists with Work Orders
- Adding Parts to Fixtures
- Creating and Managing Fixtures
- Creating and Managing Displays in Sytewise
- Vendor Forms: Compliance, Certification, and Credentials
- Reference Articles
Sytewise User Interface
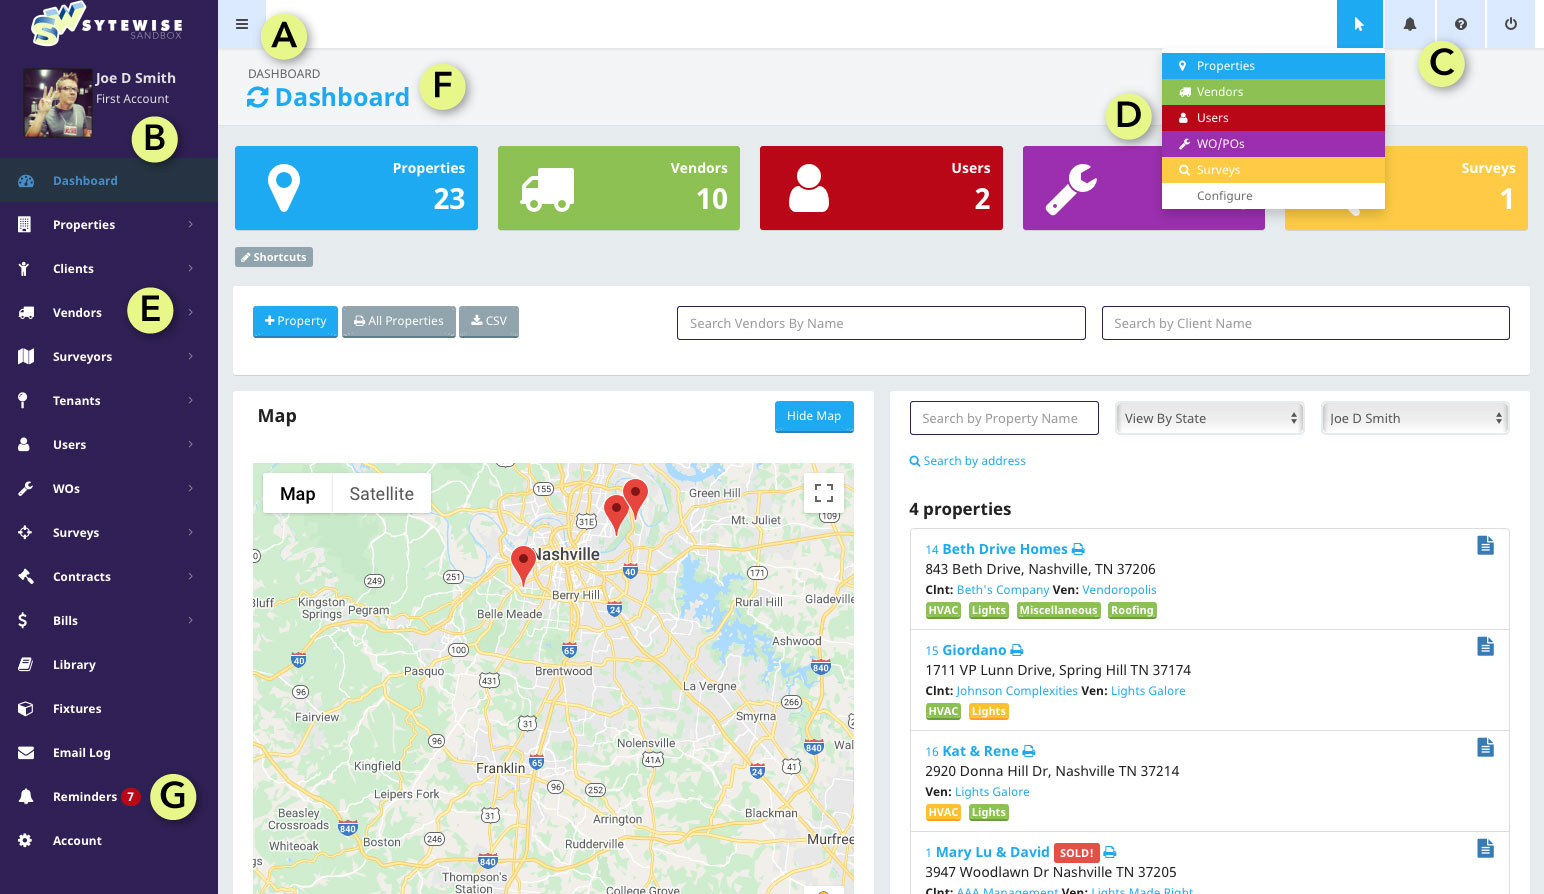
Once you are logged in the Sytewise interface will have the following components always available to you.
A. Menu Collapse
Click this "hamburger" icon to the right of the Sytewise Logo to collapse the main menu bar to the left. This is convenient when you need more screen real estate in the main window area.
B. Account Block
At the top of the main menu bar on the left is your account block. This area contains the Photo you uploaded for your user profile (the username and password you logged in with). Clicking the Username or the Photo takes you to your user profile page. If you have super user privileges you can click the Account name under the user's name to go to the account settings.
C. Quick Tools Navigation
At the upper right of the top of every page you will find a series of 4 icons. These are quick links to useful tools in the Sytewise system.
- Shortcuts Arrow: Clicking this opens a dropdown with quick links to the shortcuts
- Reminder Bell: This drops down the reminder tool. Reminders are one-time or recurring events that remind you on a particular day to do something in Sytewise. Reminders can be attached to many of the items within Sytewise. Just go to that page and start making a reminder.
- Help Icon: Clicking this question mark icon takes you to the Sytewise help site. (this site)
- Logout Icon: Clicking this icon will log you out of Sytewise. You are automatically logged out after an hour.
D. Shortcuts
You can set shortcuts for yourself in your user profile. They are in the shortcut quick tools dropdown and are shown on your dashboard (as seen in the image above).
E. Main Menu Navigation
On the left of the screen in the dark band is the Main Menu. Here are links to every section within the system and their details. Some links have more detail pages in them and require one click to reveal those detail pages. Properties > New Property, Properties > Property Search for example.
F. Page Header
Each page has a header with a breadcrumb for knowing the context of your current page, a page title and a refresh icon. You can click any of the upward links in the breadcrumb to go back to that page. The refresh Icon is helpful if you need to start your entries.
G. Reminders Indicator
Next to the Reminders Main Menu item there will occur a number in a red circle. This is the un-attended-to reminders number. If this number appears (it will not if there are zero reminders to attend), you can click "Reminders" in the Main Menu to see what is in your reminders queue.
The Dashboard
The initial page once you log in is your property management dashboard.
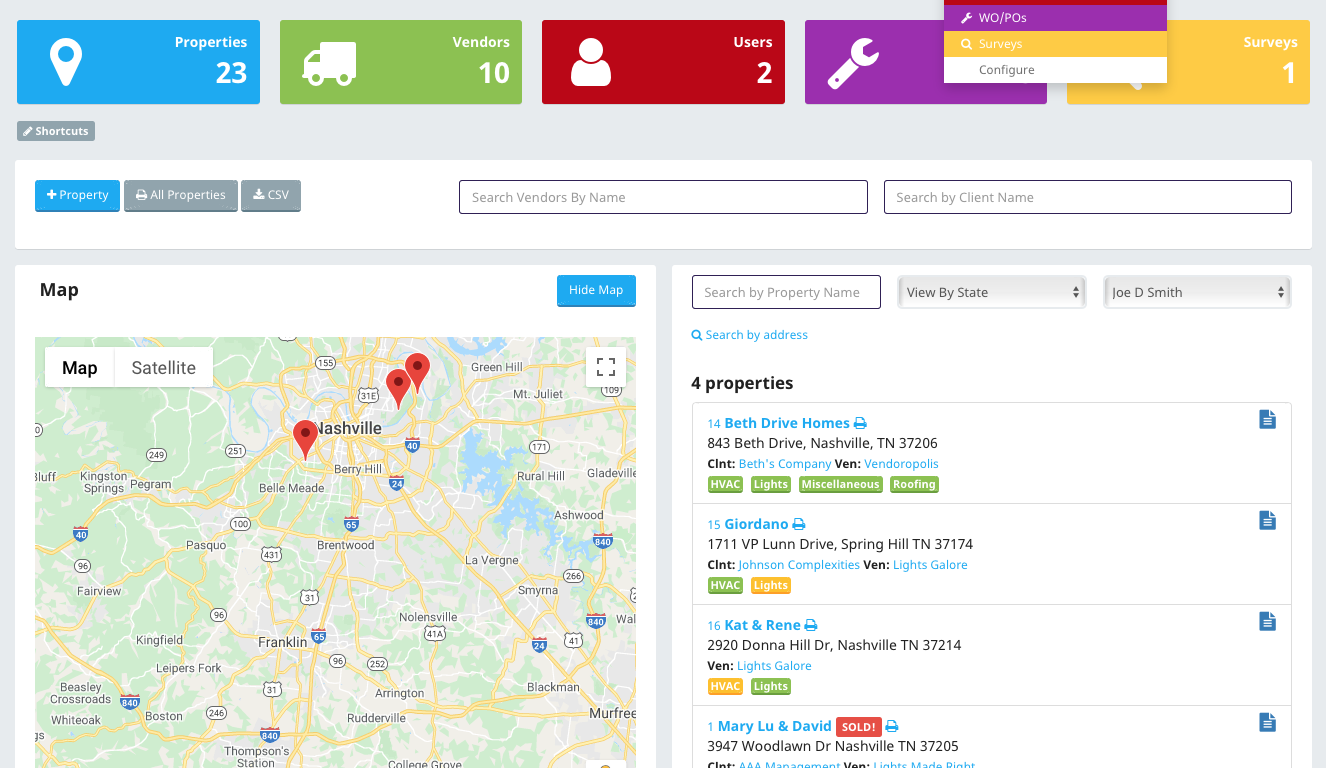
Shortcuts
The top contains your shortcuts. These are summary color blocks that are also links to important sections of the Sytewise system.
To edit your shortcuts
- Go to your user profile page by clicking your photo
- Or click the shortcuts button below the blocks
- Or click the "Configure" item in the shortcuts dropdown
- Find the shortcuts section and select up to 5 by checking the checkbox next to the shortcut.
Special Dashboard Tools
Just below the shortcuts is a set of buttons and search boxes that have particular functions. These choices are changing as Sytewise continues to improve it's toolset but the basics will remain the same.
Creating a new property
You can create a new property from the Main Menu on the left at anytime. Go to Properties > New Property. The dashboard and property pages also have a one click button that take you to the new property page.
Printing and Downloading All Properties
Sytewise lets users maintain a "Favorite Properties" list that is what is displayed in the Properties Summary on the dashboard and properties page. If you want to print or download a CSV of all the properties in the account click the associated button.
Quick Searches
On the dashboard there are quick search fields for going straight to a vendor or client profile page. Simply start typing the name of a vendor or client in the field, select the name from the list (arrow keys or with your mouse) and hit return. This will take you to the appropriate page.
Property Summary Map and List
The main part of the dashboard and property pages is the map and list of your favorite properties. You can add favorite properties in your User Profile or by visiting a property page and click the star next to the property name.
Clicking on a map marker reveals the property name (as a link to that property) and highlights the property in the list to the right. You can scale and move the map around with your mouse. You can also switch views and even go to street level view in every map on Sytewise. Sytewise maps are generated from Googles maps interface and will reflect their user interface and data.
Search by Name
Clicking in the "Search by Property Name" field and start typing will dropdown a list of properties in your account that match by name. Clicking (or using the arrow keys) to a name in the list and hitting return will go to that property page.
Narrowing or Expanding the Summary List
The list of properties (and their corresponding map locations) can be changed using the View By State and User dropdown choices. Simply choose any of the options in the lists and the list changes to only include those. Choosing a state will show all the properties located in that state. Choose a user will show you that user's favorite properties. This can be useful for management to check on the status of an employee's properties.
The Property List

The Property Name Line has the Sytewise internal property ID first, then the given name for the property. Clicking either of these will take you to the first created trade for that property. Finally, there is a printer icon which takes you to that property's printable page. The address is always on the second line.
Client and Vendors Line lists the client (which is for every trade on this property) and the default vendor for the first trade created for the property. To see who the vendor is for each trade go to the trade for that property.
Blue Contract Icon to the left allows you to reveal any contracts for the property. Clicking it will load a list of contracts under the property trades.
Property Trades are listed under the client and vendor line. Clicking "Load Trade Statuses" will change the color of each trade button on the list to the current status of that trade. Green: all fixtures in good order. Yellow: at least one fixture is out of order. Red: all fixtures and parts in that trade are in need of attention.
Additional Reading: WELCOME TO YOUR DASHBOARD
Property Page (part 1)
The property page in the Sytewise system is the central hub for all things property management. The page contains all pertinent information about a property with direct links to everything you need to know, if it isn't already represented on the page. There is, in fact so much to cover on the property page we created two pages just for the overview. Reminder: more detailed information about the use and best practice of Sytewise is contained in other chapters on this help site. Read about the bottom half of the property page.
 FYI Anytime you see this icon clicking it expands more information related to the title next to this button.
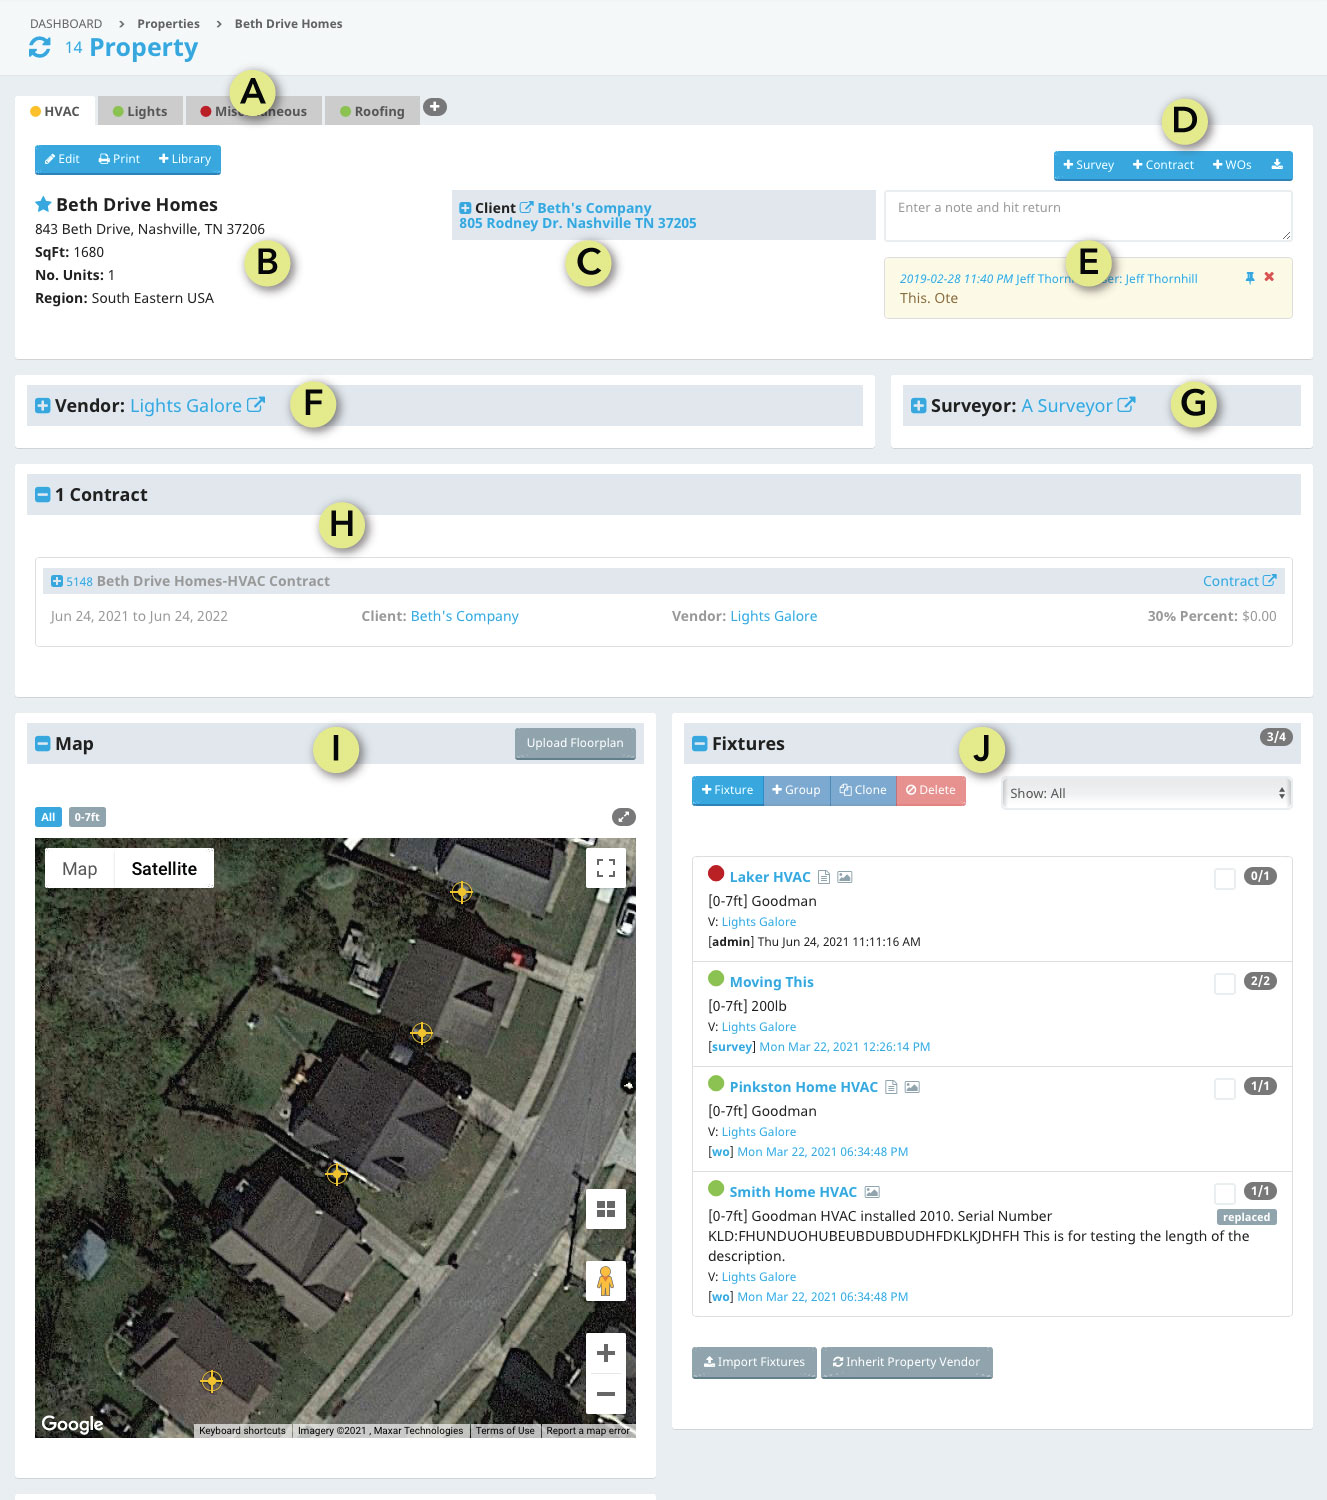
A. Trade Tabs
Each property has at least one trade. Your account has a set number of trades it can create, contact Sytewise to add or change that list of available trades. Adding a trade is as simple as clicking the "+" button at the far right of the trade tabs.
Switch between trades by clicking the tab. The colored dot indicates the status of that trade's fixtures. Green: all good. Yellow: at least one issue. Red: all parts and fixtures have issues.
B. Property Settings
The left third of the property info section is for specifics about the whole property, including any trades. Clicking the "Edit" button will open a form to change these settings.
NOTE: The property address is not editable. It was set when the property was created in Sytewise and is based on Geolocation technology for properly formatted addresses. It also includes the specific GPS location of the property marker.
C. Property Client
Each property can optionally be assigned a client. To see the client's contacts and other information expand the information box by clicking the "+" next to the client name.
D. Add Buttons
On the top right side of the property info section you will find a group of buttons for creating new Work Orders, Contracts and Surveys.
The download icon will download all the fixture data in a CSV format.
E. Notes
The right side of the property info section includes a notes tool. Simply type a note in the field and hit return to create a new note. Clicking the red "X" will delete the note. Clicking the blue thumbtack will pin the note to the top of all notes.
Each note is timestamped and indicates the username who created it.
F. Vendor Section
The vendor for the selected trade is listed in the title with a link to that vendor's page. Clicking the "+" button shows the vendor's contact details including any staff or other contacts you've created for that vendor.
To change vendors for the selected trade you can select a vendor by name or by distance from the property. Selected vendors are chosen when creating work orders or contracts for the selected trade.
- Select a vendor by name
- Starting typing a vendor's name in the vendor name field. From the list of found vendors click or arrow-key to the name and hit return.
- This will change the vendor for the selected trade.
- Select a vendor by distance
- Choose a distance from the dropdown list of distances and click "Find".
- This will produce a list of vendors within the distance selected sorted closest to furthest
- Click the "Select" button next to your vendor of choice to change the vendor for the selected trade.
Alternate vendors can be added to a trade. This is useful of your trade vendor is not available for particular work orders. Add alternate vendors the same way you select the primary vendor by name.
G. Surveyor Section
Surveys are a way of evaluating your properties with a visit from a particular type of vendor or employee. They are given a portal in which they can evaluate the status of your fixtures and parts and report on them directly into the Sytewise system.
Selecting a Surveyor works exactly like selecting a vendor by name but from your list of surveyors.
H. Contracts Section
This section gives a summary of any contracts associated with the property / trade. It includes links to related vendors, clients and the contract itself. Clicking the "+" next to the contract name reveals more details about the contract. A contract with a gray background has expired.
I. Fixture Map Section
Sytewise enables you to show fixtures for any Property / Trade on a GPS map or overlaid on a floorpan. By default fixtures are placed on the GPS map, and when you create a new fixture it is placed in the same GPS location as the property.
Custom markers indicate the fixture position on the map or floorpan. Yellow markers are for fixtures at ground level up to 7ft. Blue are from 8 to 16ft and Red and 17ft and higher.
To use a floorpan instead of the GPS map you click "Upload Floorpan". Follow the on screen instruction to upload an image. A floorpan must be at least 790 pixels and no more than 2200 pixels in either dimension. Once uploaded any existing markers will be placed in the upper left corner of the floorpan.
A Floorpan can be converted back to GPS, you will lose any marker position data if you do so.
The GPS map is embedded from Google's mapping API and operates like a typical interactive map with size, scroll, satellite and street views.
J. Fixtures List Section
The list of fixtures for the selected trade includes a lot of useful at-a-glance information and functions.

Status and Name: The colored dot indicates the fixture's status. Green: all parts good, Yellow, At least one part needs service, Red: all parts need service. See the gray numeric indicator to the right for the total good parts / total parts in the fixture. Clicking the name or the status dot takes you to the fixture page.
Note and Image Icons will appear to the right of the name if there is either of those associated with the fixture. Mousing over the note icon will summarize the most recent note.
[Height group] The fixture's height group is indicated in the brackets.
The Vendor for the fixture is indicated after "V:". and is a link to that vendor. A fixture can have an independently assigned vendor, otherwise it is assigned the default vendor for its Property / Trade.
If you set a separate vendor for a fixture and then go back to the Property / Trade and change default vendor this will change the specific vendor for each fixture.
The last line of the fixture listing is the most recent activity on that fixture as a one line log.
Read more about the property page.
Property Page (part 2)
The bottom half of the property page includes related information and links related to the selected Property / Trade. This article covers these parts of the property page. Read more about the top portion of the property page.
The property page includes a Tenants Section, A Work Orders Section, A Surveys Section and a section for Files and Insurance.
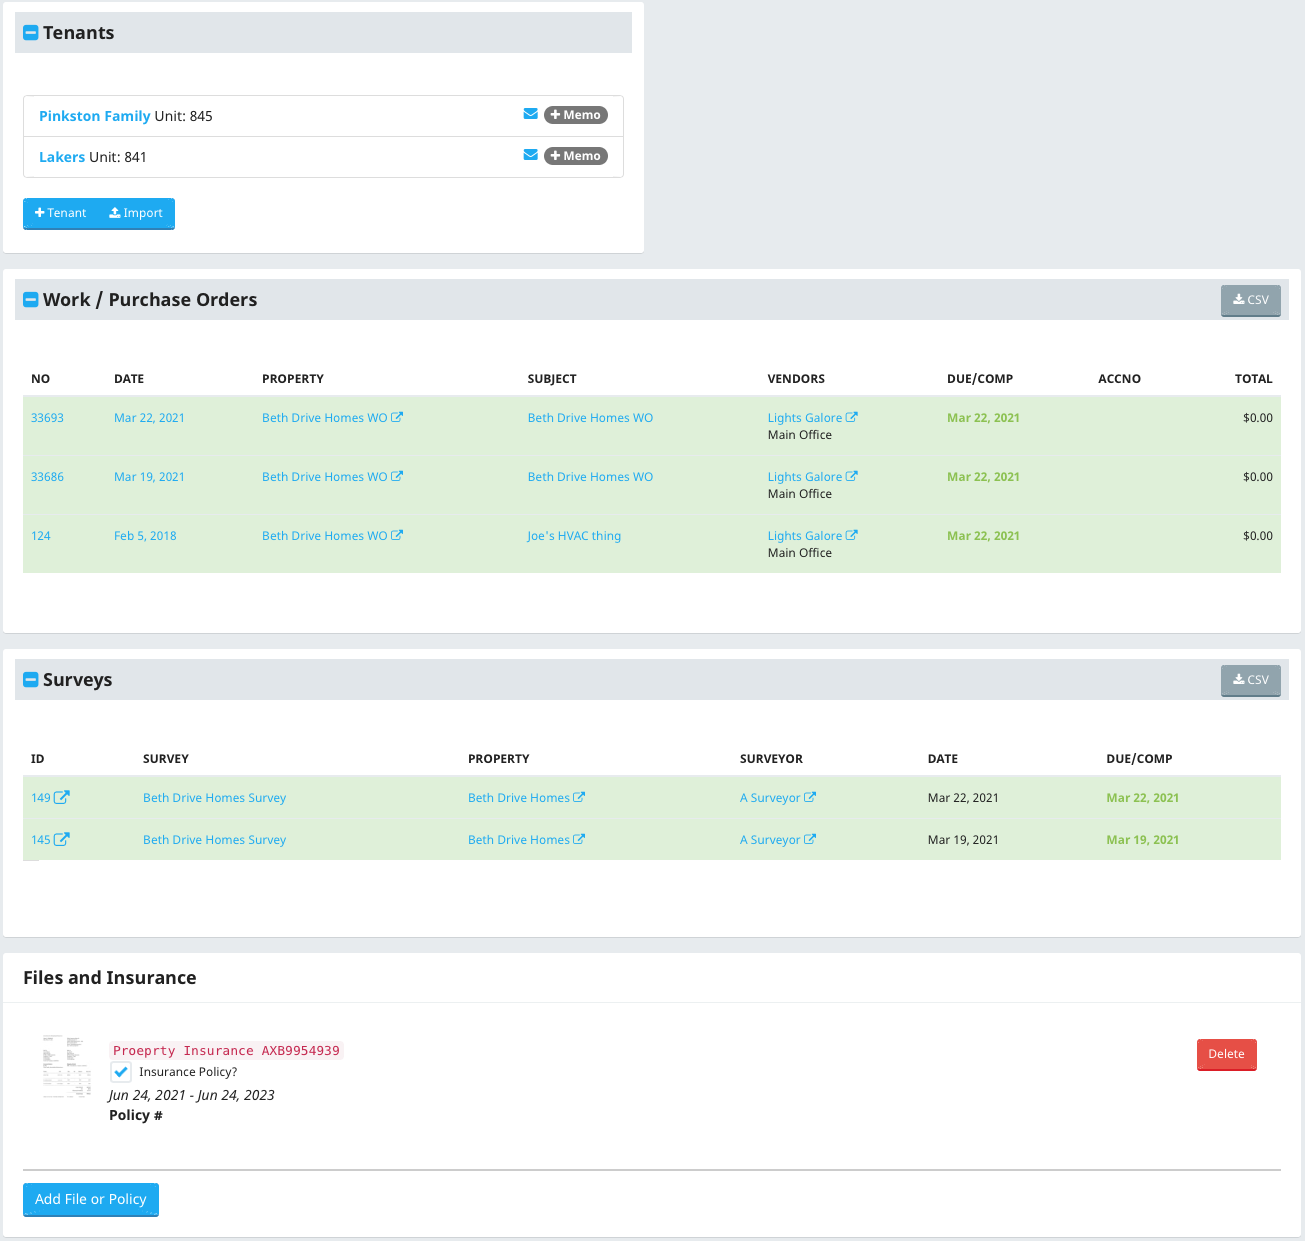
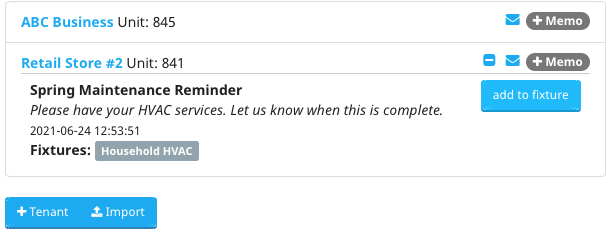
The Tenants Section
Each Sytewise property can have a number of tenants. They are trade independent so they are available no matter what trade you select. A tenant portal is available for tenants to respond to memos and send messages to admins.
Sytewise's tenant portal is a way to communicate with tenants in a convenient way that associates property and fixture information from the Sytewise Property / Trade specifically.
To create a memo
Click the "+Memo" button. In the popup window you can set a subject (which will be the email subject as well), a message and select fixtures to include in the memo from the fixture list. This sends the tenant a memo email with a link to the tenant portal. You can view any memos and their responses clicking the chat icon.
Once a memo has been created and it is associated with a fixture clicking the "Add to Fixture" button adds a note and any images in the memo to the associated fixture.
To add a tenant
Click the "+Tenant" button and fill out the popup form. If you want tenants to access the Tenant Portal create a username and password.
Once you have tenants you can click their name to go to their profile page and edit their information.
Clicking the envelope icon opens your email client with a new message to the tenant.
Work Orders and Surveys Section
All Work Orders and Surveys are listed in their respective sections. These are sorted by date with most recent at the top. A white background listing is active but incomplete. Green is completed and red is past due.
Clicking the number, date or title of the Work Order or Survey takes you to their respective details. You can also go directly to vendor's or surveyor's page from the list.
Files and Insurance
At the bottom of a Property / Trade page, as well as several other contexts within Sytewise, you can upload files. These files can be image (gif, jpg or png) or PDF files.
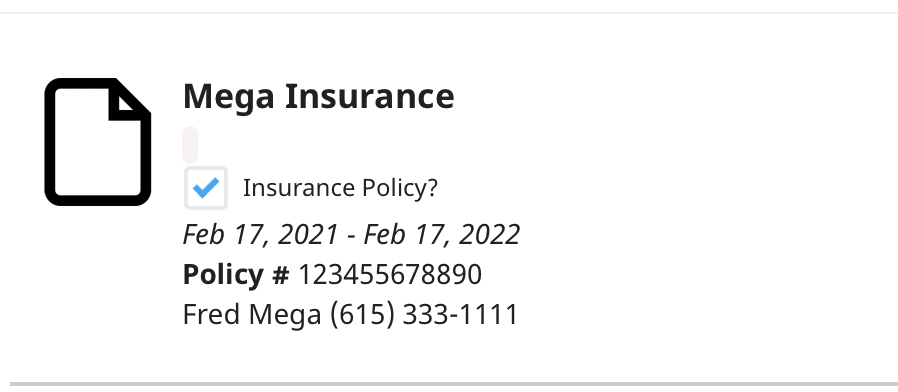
Once you've uploaded a file you can designate that file as an insurance policy. Doing so will add the insurance effective dates and policy specific information. Expired policies are indicated with a red background.
Fixture Page
Fixtures are where Sytewise's power comes in full display. A property manager manages fixed assets (Fixtures) and their detailed parts by entering critical information for fixtures and the maintainable parts of any fixture. Simply as a reference this is a substantial resource. But when coupled with Sytewise's Work Orders not only do you have reference you have history and performance.
The Fixture Page Sections
Fixture Details Section
Fixture Details
This section includes editable detail fields for your fixture including the title, description, installation notes and the default vendor among other characteristics.
The middle portion is for notes.
Enter a note and hit return to save it. You can delete or pin saved notes.
The right portion is for uploaded files.
You can upload images (gif, jpg, and png) and PDF files. When you've uploaded a file a thumbnail appears. Clicking the middle of the thumbnail opens images in a popover modal with the original filename at the bottom. Clicking a PDF opens the file in a new browser window from which you can save the file to your local computer.
Click the "Heart" icon in the upper right of any thumbnail to make it the primary image that shows up on the printed summary of the fixture and places it as the first file in the thumbnail grid of files.
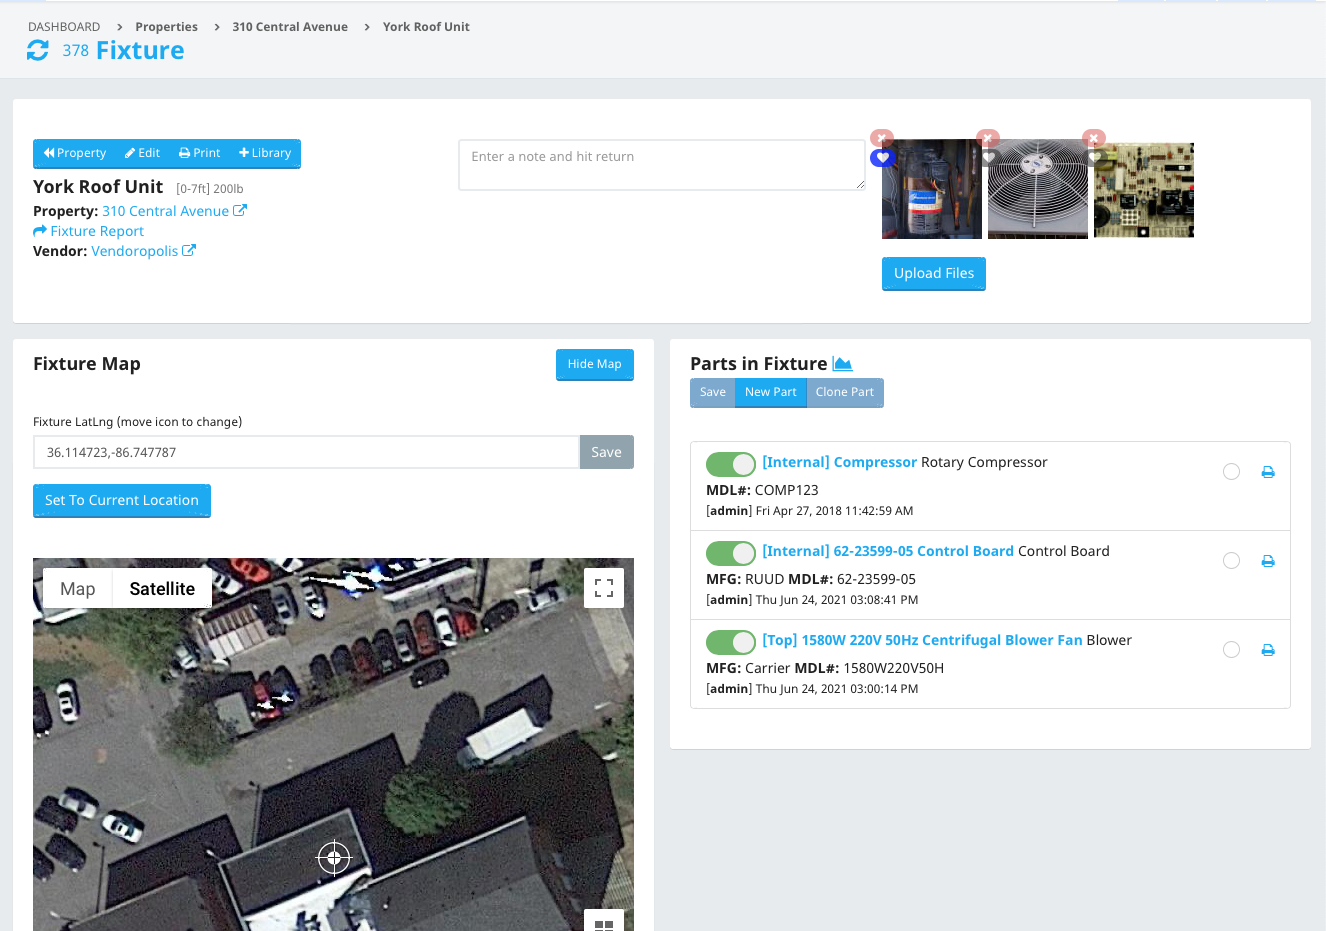
Fixture Map
The Fixture Map is where the map or floorpan marker is located in context. Fixtures are on either GPS or Floorplan maps.
For GPS Property / Trades Markers
The marker is located by GPS coordinates. The fixture selected will be the larger marker in the center of the map. To relocate the marker click and drag the marker to it's new location. If you have trouble grabbing the marker place your mouse over it's edge and wait a couple seconds. If a "Move Me" label appears, move the marker to your desired location on the map.
Once the marker is at the desired location find the red "Save" button above the map. It will show the new coordinates of your marker. Click save.
For Floor Plan Markers
When the Property / Trade has an uploaded Floor Plan you can move and save the markers in the same way. Just find the larger marker and click and drag it. (The other, smaller makers are not "draggable). Make sure you save the new location before leaving the page.
The Parts List
The parts list is an at a glance view of all the parts in a fixture with tools for managing the list. Each part lists a summary of the data for that part including
- [The Position] in brackets. Position is a short text field that let's you reference how to differentiate similar parts. Uses include "Top", "Southwest", "A", "Internal" etc.
- Part Number is the next field, or the name of the part. Both position and Partno are links to open the detail part editor.
- Description is on the end of the first line.
- Manufacturer and Model Number are on the second line.
- Recent Activity is on the bottom
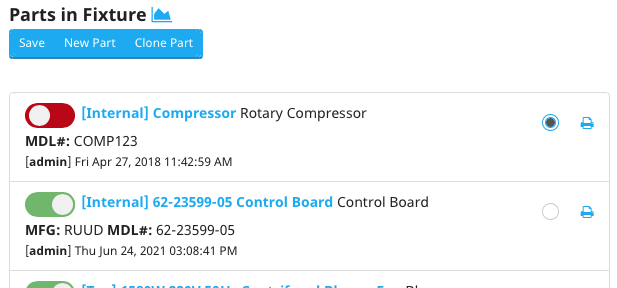
Managing, Editing Parts
Status Change
A part can have one of two status's. On or Off. "Good" or "Bad", "In Service" or "Out of Service". You can change this status by clicking the Red or Green status toggle and clicking the "Save" button above the list. This will be logged as an Admin change to the status of that part and fixture status.
Surveys and Work Orders are the most common way part status's get changed although an admin has the authority to make those changes within the Sytewise master system.
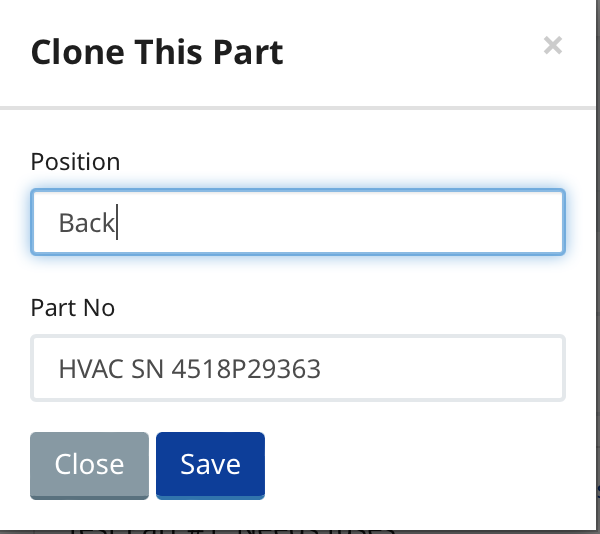
To Clone A Part
- Select the part to clone by checking the radio choice on the right side of the part listed. It's to the left of the print icon.
- Click "Clone Part" at the top of the list to open the clone part modal window.
- Give it a Position and a new part number if necessary.
- Save.
- This will create an exact clone of the part with all the details.
- Open the new part to edit any differences.
To Delete A Part, open the edit modal and click "Delete This Part"
Part Details
If the fields made available to you in the parts details are not enough for the information you wish to add to your parts, Sytewise gives you a simple tool for adding a table of data for your parts.
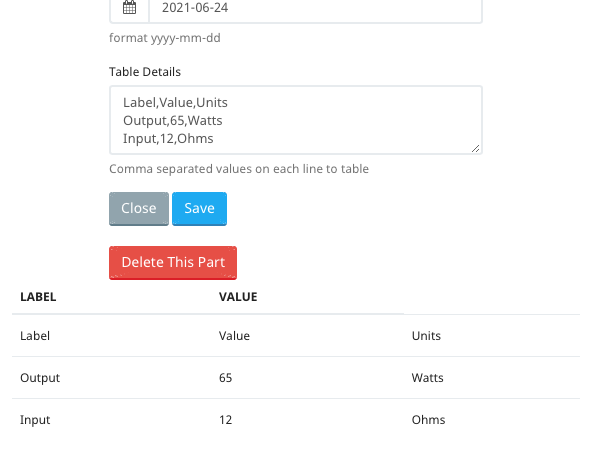
To add a detail table to a part do the following:
- Open a part detail editor by clicking the part name or position
- Find the field labeled "Table Details"
- Enter comma separated text to the field.
- For example enter: Label, Value, Units for three columns
- Add a line break (return) to start a new row and enter the same number of comma separated values.
- To preview your table click outside the edit field or tab to escape the field.
- The new table will appear below the buttons.
- Feel free to make changes and click out of the field to continue editing
- Once you are done adding your table don't forget to click "Save"
Work Orders in the Vendor Portal
Sytewise offers a Vendor Portal to all accounts where vendors can interact with Work Orders and their account information. When you create a vendor they are given credentials for logging into the portal. When you create a new Work Order it is registered in the system and added to the vendor's portal account. If you send an email version of the Work Order to the vendor the email contains a link to the Work Order in the portal with an option to login.
The Work Order Options
Simple Completion Option
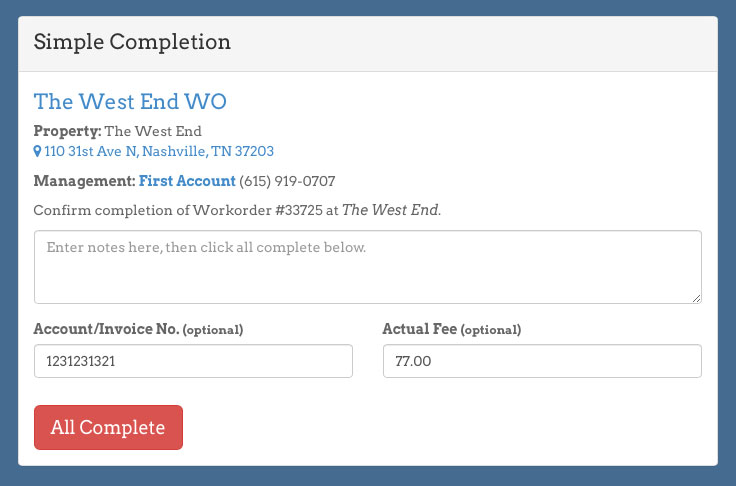
If the vendor is able to complete the work with no issues or changes they can simply click the "All Complete" button. They can optionally add a note and update (if available) the Account or Invoice Number and the final cost. The fixtures and parts are updated, Sytewise logs the activity and you get notified. Done!
Detailed Completion Option
Vendors may need to enter some extra details with the work they perform (or cannot). This when they use the Detailed Completion option.
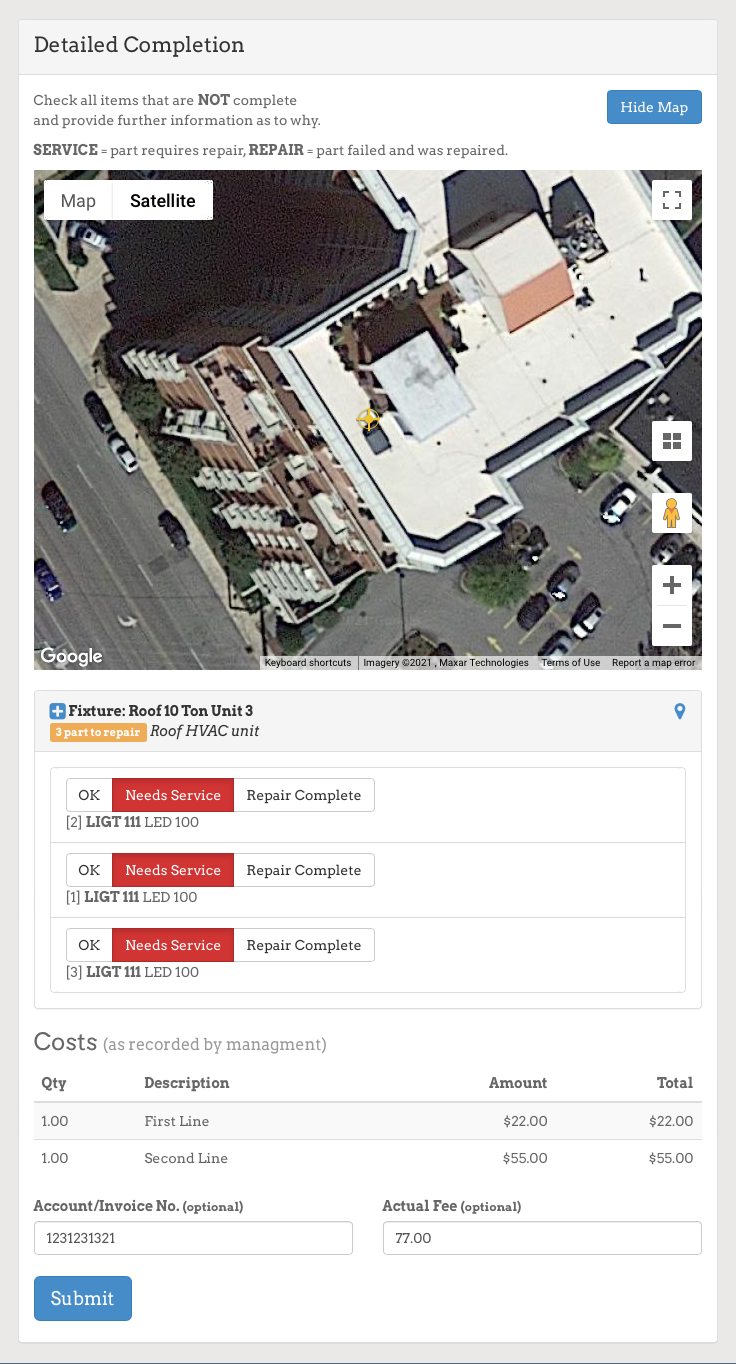
The fixtures in question will be shown on a map or floor plan. Expanding the fixture details using the "+" button next to the fixture name reveals all the parts and each three choices for each.
- OK: They find the part to need no service and they did not perform any. In this case they check "OK"
- Needs Service: the vendor can chose this if they find the part faulty but are not performing any repairs
- Repair Complete: This is most typically what a vendor checks. The part needed service and they performed a repair or replacement therefore the part repair is complete.
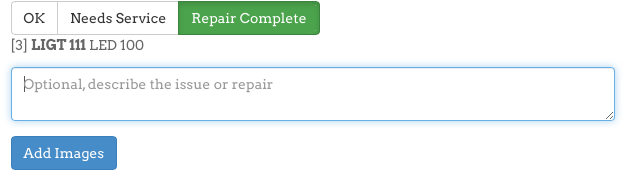
If a part is changed to Repair Complete or Needs Service a note field and image uploader is provided. Vendors can enter notes and upload as many as 6 images. These entries will be a part of the Work Order but also integrated into the fixture on Systwise.
Just like the simple completion version, the detailed version allows the vendor to enter or update costs and account numbers. Once submitted the Work Order's data is integrated into the Sytewise account.
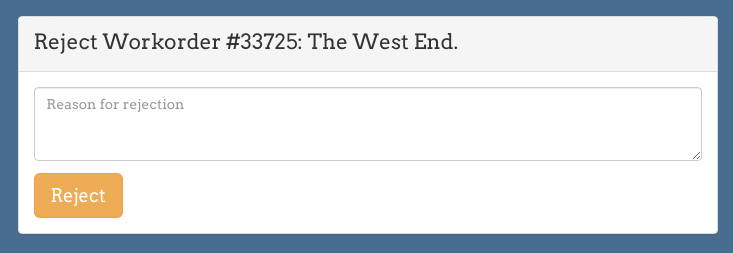
Reject Work Order
A vendor is given the opportunity to reject any submitted Work Order. This will notify the account managers as set in their preferences and show the Work Order Rejected in the system.
Adding and Managing Clients
Clients are an integral part of property management if the relationship with the property manager is on behalf of an owner. This would be the client. Clients are also integrated into the contract system as there is a relationship between the the vendor and the client and sometimes the Sytewise account holder (the property manager).
To create a new client
Go to Clients > Clients and expand the section "Create a New Client". A form will appear that looks something like this:
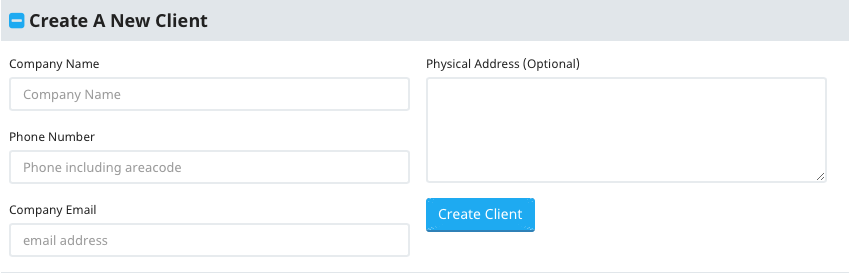
Clients must have a name, a contact phone number and a valid email address at a minimum. Remember to choose unique names so you can differentiate between entities like clients.
The Client Profile Page
The client profile page allows many contextual links and tools.
Contracts
The relationships between a property manager, the owner (client) and a vendor often requires contractual definitions. Sytewise contracts are available for any property / trade where required.
Creating A Contract
From the property / trade you wish to add a contract, click the +Contract button found in the top right of the page header. This will open the new contract modal window.
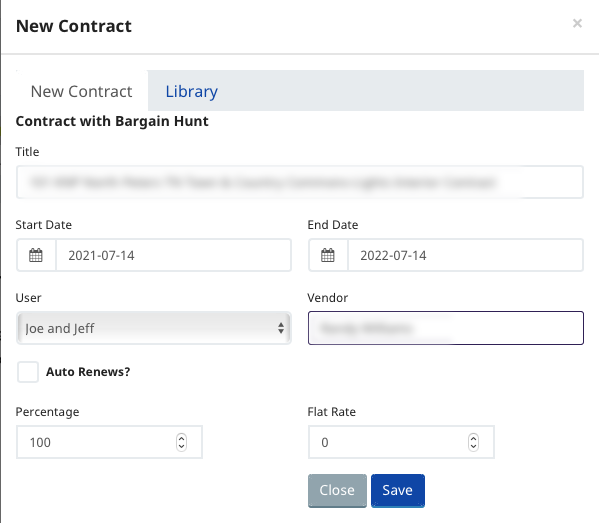
A title is created based on the Property / Trade. You can change the title to anything you want, just be sure to make it unique and identifiable. See this article on naming.
The start date is today by default but you can change it to whatever suits your needs. The end date is set to one year from today by default but feel free to change that.
The user is assigned for reference and can be used to track the responsible person for the contract. It is by default the user who is logged in.
The vendor is set to the default vendor for the property / trade. This can be changed.
Percentage and flat rate are basic cost references for calculating fees. Sytewise can create custom contract calculations and terms forms. Simply contact us to arrange for an estimate.
Email Log
Sytewise notification system utilizes a transactional email service. When a Work Order or Survey is issued an email is sent to the vendor or surveyor. Upon completion (or rejection) or the order a new message is sent to administrators who've opted in for property update emails.
Every Work Order and Survey has a log of all emails sent regarding that action. The log shows the status of that message, if it was sent successfully or not.
The Email log is a summary of all emailing acting in one place. You can narrow it down to Work Orders or Surveys and see the list in descending order by date time. These same logs are also available within each Survey or Work Order record.
Creating a Checklist Template
Think of a checklist template as the master recipe for a recurring task. You write it once, and from that point on, anyone on your team can follow the same steps every time, at every property without reinventing the wheel. Whether you're building a seasonal HVAC inspection, a roof walkthrough after a storm, or a move-out cleaning verification, templates keep the work consistent and the records clean.
This article walks you through building a template from scratch and explains every option available when setting up each item.
Getting There
Click + New Checklist to open the template panel and get started.
Step 1 — Set Up the Template
The top portion of the panel is the template's identity card — it tells the system what this checklist is, who it belongs to, and how often it should run.
Checklist Title (required)
Give your checklist a name that leaves no room for confusion. Rooftop HVAC Quarterly Inspection will serve you much better than HVAC Check six months from now when you're looking at a list of forty templates.
Minimum 2 characters.
Trade
Assign this checklist to a specific trade — Electrical, Plumbing, HVAC, General Maintenance, and so on, or leave it at Any Trade if the checklist isn't tied to a specific type of work. This determines which work orders and vendors the checklist can be linked to when it's assigned in the field.
Default Start Interval
When this template gets assigned to a fixture, how far out should the first due date land? Enter a number and pick the unit:
|
Unit |
Maximum |
|
Days |
150 |
|
Weeks |
52 |
|
Months |
12 |
Setting this to 3 Months means every new assignment of this template automatically lands 3 months out on the calendar. You can always adjust individual assignments. This is just the sensible default so you're not starting from zero every time.
Instructions (optional)
Got something important to say before the technician even looks at item one? Put it here. The rich-text editor supports bold, italic, lists, tables, and links so you can include safety warnings, required tools, reference documents, or a note like "Do not attempt this inspection during active rainfall." Instructions entered here appear at the very top of the checklist when it's opened in the field.
Step 2 — Save the Template
Click Save Checklist. The record is created and the Checklist Items section appears below. Now for the fun part.
Step 3 — Add Checklist Items
Each item is one task, one inspection point, or one step in the process. Click Add Item to expand the form and fill in the details.
Item Fields Explained
Item Title (required)
Action-oriented titles age better than vague ones.
Check condenser coil for debris and clean if needed is clear, useful, actionable. Condenser coil is technically correct, completely unhelpful.
Minimum 2 characters.
Description (optional)
This is your chance to elaborate. Step-by-step instructions, acceptable tolerance ranges, reference measurements, specific product numbers, safety reminders — anything the person doing this task needs to know goes here. The rich-text editor gives you full formatting including tables, which is handy for things like pressure reading charts or torque spec tables.
Example — Electrical Panel Inspection: Title: Inspect all breakers for heat damage or corrosion Description: Use a non-contact thermometer. Any reading above 140°F on a breaker at normal load warrants flagging. Document the breaker number and reading in the notes field.
Checkboxes (optional)
Some steps aren't one thing — they're five things that all need to happen. Rather than creating five separate items, you can load a single item with a set of sub-checkboxes. Type each one on its own line and the system turns them into individual checkboxes in the field.
Example — Filter Replacement item:
Old filter removed and disposed of properly
New filter installed in correct airflow direction
Filter size and rating logged
Access panel secured
Thermostat reset to schedule
A few things to know:
- Blank lines are ignored
- Duplicates are removed automatically (the system is forgiving if you're copy-pasting from a document)
- Checkboxes can't be used on PPE Detection steps — more on those below
Completion Requirements
Must Complete This Item
The red star treatment. When this is checked, the field technician cannot submit the checklist without addressing this item — no skipping, no sneaking past it. Uncheck only for items that are genuinely optional in every situation, like Photograph optional secondary access panel.
Required items show a red star (✱) in the item list so you can see at a glance which items are locked in.
Default: checked — because most items on a maintenance checklist probably matter.
Zip File Required
When you've attached a zip resource to this item (a wiring diagram, installation manual, or spec sheet — more on that below), checking this box means the technician must download and acknowledge that file before the item can be marked complete. It's the system's way of saying "you actually have to look at this, not just scroll past it."
Notes
Three options. Pick the one that fits the item:
|
Option |
What happens |
|
Note Allowed |
A notes field appears but it's optional. Staff can comment if there's something worth recording. |
|
No Note Allowed |
No notes field. Clean and simple — the item is pass/fail and a comment section would just add noise. |
|
Note Required |
Staff must type something before moving on. Perfect for items where a reading, measurement, or observation has to be on record. |
Example — Note Required use case: Item: Record static pressure reading across the air handler With Note Required enabled, the technician has to enter the actual reading before they can check the box. The number lives in the record forever.
Example — No Note Allowed use case: Item: Confirm unit is powered off before beginning work This is a safety confirmation. There's no measurement to record and no variation — it's either done or it isn't.
Signature Required
When this is checked, the person completing the item has to provide a digital signature before it can be marked done. Use this for safety-critical sign-offs, supervisor confirmations, or any step where accountability needs to be unambiguous.
Example: Supervisor sign-off: all work completed and tested before leaving site
Signature items show a signature icon in the item list.
Images
Two controls work together here:
Max Images Allowed — A dropdown from 0 to 9.
- 0 means no photos on this item at all
- 1–9 sets the ceiling for how many photos can be attached
Image Required — When checked, at least one photo must be uploaded before the item is complete. Only available when Max Images is 1 or higher.
Example — Image Required use case: Item: Photograph equipment nameplate showing model and serial number Set Max Images to 1, check Image Required. The record now always has the nameplate photo attached. No photo, no sign-off.
Example — Max Images without Required: Item: Document any visible damage or wear Set Max to 5, leave Image Required unchecked. If there's nothing to photograph, the technician moves on. If there are five things to document, they can capture all of them.
Illustrations (optional)
These are reference materials you attach to the item — not photos taken in the field. Think wiring schematics, product installation diagrams, floor plan excerpts showing equipment locations, or any visual aid that helps the technician do the work correctly.
- Images open in a full-screen viewer
- PDFs open in a new tab
- Multiple illustrations can be attached to a single item
- Technicians can see them; they can't delete or replace them
Click Upload Illustration to attach files via the media uploader.
Example: Attach the manufacturer's maintenance diagram to a Clean and inspect burner assembly item so the technician has the correct exploded view right there in the checklist without having to hunt for it.
Zip File Resource (optional)
Need to deliver a whole folder of materials to the technician for a specific step? Attach a zip archive. One zip per item, up to 3 GB.
This is the right tool for: firmware update packages, multi-document installation kits, collections of reference PDFs, or software tools needed to complete the task.
Click Upload Zip to attach. If Zip File Required is also checked, staff must download it before the item can be completed.
Can Annotate Images
(Available on accounts with the Annotation module)
Checking this gives field staff the ability to draw directly on photos and illustrations — circling problem areas, adding labels, marking specific locations. The annotations become part of the permanent record.
Example: A roof inspection item where the technician photographs a cracked flashing and then circles the crack and labels it "Active moisture intrusion — NW corner drain" before submitting.
PPE Detection
(Available on accounts with the optional Detection Module)
This one's a bit different. Instead of a standard task item, PPE Detection turns this step into an automated safety verification — the system actually analyzes a photo to confirm the right protective gear is being worn before the step can be cleared.
When enabled:
- The standard form is replaced with the PPE verification panel
- The item becomes required automatically
- The technician must upload a photo, and the system checks it for the selected equipment
Select the gear to verify:
|
Code |
Equipment |
|
VEST |
Safety vest |
|
HELMET |
Hard hat |
|
GLOVE |
Gloves |
|
PERSON |
Person present in frame |
|
BOOTS |
Safety boots |
|
GLASS |
Safety glasses |
Example: For a rooftop electrical inspection checklist, add a PPE Detection step as item one — Confirm PPE before beginning work — and select VEST, HELMET, and GLASS. The technician snaps a selfie in their gear, the system verifies the equipment is present, and only then can they proceed to item two. No gear, no green light.
Managing Items
Reordering
Each item has up and down arrows. Click to shift an item one position. The first item has no up arrow; the last has no down arrow. Build your checklist in the logical sequence a technician would actually follow — don't make them jump around.
Editing an Item
Click anywhere on an item row to expand its edit form. Opening one item automatically collapses the one you were looking at, so the list stays readable.
Deleting an Item
Open the item's edit form and click Delete Item. Permanent — so give it a moment's thought before clicking.
Item Status Icons at a Glance
The item list shows a row of small icons for each item so you can read the configuration without opening it:
|
Icon |
What it means |
|
✱ Red star |
Item is required |
|
Signature |
Signature required |
|
Paintbrush (blue) |
Has an illustration attached |
|
Paint tool |
Annotation enabled |
|
Image |
Photos allowed |
|
Image + red slash |
No photos allowed |
|
Image + checkmark |
Photo required |
|
Comment bubble |
Notes allowed |
|
Comment + red slash |
No notes allowed |
|
Comment + checkmark |
Notes required |
|
Archive icon |
Zip file attached |
A quick scan down the icon column tells you a lot about how a checklist is structured — which items are high-accountability, which are documentation-heavy, and which are straight pass/fail.
Duplicating a Checklist
Built a solid template and need a close variation of it? Open the template and expand the Duplicate section at the bottom of the panel. Give the copy a new name — the system helpfully pre-fills it as [Original Name] COPY — and click Duplicate.
Everything comes along for the ride: all items, all illustrations, all zip files. Edit the copy freely without touching the original.
What Happens Next
A template on its own just sits in the library. The action happens when you assign it to a specific fixture on a property — at that point, a live instance is created with its own due date, completion record, and history. The template stays pristine and reusable. The instance is the real-world paperwork.
Head to the Checklists tab on any property to put your new template to work.
Fixture Checklists: From Assignment to Archive
Checklists are how work gets done, tracked, and proven. Once you've built a template (see the article on creating checklist templates), it's time to put it to work on an actual fixture. This article walks you through assigning a checklist, managing it through completion, and downloading the evidence when the job is done.
Assigning a Checklist to a Fixture
A two-step form appears.
Step 1: Pick your template. The dropdown shows only the templates that match the fixture's trade or are set to "Any Trade," so the list stays relevant. Select your template and click Next.
Step 2: Configure the assignment. Now the fun part:
- Checklist Name is auto filled with the fixture name and template name combined. You can rename it if a more specific name will be better, or add a date to make sure repetitive work is easily found by date.
- Completion Due Date is pre-calculated based on the template's default interval. Adjust it to match the actual deadline.
- Choose A Vendor is optional. If someone needs to do this work, type at least three characters to search and select from your vendor list.
- Vendor Emails appear as checkboxes once you select a vendor. These are the contacts from the vendor's profile who will receive the checklist notification. Check the ones that should get the email. If you're not assigning a vendor yet, leave it blank.
- Instructions pulls in from the template but can be edited here for this specific assignment.
- Upload ZIP Resource is available if you need to attach reference files (like specs or drawings) for the vendor to download when they open the checklist.
Click Create to save the checklist and send notifications to any selected vendor emails.
Checklists and Work Orders
The most common way vendor email recipients are handled is through the work order, not the checklist assignment directly.
When a work order is created for a property and vendor, the Linked Checklists section on the work order page shows any fixture checklists that match the same vendor and property/trade. You can add them to the work order by selecting from the dropdown and clicking Link Checklist. The work order email that goes out automatically includes links to those checklists, so the vendor gets everything they need in one place without you having to send checklist notifications separately.
This means that when you're assigning a checklist to a fixture, you may intentionally leave the vendor email checkboxes unchecked because the work order will handle getting the link to the right people. The direct vendor email option on the checklist is there for cases where you're assigning a checklist outside of a work order and need to notify someone right away.
Making a Checklist Visible to the Public
On any active checklist, you'll see a checkbox labeled Visible on the public site. Toggle this on and the checklist gets a public URL that doesn't require a Sytewise login.
That link can be shared with a vendor or field tech who needs to complete the checklist on a phone or tablet. They see a clean, mobile-friendly version with only the checklist, not the rest of the admin. The link is also included in the notification email that goes out when you assign the checklist.
Watching Progress
Checklists live in three states: Not Started, In Progress, and Complete. A progress bar on the checklist header shows where things stand at a glance.
While a checklist is in progress, each task card shows the vendor what they need to do. Depending on how the template was built, a task might ask for:
- A written note (allowed, required, or not available at all)
- One or more uploaded photos or files
- Simple checkboxes to tick off
- A signature with a typed full name
- A zip file upload (for submitting documents or reports)
Required items must be completed before that step can be marked done. Optional items are there if the vendor needs them.
The vendor taps Mark As Complete on each task when they finish it. The checklist automatically moves to Complete once all required steps are done.
Editing an Active Checklist
Even after a checklist has started, you can make changes. Click Edit on the checklist header to update:
- The checklist name
- The assigned vendor
- The due date
- The instructions
- The attached ZIP resource
Vendor email recipients can be updated here as well. Useful when the original contact changed or you need to loop someone new in.
When It's Complete: Reviewing the Work
A completed checklist shows everything the vendor submitted:
- Notes entered for each step
- Images uploaded (click any thumbnail to enlarge)
- Checkbox responses
- Zip files submitted
- Signatures with the signer's name and timestamp
Click Check All Media to see every photo and file in one view. If any images are worth adding to the fixture's permanent record, use the Add Media to Fixture checkboxes to copy them over.
Downloading All Attachments
When a completed checklist has photos or uploaded files, the Download Assets button appears. Click it and Sytewise bundles everything into a single ZIP file and downloads it to your machine. One click, all the proof.
Deleting a Checklist
The Delete This Checklist button is available at any stage. Deleting is permanent, so Sytewise will ask you to confirm before anything disappears. If the checklist is linked to a work order, you can remove that link separately from the work order page using the delete icon in the Linked Checklists table.
Finding Checklists Across Properties
The main Checklists page (in your navigation) has a search tool for fixture checklists. Filter by status (Incomplete or Complete), property, trade, and date range, then click Find Checklists. Results can be downloaded as a CSV using the download icon at the top of the results table.
Using Checklists with Work Orders
Checklists and work orders are designed to work together. Understanding when to attach a checklist to a work order versus sending it directly to a vendor will help you get better tracking, cleaner records, and less manual follow-up.
How Checklists Connect to Work Orders
When you create a new work order, Sytewise checks for any fixture checklists that match the work order's vendor and property/trade. If eligible checklists exist, they appear at the bottom of the WO creation form and you can select them to include. After the work order is saved, the vendor email that goes out automatically includes direct links to every checklist attached to that WO. The vendor opens one email and has everything they need: the scope of work and the task checklists to complete.
You can also attach checklists to an existing work order. On the work order detail page, the Linked Checklists section shows what's currently attached and provides a dropdown to add more. Only checklists that match the work order's vendor and property/trade will appear in that list.
Tip: A checklist linked to a work order shows up in the WO email automatically. You don't need to send it separately. The vendor gets the checklist link right alongside the work order details.
When to Attach a Checklist to a Work Order
If the work described in the checklist is tied to a purchase order or vendor invoice, attaching the checklist to the work order is the right call. The work order creates the paper trail: who was assigned, when the work was due, what fixtures were involved, and what the vendor was expected to complete. The checklist becomes part of that record, not a standalone item floating outside of it.
Tip: When the work needs to be tracked against a PO or vendor payment, always attach the checklist to the work order. It keeps the accountability in one place and gives you a complete picture of what was scoped versus what was actually completed.
When to Send a Checklist Directly to a Vendor
Sometimes you need to get instructions to someone without generating a work order. If the task is for internal staff, or the vendor relationship doesn't involve a formal PO, or you just need to send a one-off checklist quickly, you can assign a checklist directly to a vendor from the fixture detail page. Sytewise sends the checklist notification email right away with a direct link, no work order required.
Tip: Use direct send when the task doesn't need a work order behind it. A vendor checklist for an informal inspection, a staff task list for routine rounds, or any instruction that doesn't generate an invoice is a good candidate for direct send.
Vendor Reassignment Carries Through Automatically
If you reassign a work order to a different vendor, Sytewise automatically updates the vendor on every checklist linked to that work order, as long as those checklists haven't been completed yet. You don't need to go into each checklist and update the vendor manually.
Tip: If a vendor change happens mid-job, reassign the work order and the open checklists follow automatically. Completed checklists are left as-is since that work was already done by the original vendor.
Deleting a Work Order Releases Its Checklists
When a work order is deleted, Sytewise detaches all linked checklists from it. The checklists themselves are not deleted. They go back to being unlinked fixture checklists, available to attach to a different work order if the work is being re-issued under a new PO or to a new vendor.
Tip: If a work order needs to be cancelled and reissued instead of being reassigned, delete the original WO and the checklists will free up automatically. Then create the new work order and attach them fresh. No need to recreate the checklists from scratch.
Removing a Single Checklist from a Work Order
You don't have to remove the whole work order to unlink a checklist. On the work order detail page, the Linked Checklists table has a delete icon next to each checklist. Clicking it removes the link between that checklist and the work order, setting the checklist free to be attached elsewhere. The checklist itself, and all progress on it, is preserved.
Summary: Attached vs. Direct
|
Situation |
Best Approach |
|
Work tied to a PO or vendor invoice |
Attach to work order |
|
Multiple fixtures, one vendor, one job |
Attach to work order |
|
Informal task, no PO involved |
Send directly from fixture |
|
Instructions to internal staff, no WO |
Send directly from fixture |
|
Quick one-off inspection checklist |
Send directly from fixture |
Adding Parts to Fixtures
A fixture in Sytewise is more than a name on a list. It's a container for the actual equipment that makes a space work: the controllers, panels, processors, cameras, access points, HVAC units, or whatever physical components live inside that fixture's scope. Parts are how you get that equipment into the record, and tracking parts is how the record becomes genuinely useful over time.
This article covers every way to add parts to a fixture, how to use the library system to make repetitive builds fast, and why the investment in building out accurate part records pays off every time something breaks, gets replaced, or needs to be reported on.
Why Track Parts at All
Before getting into the how, it's worth saying a word about the why, because this is the step many teams skip and later wish they hadn't.
When a fixture has documented parts, every work order that touches that fixture tells a more complete story. The technician arriving on-site sees exactly what's installed, where each component is located, the part number, manufacturer, model, and installation date. No guesswork, no calling around to figure out what brand of controller is in the rack.
Status tracking at the part level is where things get even more useful. Each part carries a green or red status. Green means operational. Red means it's a problem. When parts go red, the fixture's overall status reflects it, which feeds into survey reports, work order triggers, and dashboard counts. Over time, the history of which parts went red and when becomes a maintenance record. That record tells you which components fail most often, which fixtures need the most attention, and whether a pattern of failure suggests a systemic issue rather than random bad luck.
For AV integrators, the parts record is essentially the as-built documentation for the installation, structured in a way that survives vendor transitions, staff turnover, and the general amnesia that tends to accumulate over years of managing a complex system.
Finding the Parts Section on a Fixture
Open any fixture from the property detail page or from the Fixtures list. The fixture detail page shows a map or floor plan on the left and a column of cards on the right. The Parts in Fixture card is where all part management lives.
The card has a small toolbar at the top with buttons for Save, Clone, Library, and New Part, plus quick-action buttons for Check All and All Green. The part list loads below. Each part appears as a row with its part number, position, description, and a status indicator.
Adding a Part by Hand
Click New Part to open the part entry modal. The modal has two tabs: New Part and Add From Library. New Part is the one you want for entering a component from scratch.
Required Fields
Part No (Serial No) is required and must be unique within the fixture. This is the identifier you'll use to track this specific component. Use the actual part number, serial number, or a structured internal identifier, whatever makes sense for your workflow. Just make it meaningful because it's what you'll be searching and reporting on.
Description is required and is the plain-language name for this part. "Left Audio Processor," "Rack Controller Unit 2," "East HVAC Compressor." Keep it descriptive enough that someone unfamiliar with the installation understands what they're looking at.
Optional Fields That Are Worth Filling In
Position is a short field (up to 12 characters) for noting where this part lives within the fixture. "Rack 1," "Left Wall," "Bay 3," or coordinates if you're working with a structured grid. Position makes the parts list readable at a glance and helps anyone walking into the space orient themselves quickly.
Manufacturer and Model Number round out the identification of the part. These fields are what connect a part record to a real-world product, which matters when you need to reorder, file a warranty claim, or find a compatible replacement.
Installed Date defaults to today but should reflect the actual installation date if you're backfilling records. This is the starting point for warranty tracking and age-based maintenance planning.
Warranty Expire Date and Warranty Description are there if you want to track coverage. A fixture with expiring warranties worth thousands of dollars is worth flagging before those dates pass.
Table Details is a flexible free-text field that displays as a structured table on the part record. Format it as one item per line with comma-separated label and value pairs. Use it for firmware versions, configuration details, IP addresses, calibration values, or any structured technical data that doesn't have a dedicated field. It's flexible by design and useful for capturing the specifics that matter for your particular type of equipment.
Click Save and the part is added to the fixture. Its status is set to green (operational) by default and a creation entry is written to the part history log.
Cloning a Part
You can clone any part already created in your account. This may come in handy if you have redundant parts, especially ones with a lot of detail. Cloning parts places the cloned part within the original Fixture. To copy a part (or a select set of parts) into another fixture look into create a Library of that part (or parts) to reuse elsewhere.
To Clone a Part:
This is the right tool when you're documenting a row of identical display panels, a bank of matching controllers, or any configuration where the components share the same specs but need individual identifiers. Clone the first, give each copy a unique part number and position, and you've built out the full inventory in a fraction of the time it would take to enter each record separately.
Adding Parts from the Library
The Library is where the real portfolio-scale efficiency lives.
What the Library Is
A library item is a saved snapshot of a part record, stored at the account level and available to any fixture across any property in your portfolio. It captures every field: part number, description, manufacturer, model, position, all technical specifications, and any structured detail data. You create a library item once and apply it to as many fixtures as you need, each time generating a fresh part record with the stored specifications and whatever installation date you set for that specific deployment.
This is the feature that transforms the difference between managing five identical fixtures and managing five hundred of them. The specs are defined once. Every fixture that uses that component type gets its part records from the same source.
Saving a Part to the Library
Before you can use the library, you need to save something to it. In any fixture, select one or more parts by checking their checkboxes. Click the Library button in the toolbar. The modal asks for a Library Title, up to 24 characters. Give it a name that will make sense when you're searching for it from a completely different fixture six months from now. "Samsung SB-1 Controller v2.3" is more useful than "Controller."
Click Save and the part is stored in the library with its complete field data serialized and ready to redeploy.
Applying a Library Item to a Fixture
On any fixture, click New Part and switch to the Add From Library tab. A list of all saved library items in your account appears as radio buttons. Select the one you want, set the Parts Install Date for this specific installation, and click Add From Library.
A new part record is created with all the stored specifications from the library item and the installation date you specified. The part is independent from the library item from that point forward. Changes to the library item don't affect parts already deployed from it, and changes to the deployed part don't affect the library item or other fixtures that used it.
Where the Library Shines
Consider a portfolio of retail locations, each with the same model of HVAC unit, or a chain of venues all running the same AV platform. The first time you document that equipment at one location, you build the parts records carefully: correct part numbers, model numbers, firmware versions, all technical details accurate and complete. You save those parts to the library.
At every subsequent location, you open the fixture, click New Part, switch to Add From Library, select the part, set the install date, and move on. The record is as complete and accurate as the first one without any additional data entry. Multiply that across dozens or hundreds of locations and the time savings are substantial. More importantly, the consistency is perfect. Every location's records describe the same equipment in the same way, which makes cross-portfolio reporting and maintenance planning dramatically cleaner.
The library also serves as an institutional knowledge base. If a particular component type has specific technical details that a new team member wouldn't know off the top of their head, those details live in the library item and deploy with every new installation automatically.
Managing Part Status
Parts are either Status “On” or “Off”
![]()
![]()
You change part status directly in the parts list on the fixture page. Each part has a colored status indicator (green circle for operational, red for problem). Toggle the checkbox next to any part to flip its status. You can change multiple parts at once and then click Save to write all the changes to the database in a single operation.
Surveys and Work Orders can affect changes to parts statuses as well.
Two quick-action buttons at the top of the parts section make bulk updates easier:
All Green sets every part in the fixture to operational status at once. Useful after a service call where everything was repaired or replaced.
Check All selects all parts, which is the first step if you want to perform any bulk action on the whole set.
When parts go red, the fixture's overall status score recalculates automatically. A fixture with three working parts out of five shows a different health status than one where all five are green. Those status calculations feed into property reports, survey summaries, and the dashboard fixture counts, which means part-level accuracy translates directly into portfolio-level visibility.
Part History
Every part carries a log of changes. In the edit modal for any part, a Show Part Log link at the bottom expands a table showing every recorded event for that part: when it was created, when its status changed, when its part number was updated, and who made each change. Each entry includes the date and the admin user responsible.
This history is also available as a dedicated print view from the part detail page, showing the 100 most recent log entries alongside the part's full specifications.
The history is what turns a part record into a maintenance document. A part that has gone red three times in eighteen months is telling you something. A part that's been green since installation day is telling you something different. You can't have that conversation without the log.
Reference Articles
If your account has the Reference module enabled, parts can be linked to reference articles stored in the system. Reference articles are technical documents, installation guides, configuration references, or any documentation relevant to a specific component type. They link at the model number level and appear on the part detail page and in the fixture print report.
For AV integrators managing complex equipment, linking reference articles to part records means the technical documentation travels with the equipment record rather than sitting in a folder somewhere that only one person knows about.
A Note on the Display Grid Module
If your account uses the Display Grid module for managing LED display systems and media walls, the part form includes additional fields for controller and cabinet components: firmware versions, FPGA and Valens revisions, resolution, grid location coordinates, IP addresses, and LED batch codes. These fields support a structured hierarchy where cabinet panels are linked to their parent controller, and the whole configuration can be built using the grid builder tool or imported from CSV files exported from the display manufacturer's software.
The library system is particularly valuable for Display installations because the technical specifications for a given display configuration are extensive and consistent across deployments. Save the controller and cabinet specs to the library once and every subsequent installation of the same display system starts with a complete, accurate part record.
Creating and Managing Fixtures
A fixture is the unit of work in Sytewise. Properties hold trades, trades hold fixtures, and fixtures are where the actual equipment lives: the lights, the HVAC units, the AV systems, the access points, the cameras, or whatever physical asset you're tracking and maintaining. Getting fixtures built accurately is what makes work orders, surveys, checklists, and reports meaningful. This article covers every way to create a fixture, how to delete one, and what to think about before you do.
Finding the New Fixture Form
Fixtures are created from the property detail page. Open the property, navigate to the trade where the fixture belongs, and look for the New Fixture button in the fixtures section. The modal that opens has two tabs: New Fixture for building one from scratch and Add From Library for deploying a saved template. There is also a separate Import option for bulk creation from a CSV file, and a Clone option for copying an existing fixture within the same property.
Creating a Fixture by Hand
The New Fixture tab has four fields.
Fixture Name is required and should be short and specific. The form even suggests the format: "Pole Light 1" or similar. This name appears in the fixture list, in work orders, in surveys, and in reports. A name that makes sense in isolation, without needing the surrounding context to interpret it, is worth the extra thought up front.
Description is also required and gives you room to add more detail. Where the name is a label, the description is a sentence. "Northwest corner LED pole light on Circuit 4" tells the next technician something useful.
Type is a dropdown populated from the fixture types configured in your account. Fixture types represent categories or classifications for your equipment, such as height classes for outdoor lighting or equipment categories for AV systems. If the type you need isn't in the list, it needs to be added by an account administrator before you can use it.
Vendor is pre-filled with the default vendor for this property/trade combination. If a different vendor is responsible for this specific fixture, search by name and select the right one.
Click Save and you land on the fixture detail page. From there you can add parts, position the fixture on the map or floor plan, add images, and assign it to a group. The fixture starts with zero parts, a blank status, and its position set to the property's center coordinates. Repositioning it right away is a good habit before the list gets long.
Positioning a Fixture
Every fixture needs a position on the property map so it can be identified visually alongside its neighbors.
GPS-based based trades use Google Maps. The fixture marker starts at the property's center point and can be dragged to the correct location. Click and hold the marker on the map and move it to where the fixture actually lives. The coordinates update automatically when you drop it.
Floor plan based trades use an uploaded image of the building or site layout instead of a map. The fixture marker appears on that image and is dragged into position the same way. This mode is common for interior spaces where GPS coordinates don't distinguish one room from another.
Which mode a trade uses is set at the trade level on the property. All fixtures within a trade share the same positioning system.
Creating a Fixture from the Library
If a fixture you need to add is the same as or very similar to one you've already built and documented elsewhere, the library saves you from rebuilding it from scratch.
Click New Fixture and switch to the Add From Library tab. A list of saved fixture library items appears as radio buttons. Each item represents a complete fixture snapshot including all its parts, specifications, and technical detail. Select the one that matches what you're installing, set the Parts Install Date (which becomes the installation date recorded on every part created from the template), and click Add From Library.
The system creates the fixture and all its parts in one operation. Every part field from the library item, part number, description, manufacturer, model number, firmware versions, and all technical detail fields, is copied to the new fixture. The install date you entered is applied to each part record.
The Include Groups checkbox is worth knowing about. If the library item was part of a group when it was saved, checking this box recreates that group association on the new fixture. Leave it unchecked if you want the fixture to start ungrouped and organize it later.
After creation you land on the fixture detail page with a fully built part inventory already in place. The main thing to do immediately is position the fixture on the map, since it will be sitting at the property center point until you move it.
Saving a Fixture to the Library
To save a fixture to the library, go to the fixture detail page and click the Library button in the parts section. Enter a library title up to 24 characters and click Save. Everything is captured: the fixture definition, every part record with its full specifications, wiring diagrams, and group associations. That snapshot becomes available immediately on the Add From Library tab for any fixture on any property in your account.
The library title is what you'll be selecting from a list later, so make it descriptive. "Standard 20ft LED Pole w/ Driver" or "Samsung 3x4 ION Wall v2.1" will serve you better than something generic.
Cloning a Fixture
Cloning creates an exact copy of an existing fixture within the same property. It's the right tool when you have multiple identical or nearly identical fixtures at the same location and don't want to enter the same specifications repeatedly.
Select the fixture you want to clone from the property fixture list (the checkbox next to the fixture row), then click Clone. A small modal asks for the new fixture name. That's it. Everything else, description, type, vendor, all parts with their full specifications, and group memberships, copies from the original.
Cloned parts are initially marked with "CLONE" in the part number, signaling that they need to be updated with the actual serial or part numbers for the specific units being documented. The fixture drops at the property center point, so reposition it on the map as soon as it's created.
Clone is different from the library in one important way: cloning works within a single property in the moment, while the library persists configurations for use across properties and over time. For adding the second of two identical fixtures on the same site, clone is faster. For deploying the same fixture configuration across twenty properties, the library is the right tool.
Importing Fixtures from a CSV File
When you have a large number of fixtures to add to a property at once, the import tool lets you upload them all from a spreadsheet.
The import modal accepts a CSV file with one fixture per row. The columns, in order, are:
- Fixture Title (required, minimum three characters)
- Fixture Description (defaults to the fixture title if left empty)
- Total Parts in Fixture (required, between 1 and 50)
- Part Number (defaults to the fixture title if left empty)
- Part Description (defaults to the part number if left empty)
- Part Position (optional)
- Part Manufacturer (optional)
- Part Model Number (optional)
- Fixture Height in Feet (required, as a whole number)
A sample CSV file is available to download directly from the import modal so you can see the exact format before building your file. The import also has a checkbox for "First row is a header row, so ignore it" in case your spreadsheet includes column headers.
After you upload the file, Sytewise shows you a summary table of what it parsed. Any rows with errors are highlighted so you can correct them before committing. If everything looks good, click Finish Import to create all the fixtures at once. All imported fixtures start at the property center point and will need to be repositioned.
The import is best suited for properties with a large number of uniform fixtures where the basic data (name, type, part number) is already organized in a spreadsheet. It creates one part per fixture based on the single row of part data provided. For fixtures with multiple parts or complex specifications, adding parts individually after import gives you more control.
Fixture Groups
Fixtures can be organized into groups within a property. Groups are useful for representing physical clusters of equipment: a bank of lights on a single circuit, the displays on one wall of a venue, or the HVAC units serving a specific zone.
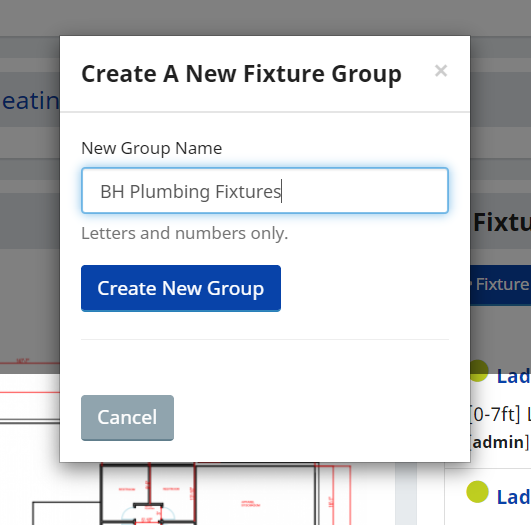
To add fixtures to a group, select them using the checkboxes in the fixture list and open the group modal. You can either create a new group name or add the selected fixtures to an existing group. A fixture can only be in one group at a time.
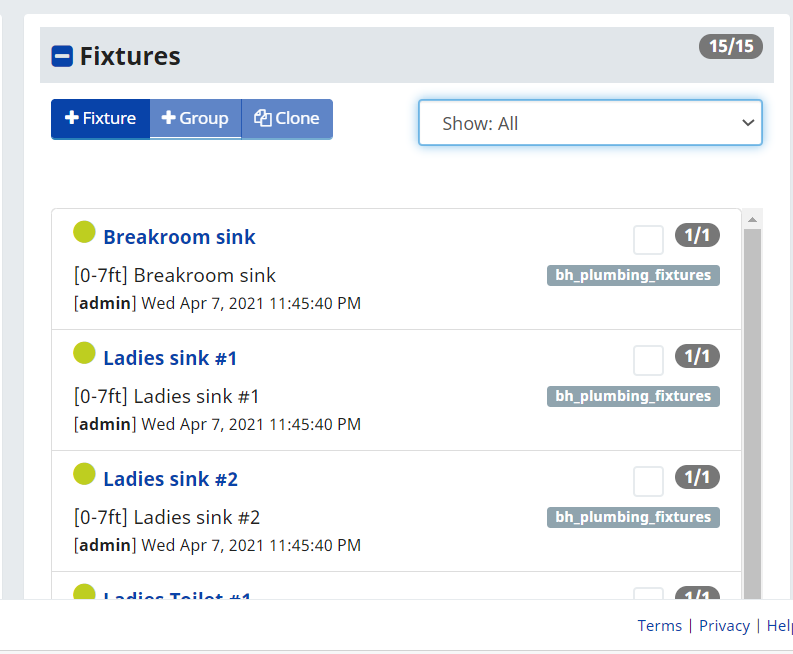
Group names are stored in lowercase with spaces and dashes converted to underscores. Keep them short and descriptive since they appear as labels on the property map.
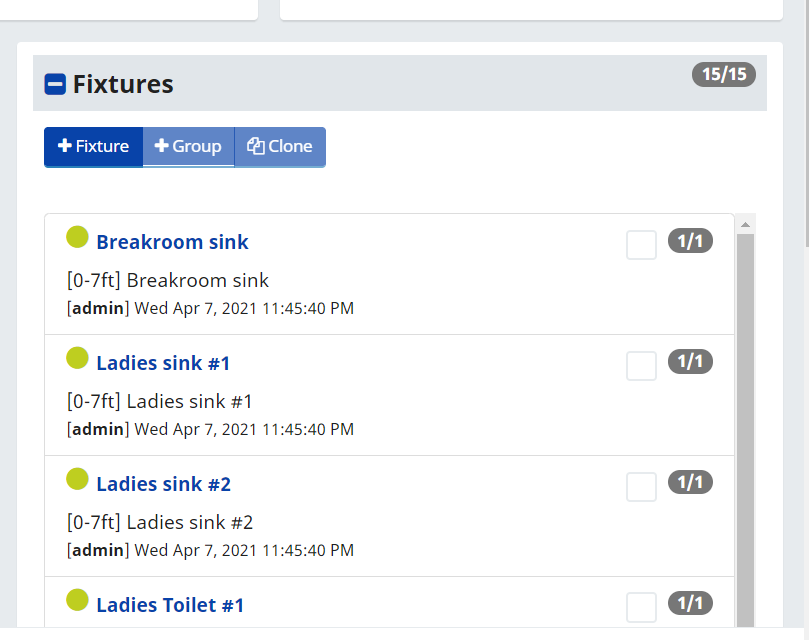
Select the checkbox next to each fixture that you would like in the Group.
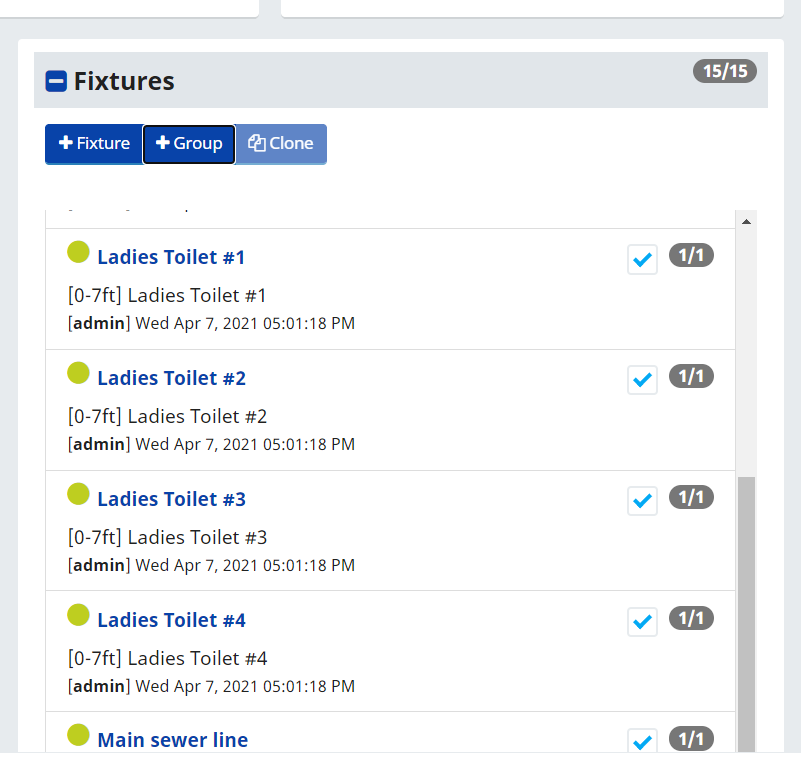
Once you select a Fixture you will notice that the +Group button become active. Select the Group button and type in the Name of the Group for the list of Fixtures you have selected.
Click Save. Now you can view just the items in that group by selecting it from the Group Selection pull down menu and the presence of a Group title just beneath the Selection box.
Deleting a Fixture
Deleting a fixture is done from the fixture list on the property detail page. Select the fixtures you want to remove using their checkboxes and click the delete action. Sytewise uses soft deletion, meaning the fixture record is marked inactive rather than permanently erased. The fixture disappears from the active list but its history, logs, and associated records remain in the database.
A few things to know before deleting:
Parts are not deleted. The parts inside a deleted fixture become orphaned in the database. They don't disappear, but they're no longer accessible through the fixture's detail page. If the part records contain important documentation or history, consider whether the fixture should actually be deleted or simply left inactive.
Work orders and checklists are not automatically cleaned up. Any open work orders or checklists that referenced the fixture remain in the system but lose their connection to an active fixture record. Close out or reassign those items before deleting the fixture if clean records matter.
Group memberships are cleaned up. When a fixture is deleted, its group association is also marked inactive, so it won't leave behind a ghost entry in the group.
There is no built-in undelete. The soft-delete approach means recovery is technically possible at the database level, but there is no UI to restore a deleted fixture. Delete if you are confident that you're done with the fixture, such as being replaced or abandoned.
The practical guidance: if a fixture is being replaced, update its parts to reflect the new equipment rather than deleting it. The fixture record and its history are more valuable than a clean list. Delete when a fixture genuinely no longer exists at the property, not just because it was serviced or upgraded.
Additional Reading: ADDING PARTS TO FIXTURES, CHECKLIST TEMPLATE, PROPERTY PAGE
Creating and Managing Displays in Sytewise
Overview
If you are installing or documenting a multi-panel LED display, Sytewise has a purpose-built toolset to capture everything from grid layout and network groups to per-panel firmware data and cable routing diagrams. The workflow starts with Cabinet Presets, moves through a visual grid builder inside the fixture record, and finishes with wiring diagram documentation. For Samsung installations, there is a direct import path using Samsung SBox CSV exports that gets you to a fully documented fixture record in a fraction of the time.
This guide walks you through the whole process.
Display Grids is an additional module in Sytewise, developed for AV Integrators and Facility Managers. If you need this feature in your account, contact Sytewise and we'll add it to your profile.
Cabinet Presets
Before you build your first grid, spend a few minutes setting up Cabinet Presets. Think of presets as reusable panel profiles -- you store the technical specs for a cabinet model once, and then apply them with a single click every time you build a grid using that panel. Every cabinet in the grid inherits those values automatically, though you can always edit individual panels afterward.
Tip: If your team regularly works with a handful of panel models, getting those presets built before installation day will save you real time on the job site.
Getting to Cabinet Presets
Creating a New Preset
Click Add a New Cabinet Preset. A form appears on the left side of the page. Fill in the following fields:
Cabinet Preset Name (required): Give this something you will immediately recognize in the grid builder dropdown. Including the manufacturer and model works well -- for example, "Absen A2715 2.5mm" or "Leyard LVA146 1.46mm."
Cabinet Resolution (required): The native pixel dimensions of one cabinet, entered as width x height. A cabinet with 384 columns and 216 rows would be entered as 384x216. The grid builder uses this value to calculate proportional sizing and total pixel output for the display.
Part No / Serial No: The manufacturer part number for this cabinet model. When the preset is applied, this populates the part number field on every cabinet record in the grid.
Description: A short plain-language note about the panel. Useful for anyone looking at the fixture record later who needs a quick reminder of what they are looking at.
Manufacturer Name: The panel manufacturer.
Model Number: The manufacturer model number for this cabinet.
The next four fields are the firmware and hardware configuration values. They are optional on the preset, but if your team maintains consistent firmware versions across a panel family, storing them here means they carry through to every grid you build with that preset automatically:
CFPGA: The FPGA firmware version for the cabinet receiving card or module. This identifies the programmable logic firmware layer and is used to verify consistency across panels.
FW: The main cabinet firmware version running on the receiving card, distinct from the FPGA layer.
Valens: The Valens chipset firmware version, relevant for panels using Valens-based signal distribution. Not applicable to every manufacturer.
OSD: The on-screen display firmware version or configuration string.
Click Create Preset when you are done. The preset appears immediately in the list on the right.
Tip: You can create as many presets as you need. One per panel model your team regularly deploys is a practical starting point. Deleting a preset later does not affect any grids that were already built from it -- those cabinet records already have the values baked in.
Editing and Deleting Presets
Click the pencil icon on any preset to open its edit form. All fields are editable. Click Update Preset to save your changes. Click the trash icon to delete a preset, and confirm when prompted.
Getting to the Grid Builder
Display grids live inside fixture records, which live inside properties. To reach the grid builder:
- Open the property that contains the display you are working on.
- Select the fixture for that display.
Once you are on the fixture page, look for these three action buttons:
Import Samsung Panels -- Starts the Samsung SBox CSV import workflow, which builds a complete grid from files exported directly by the Samsung SBox controller. See the Samsung section at the end of this guide for details.
Create Grid (appears when no grid exists yet) or Edit Grid (appears after a grid has been saved) -- Opens the interactive grid builder where you configure, visualize, and save the full cabinet array.
Add Wiring Diagrams -- Opens the diagram canvas for documenting signal, control, and power cable routing. This button is available after a grid has been created.
Creating a New Grid
Click Create Grid. A full-width editor panel opens at the top of the fixture page and walks you through three steps.
Tip: Grids up to 10 cabinets wide display fully within the standard view. For displays wider than 10 cabinets, the grid area adds horizontal scroll bars so you can navigate the full layout on any device -- including a handheld wireless device on the job site. No need to lug a laptop if you are working on a large installation.
Step 1: Build the Grid
This step defines the physical structure of the display.
Controller Name: Enter a name for the controller driving this display. This becomes the label on the controller record in the parts list -- something like "Main SBox" or "LED Controller A" works well.
Cabinet Preset: If you have presets defined, a dropdown appears here. Select the preset for the panel model you are installing. This applies the resolution, manufacturer, model, and firmware values to every cabinet in the grid. The default option is Standard Cabinet 650x480, which is a useful starting point if you plan to set resolution manually in the next step.
Cab/Panel Prefix: A short alphabetic prefix used to label each cabinet. The system combines the prefix with row and column coordinates to generate part numbers -- for example, prefix "C" produces C-0-0, C-0-1, C-1-0, and so on. Only alpha characters are accepted. The default is "C" and that works for most installations.
Columns x Rows: The physical layout of the display entered as columns first, then rows. A display four cabinets wide and three tall would be entered as 4x3. Think of it as the landscape footprint of the display as viewed from the front.
Click Build Grid. The cabinet array appears as a proportionally sized visual grid. Each box represents one physical cabinet, labeled with its auto-generated part number and current pixel dimensions. The grid scales to fit no matter how large the display is, and scroll bars appear automatically on wide displays.
Step 2: Set Cabinet Resolution
After building the grid, the editor moves you to the resolution step. For a standard display where every cabinet is the same model, your preset has likely already handled this. For mixed-resolution displays or any non-standard configuration, this is where you make individual assignments.
To select cabinets, click individual boxes on the grid. A number appears on each selected cabinet showing the selection order. Along the top edge of the grid you will see small column selector icons, and along the left edge you will see row selector icons. Clicking a column selector selects every cabinet in that column in one click. Same for rows. On a 12-wide display, that single click saves you a lot of individual tapping.
Once you have selected the cabinets you want to adjust, enter the new resolution in the width x height field and click the checkmark button. The selected cabinets update and the grid redraws to show the new proportions. Use the clear selection button to deselect everything and start a new selection group.
Click Next when your resolution assignments are correct.
Step 3: Assign Groups and Omit Panels
This step maps cabinets to their network groups and handles any gaps in the physical layout.
Assigning groups: Select a set of cabinets using the same click or column/row selector approach from Step 2. Enter the IP address or group name for those cabinets in the field and click Set Group. The selected cabinets immediately color-code to that group and a brief confirmation message appears. Repeat for each group in the installation. Most displays have one group per SBox output port or per network subnet, but there is no limit on the number of groups you can define.
Omitting panels: Some displays have an irregular shape -- an L-configuration, a cutout for a camera housing, or a deliberate gap in the panel arrangement. Select the cabinets that represent those empty positions and click the omit button (the ban icon). Omitted cabinets are marked distinctly in the grid view and excluded from the grid layout while still holding their position. This lets you accurately document any non-rectangular configuration without faking the grid dimensions.
Tip: The color-coding by group makes it easy to do a visual sanity check before saving. If a cabinet shows the wrong color, select it and reassign the group before you move on.
Step 4: Save
Click Save Grid. Sytewise creates a controller part record and individual cabinet part records for every non-omitted position in the grid. The editor closes and the fixture page refreshes, now showing the Edit Grid and Add Wiring Diagrams buttons along with a visual representation of the completed grid.
Editing an Existing Grid
Click Edit Grid on the fixture page to reopen the grid editor. The saved grid loads and you have two targeted editing options.
Editing Resolution
Click Edit Resolution. The grid loads in an editable state with the column and row selectors active. Select the cabinets you need to change, enter the new dimensions, and click the checkmark. When you are done, click Save Resolution. The parts database updates immediately and the grid redraws.
Editing Groups
Click Edit Groups. The saved grid loads with all existing group color-coding visible so you can see what is currently assigned. Select the cabinets you want to reassign, enter the new IP or group name, and click Set Group. When all assignments look right, click Save Groups.
Exporting and Importing Cabinet Data
After a grid is saved, Sytewise provides a CSV-based workflow for loading site-specific data into the cabinet records in bulk. Serial numbers, firmware versions, warranty dates, model numbers, IP assignments -- anything that is easier to fill in on a spreadsheet than clicking through individual cabinet records gets handled here. This is the manufacturer-agnostic path. Samsung users have an additional option covered in the next section.
Exporting the Cabinet CSV
From the fixture page with an existing grid, open the Edit Grid panel and click Download. Sytewise generates cabinets_data.csv and your browser downloads it automatically. Open it in Excel or any spreadsheet application.
The file contains one row per cabinet. Three columns are locked and must not be modified:
ID_No_Change: The internal Sytewise part ID used to match each row back to the right database record on import. Do not touch this one.
res_No_Change: The resolution on record for this cabinet.
loc_No_Change: The stored position coordinates.
Every other column is editable: partno_serialno, description, ip_group, cabid, warr_desc, warrantytime, mfg, modelno, cfw, cfpga, valens, osd, coord, and batchcode.
Fill in the site-specific data across all rows and save the file as CSV when finished.
Tip: This is a natural handoff point between the installation team and the project documentation team. A technician captures serial numbers and firmware versions during installation, fills in the spreadsheet, and hands it back. One import and the fixture record is fully populated as-built.
Importing the Updated CSV
Use the CSV upload control in the Edit Grid panel. Select your completed file and click Upload. Sytewise processes each row, matches records by the ID_No_Change value, and updates the cabinet fields in the database. A success message confirms how many records were updated, and the parts list and grid view refresh automatically.
Wiring Diagrams
After a grid is saved, click Add Wiring Diagrams on the fixture page. A drawing canvas opens as a modal overlay with the display grid as a visual reference layer underneath. You can create multiple named diagrams per fixture, each on its own canvas.
The drawing tools let you add lines, shapes, and annotations over the cabinet grid to document how cables are physically routed. The most common uses are:
Video Signal: The path from the media player or video processor through the SBox controller to each cabinet, including daisy-chain or star topology routing.
Control Signal: Network or control data paths, switch connections, IP addressing, and any serial control runs.
Power: Power distribution layout, panel circuit assignments, PDU connections, and cable entry points.
Keeping signal, control, and power on separate named canvases rather than combining everything into one diagram makes the documentation much easier to read during a service call at two in the morning.
Tip: Wiring diagrams are accessible to anyone with access to the fixture record, including field technicians doing maintenance or repair. A well-documented diagram can save hours of troubleshooting when the original installer is not available.
Samsung Panel Import
For Samsung LED installations, Sytewise supports a direct import path using the CSV exports from the Samsung SBox controller. An AV technician typically runs this import during installation. Once in the system, the fixture record is available to everyone doing ongoing repair and maintenance -- no need to rebuild it later.
Click Import Samsung Panels on the fixture page. A two-panel import interface appears.
Upload Samsung SBox CSV: The left panel accepts a drag-and-drop or file-select upload of the SBox CSV file exported from the Samsung controller. Drop your SBox file here or click Select A File. The system reads the controller data and establishes the grid structure and controller record.
Upload Cabinet CSV: The right panel accepts the accompanying cabinet CSV containing individual panel specifications -- serial numbers, cfw, cfpga, Valens, OSD settings, batch codes, warranty information, model numbers, IP group assignments, and coordinates. Drop the cabinet file or click Select A File.
Sytewise processes both files together and creates the complete fixture record: the controller part, all cabinet parts, and the visual grid.
Tip: The Samsung import does in two file uploads what would otherwise take a manual grid build plus a full cabinet CSV import. Once it is done, the fixture behaves exactly like any other saved grid -- you can edit resolution and groups, re-import an updated CSV, and add wiring diagrams the same way.
Note: Samsung panels are the one case where the SBox CSV drives the initial grid creation. For every other manufacturer, build the grid manually using the Create Grid workflow, then use the CSV export/import workflow to populate the site-specific cabinet data.
Getting Help
If something is not behaving the way you expect, or you run into an error not covered here, reach out to your Sytewise account administrator. When you contact them, mention which step you were on and what you were trying to do when the issue occurred. A screenshot is worth a thousand words if you can grab one.
Additional Reading: ADDING PARTS TO FIXTURES, CREATING AND MANAGING FIXTURES
Vendor Forms: Compliance, Certification, and Credentials
Every vendor who works on your properties brings something with them beyond tools and a truck. They bring qualifications, certifications, safety training, signed agreements, and sometimes a history you need to verify before they set foot on a job site. The Vendor Forms feature gives you a structured way to collect, store, and search all of that information in the same system where you track their work orders, insurance certificates, and service history.
Forms live in the Vendor Portal where vendors fill them out and submit them. The admin side is where you manage which vendors see which forms, review what's been submitted, and search across all submissions when you need to find something specific.
This article covers how the assignment system works, what you can do with it, and how to use it for a range of real-world documentation needs.
What Vendor Forms Are
A vendor form in Sytewise is a structured data collection tool presented to vendors through their portal. It can contain any combination of text fields, dropdowns, checkboxes, file uploads, and digital signatures. When a vendor fills one out and submits it, the answers are stored permanently and searchable from the admin portal.
Forms are built by the Sytewise team. Your job as an admin is deciding which forms your vendors need to complete and under what circumstances. The system gives you precise control over that, with three distinct levels of assignment.
The Three Levels of Form Availability
Understanding how forms reach vendors is the key to using the system well.
Level 1: Platform-Wide Forms
Some forms are made available by Sytewise across all accounts. These appear in every vendor's portal regardless of any action on your part. They typically cover foundational things that any professional vendor relationship might require: basic safety acknowledgments, standard terms of service, or platform-wide credential declarations.
You can see which forms fall into this category from your Forms page. They are displayed in blue and labeled "All Vendors See These Forms."
Level 2: Account-Wide Forms
Your account can designate certain forms as required for every vendor in your roster. When a form is assigned at the account level, it appears in the portal for all of your vendors, not just the ones you specifically targeted. This is the right level for policies and requirements that apply to your entire operation regardless of the specific job or client.
Examples where account-wide assignment makes sense:
- A master vendor agreement that all contractors must sign before working with your company
- A background check authorization form required by your organization's policy
- An emergency contact and incident notification form you need on file for everyone
Account-wide forms also appear in blue with the "All Vendors See These Forms" label, alongside the platform-wide forms.
Level 3: Vendor-Specific Forms
The most targeted level. You assign a form to one specific vendor, and only that vendor sees it. This is where the real flexibility comes in. It lets you apply requirements selectively based on who the vendor is, which client they're working for, or what kind of work they're being asked to perform.
Vendor-specific forms appear in green and are labeled "You Assign These Forms."
The distinction between account-wide and vendor-specific is the core of the system. Not every form needs to go to every vendor. A security clearance form for a client with government contracts only needs to go to the vendors working that client's properties. A specialized chemical handling certification only applies to certain trades. A site-specific safety briefing is only relevant to vendors assigned to that client. Vendor-specific assignment lets you apply the right forms to the right people without cluttering the portal for vendors who don't need them.
Managing Forms from the Admin Forms Page
The Forms List
The left panel shows all forms currently in play for your account, organized by assignment level. Each form displays with a color-coded badge:
- Blue for platform-wide and account-wide forms (all your vendors see these)
- Green for forms you have assigned to specific vendors
Clicking on any form in the list loads its detail on the right panel, including a list of submissions with the vendor name, submission date, and the answers they provided. You can expand any submission to read the full response.
Assigning a Form to a Specific Vendor
To assign a form to a specific vendor from the Forms page, select the form from the list and use the assignment controls in the detail panel. The change takes effect immediately and the form appears in that vendor's portal the next time they log in.
The other path to per-vendor assignment is from the vendor's own profile page. Open any vendor, find the HSE Forms section on their profile, and you will see the full list of forms with toggles showing which are currently active for that vendor. Turn any form on or off directly from there. This is the most efficient path when you are onboarding a vendor and want to set up all their required forms in one place.
How Vendors Complete Forms
When a vendor logs into their portal, any forms assigned to them appear in the HSE Forms section of their navigation. Each form card shows the form name and how many times it has been submitted.
Vendors fill out the form directly in the portal. Depending on how the form is built, they may be entering text, selecting options from a dropdown, checking checkboxes, uploading files, or providing a digital signature. When they hit Submit, the answers are captured and stored under their vendor record.
Once-Only Forms
Some forms are designed to collect information that replaces itself each time it is updated. A vendor agreement is a good example: you want the most current signed version on file, not a stack of historical copies cluttering the submissions list. Forms with this behavior are called "once-only" forms.
When a vendor submits a once-only form, their previous submission for that form is marked as replaced. The new submission becomes the current record. This keeps credential and certification forms clean without losing the fact that a new submission was made.
Forms that are not once-only accumulate submissions over time. This is the right behavior for incident reports, safety meeting logs, or any form where multiple submissions represent separate events rather than updates to a single record.
Searching Submissions
The Search Form Submissions section at the top of the Forms page is one of the most operationally useful tools in the system. You can search across every form submission in your account by keyword, and narrow the results by form type and property.
How to search:
- Type a search term into the search field and click the plus button to add it as a tag. You can add up to four terms.
- Optionally select a specific form from the "Search What Form?" dropdown to limit results to one form type.
- Optionally enter a property name in the property filter to find submissions associated with work orders at a specific location.
- Click Search Forms.
The results show each matching submission with the vendor name, the form it came from, the property it was associated with (if any), the submission date, and the specific answers that matched your search terms.
This is powerful when you need to find things you would not naturally remember to look for. If a vendor claims they have a certain certification and you want to verify what was submitted, search their company name and the certification type. If you need to pull every submission mentioning a specific chemical or procedure, search that term across all forms at once. If an incident occurred at a property and you need to find all documentation submitted in connection with it, filter by that property.
Practical Use Cases
The forms system is flexible enough to handle a wide range of vendor documentation needs. Here are examples that show the range.
Vendor Onboarding and Prequalification
A prequalification form sent to all new vendors before they are approved for assignments. Fields include trade certifications held, years of experience, number of licensed technicians, references, and a signature acknowledging they have read and accepted your vendor code of conduct.
Assign it at the account level so every vendor in your roster completes it. Mark it as once-only since the signed acceptance needs to reflect the most current version of your terms. When you onboard a new vendor, the form is already waiting in their portal.
Background Check Authorization
Some clients require background checks for all personnel entering their facilities. Rather than managing this outside the system, a background check authorization form lets vendors complete the required consent and provide the necessary information, then upload the actual check results as a file attachment.
Assign this form specifically to vendors approved to work that client's properties, not to your entire vendor roster. Use vendor-specific assignment for each vendor in scope.
Site-Specific Safety Briefing Acknowledgment
A client with a specific on-site hazard, a secure facility, or a detailed safety protocol needs vendors to confirm they have read and understood site-specific procedures before entering. A safety briefing form with checkboxes for each key requirement and a signature field at the end captures that acknowledgment formally.
Assign this form to each vendor dispatched to that client's properties. The submission becomes your documentation that the briefing was received and acknowledged.
Certification and License Verification
AV integrators often need manufacturers' certifications or specialized training before working on proprietary systems. An annual certification renewal form with a file upload for the certificate, fields for the certifying body and license number, an expiration date field, and a signature field creates a clean record that replaces itself each time a renewed certificate is submitted.
Mark this as once-only. When a vendor's certification expires and they renew, the new submission replaces the old one and you always have the current credentials on file. Use the search function to find any vendor whose submitted certification mentions a specific manufacturer or platform.
Work Authorization for Restricted Clients
Some clients require formal approval before any vendor performs work on their behalf. A work authorization form with fields for the project name, scope of work, authorization date, and a signature from a named client representative gives you a signed record for every job.
Assign this form individually to vendors only when they are being dispatched to that specific client's properties, not as a standing assignment across the whole account.
Incident and Injury Reporting
When something happens on site, documentation needs to happen quickly and consistently. An incident report form captures the essential information while it is fresh: who was involved, what happened, where on the property, what time, what immediate actions were taken, who witnessed it, and whether medical attention was sought.
For injuries, separate forms handle different severity levels: a First Aid Report for minor injuries treated on site, a Medical Aid Report when professional medical attention was needed, and a Lost Time Report for injuries resulting in absence from work.
These forms are assigned at the account level because any vendor could have an incident at any property. Vendors submit immediately following the event. The admin team can search for the submission by property or vendor name and has a complete documented record that supports any follow-up process.
A Near Miss Report form captures events that did not result in injury but had the potential to. These are often the most actionable reports because they identify hazards before someone gets hurt. Making near miss reporting simple and expected is good safety culture, and Sytewise makes it easy to build that expectation into every vendor relationship.
Safety Program Submission
Some clients or jurisdictions require vendors to demonstrate that they have a formal Health, Safety and Environment program in place before being approved for work. An HS&E Program Submission form asks the vendor to document their safety program: whether they have a written policy, who is responsible for safety in their organization, what training their workers receive, whether they carry specific certifications, and what their incident rate history looks like. A file upload field lets them attach their written program documentation.
This is naturally a once-only form, updated when the vendor's program is renewed or revised. Assign it to vendors working clients or jurisdictions with this requirement.
Keeping Submissions Organized
Use descriptive form names. Know which forms are which and why each one exists. When a vendor asks why they are seeing a particular form in their portal, you should have a clear answer.
Tie forms to work orders when relevant. When a vendor submits an incident report related to a specific work order, note the connection. The search tool can find submissions associated with work orders at specific properties, which means your documentation lives in context rather than as a free-floating record.
Review incident-type submissions promptly. An injury report sitting in the submissions list unread is not the same as a reviewed, responded-to record. Set up a workflow where incident-type submissions trigger a notification and a review. Global email preferences on the admin user profile can be configured to alert specific users when submissions come in.
Track certification expiration dates. Once-only forms for certifications tell you the current state but not when they expire. Build a reminder workflow for vendors whose certifications have time limits. A reminder set sixty days before a known expiration date gives you time to follow up before the vendor becomes uncertifiable for work that requires it.
A Note on Form Creation
Forms in Sytewise are built and managed by the Sytewise team. If you need a form that does not currently exist in the system, contact Sytewise with the details of what you need and they will create it for your account. Custom forms are available and the system is flexible enough to accommodate a wide range of field types and structures.
Additional Reading: Setting Up Vendors in Sytewise, WO and Survey Email Preferences, Setting Up Admin Users
Reference Articles
A technician arrives at a property to service a piece of equipment they have never worked on before. The work order is in their phone. The fixture is in front of them. What they need next is the manual, the wiring diagram, the firmware update procedure, and maybe a quick video showing the service sequence for this specific model. In most operations, finding all of that means a phone call, an email chain, or a search through a shared drive that nobody has organized in two years.
Reference articles in Sytewise solve that problem by putting the documentation exactly where the technician is already looking. Write the article once, link it to the model number, and every fixture across your entire portfolio that contains that equipment surfaces the article automatically. The technician on site opens their fixture record and the documentation is right there, whether it is their first time with that equipment or their fiftieth.
This article covers how to create and build a reference article, how to link it to your fixtures by model number, and how that single article becomes a tool for both field support and portfolio-level planning.
Getting to Reference Articles
To find an existing article, type at least three characters of the title or model number in the search field and select from the autocomplete results.
The Reference module must be enabled on your account. If you do not see Reference in your navigation, contact Sytewise to have it added.
Creating a New Reference Article
Click Create A Reference Article. Sytewise creates a blank article record and opens the article editor immediately. The article is titled "New Article" by default. The first thing you should do is give it a real name.
Setting the Title
At the top of the editor, click the title to make it editable and type the name of the article. Be specific. "Samsung IF Series LED Display" or "Lennox KGA 12.5 Ton RTU Service Guide" will be easy to find and understand in a list. "Display Docs" will not.
The title is also what appears when a technician sees the article linked from their fixture or part record, so it should be clear enough to identify the content at a glance.
Setting the Model Number
Each reference article can be associated with a specific model number. This is not just a label. It is the key that connects the article to every part in your portfolio that shares that model number. Enter the model number exactly as it appears in your parts records. Capitalization and spacing matter because the system uses exact matching when it searches for parts to link.
Setting the model number before you link parts saves a significant amount of manual work, especially on large portfolios where the same equipment is installed across dozens or hundreds of locations.
Building the Article Content
The article is built from sections. Each section is a distinct block of content, and sections can be reordered by dragging them after they are created. Click any of the section type buttons at the bottom of the editor to add one.
Text
The Text section is a rich text editor. It supports headings, bold and italic formatting, bulleted and numbered lists, tables, and links. Use it for:
- Installation and commissioning procedures
- Service and maintenance instructions
- Configuration settings and recommended values
- Troubleshooting guides with step-by-step resolution sequences
- Warranty information and contact details for the manufacturer
- Safety notes and precautions specific to this equipment
- A brief product overview for team members who are new to the model
You can add multiple Text sections to organize long content into logical blocks. A well-structured article might have separate Text sections for Overview, Installation, Maintenance, and Troubleshooting, each with its own content.
Images
The Images section accepts photo uploads. Use it for product photos, labeled diagrams, before and after photos, and reference photos showing correct and incorrect configurations side by side. Images are stored in Cloudinary and displayed inline in the article. A technician looking at the article on a phone sees the images at full quality without any download step.
Downloads
The Downloads section lets you attach files for technicians to save to their device. This is where spec sheets, installation manuals, firmware update files, calibration tools, and multi-page PDF documentation live. Files attached here appear as named download links in the article. Each file can be given a descriptive title so the technician knows what they are downloading before they click.
YouTube
The YouTube section accepts a YouTube URL and embeds the video directly in the article. Manufacturer training videos, installation walkthroughs, maintenance demonstration videos, and product overview clips are all fair game. If the manufacturer has published a service video for this equipment, link it here and it plays inline without leaving Sytewise.
Embed
The Embed section accepts raw HTML embed code for anything that is not a YouTube video. Use it for Vimeo videos, interactive product documentation, embedded spec comparison tools, or any iframe-based external content the manufacturer or distributor makes available.
Linking the Article to Fixtures
An article sitting in the library does nothing on its own. Its value comes from being linked to the actual parts in your portfolio that contain the equipment it covers. There are two ways to create those links.
Link by Model Number (the fast path)
This is the most important feature in the reference module. Click the Link Modno button at the top of the article page. A modal window opens showing all parts in your account whose model number matches the model number you entered on this article. Each matching part is listed with its fixture name, property name, and the model number that triggered the match.
Check the parts you want to link and click to confirm. The article is now connected to every selected part. Those parts, their fixtures, and the properties they live on now surface this article automatically whenever someone accesses that fixture's detail page, print report, or linked documentation.
If you manage fifty retail locations with the same HVAC unit, every one of those units shows up in the model number search. Select all fifty, click link, and the article is connected to the entire fleet in one operation. Every technician who opens any of those fixtures from that point forward sees the article without you having to do anything else.
The Linked Parts table at the bottom of the article page shows the current list of all parts connected to this article: part number, fixture name, and property name. This table is also a useful view of how widely a given equipment model is deployed across your portfolio.
Linking Individual Parts
Parts can also be linked from the part detail page itself. When you need to connect a specific part to an article and that part's model number does not match the standard model number due to a variant, an import discrepancy, or a legacy naming convention, link it individually from the part record rather than the model number search.
Making an Article Public
Each reference article has a unique public URL. This URL works without any Sytewise login.
The Public toggle at the top of the article page controls whether the article is accessible at that URL. When public is on, anyone with the link can read the article: technicians in the field, vendors, clients, or anyone else you share the URL with. When public is off, the article content is still linked to parts and visible within the admin portal, but the public URL returns nothing.
Public articles are useful when you want to share documentation with people who do not have Sytewise accounts. A vendor assigned to a work order on a specific fixture can be given the public URL to the reference article for that fixture type, and they have the documentation before they arrive on site without needing portal access.
Linking Related Articles
Reference articles can be linked to other reference articles in your library. This creates a Related Articles section at the bottom of each article that makes navigation natural when documentation is spread across multiple records.
Use this when the equipment documented in one article connects meaningfully to another: a controller article linked to the cabinet article it drives, an HVAC unit article linked to the article covering its specific thermostat model, an LED display article linked to the article covering the media player in the same system.
The Field Support Value: One Article, Every Technician
The moment an article is linked to a model number and that link is applied to your parts, something changes about how your operation works. Documentation stops living in email threads, shared drives, and the institutional memory of whoever has been at the company the longest. It starts living exactly where the work happens.
A new technician on their first solo service call opens the fixture record, sees the reference article linked to the equipment, and has the installation diagram, the maintenance procedure, the firmware version to look for, and the manufacturer's service video all in one place. They do not need to call the office. They do not need to guess. The knowledge transfers automatically.
For a portfolio of identical installations, this effect multiplies with every location. You write the article once for a display model, a compressor type, a control system, or any other equipment your team regularly works on. From that point on, any technician at any location working on that equipment type has the same documentation. The article is the institutional memory that does not leave when someone does.
The more complete the article, the more value it delivers on each use. A well-built reference article for a piece of equipment that appears at forty locations pays back the time spent building it on the first service call that saves a trip, avoids a callback, or prevents a configuration error.
Portfolio Planning Value: See What You Have
The Linked Parts table on a reference article is more than a list of connections. It is an inventory report.
Open the reference article for a specific HVAC model and the linked parts table shows every installation of that model in your portfolio: the part number, the fixture name, and the property it lives on. That list is your complete picture of how widely that specific equipment is deployed. Open the article for a specific display panel model and you see every property where that panel is installed.
That visibility has direct operational and financial value.
Replacement planning. If a manufacturer discontinues a model or issues an end-of-life notice, the linked parts table tells you immediately how many units are in the field and where they are. You can plan replacements before the equipment fails rather than responding to individual outages one at a time.
Recall and advisory response. When a manufacturer issues a safety recall or service advisory for a specific model, the linked parts table gives you the affected inventory in seconds. You know exactly which properties to contact, which vendors to dispatch, and how large the scope of work is before you make a single phone call.
Warranty and contract management. All parts linked to an article carry installation dates. Sorting the linked parts list by install date shows you which units are oldest and likely approaching end of warranty or end of useful life. That information feeds capital planning conversations with clients and helps you prioritize where maintenance investment will be most impactful.
Fleet consistency. For clients who care about portfolio-wide consistency, the linked parts table shows at a glance whether every installation uses the same model and whether any locations received different equipment. Inconsistencies that would otherwise require a manual audit surface immediately.
Client conversations. A reference article linked to every installation of a client's primary equipment type becomes a ready-made basis for a portfolio review conversation. The documentation covers what is installed. The linked parts show where it is installed. The install dates show how old each unit is. That combination, pulled from a single article page, is a professional starting point for any discussion about maintenance contracts, upgrade cycles, or replacement timelines.
A Practical Workflow
The most effective way to use reference articles is to build them for products with large numbers of installations in the field first.
When you document a new equipment type in your portfolio for the first time, create the reference article at the same time. Give it a title and model number. Add the manufacturer documentation, a text section with service notes your team has learned, training videos, and the best possible phone number for support, if one exists. Then link it to the parts you just created. That article is now the foundation for every future installation of that equipment across the entire portfolio.
Modify articles with updates to software, or notes from seasoned technicians and all of that history compounds to help support technicians on future visits.
Additional Reading: Adding Parts to Fixtures, Creating and Managing Fixtures, Descriptions Save You Time and Money