Reference: Terms & Concepts
Terms and concepts related to using the Sytewise platform.
- Properties
- Trades
- Fixtures
- Parts
- Clients
- Adding Photos to Fixtures
- Work Orders in Sytewise
- Why Property / Trade?
- Survey
- Tenants
- Users
- Contracts
- Contacts
- The Sytewise Information Funnel
- WO, Survey Email Preferences
- Favorite Properties
Properties
Properties are one of the fundamental concepts of the Sytewise system. A Property can be an actual property that you manager, or it may just be an address of the location where you have an asset that you manage. It can be the location where you do contractual work or provide a service. Whatever it means to you and your company, Sytewise sees a Property as a location and that location is unchangeable once established in the system.
When you add a property to your Sytewise account you are establishing a physical location on the planet for any Trade you use within your account. HVAC, Plumbing, Asphalt, Doors, and Keys are just a few of the many Trades you can establish for a Property Location in your account.
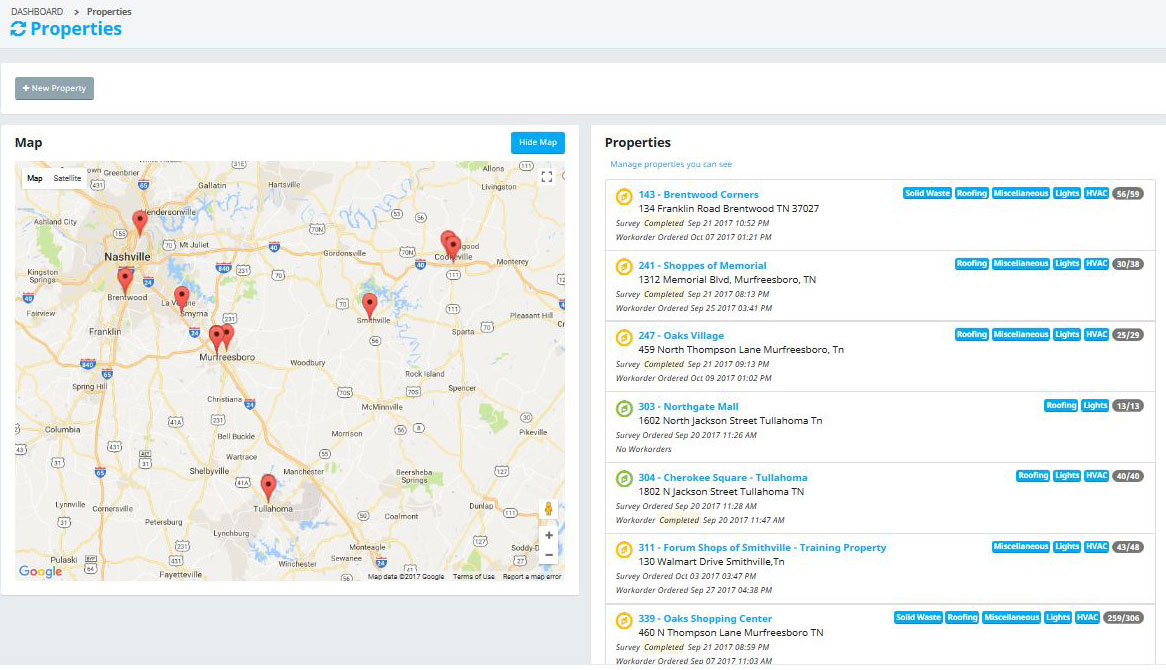
Favorite Properties
Your Dashboard and Properties pages in the Sytewise Admin show a list of your favorite properties. This is a convenient list for quick reference. Otherwise you can search for properties by name, by state, or by other user's favorites at the top of the property list.
To make a property your favorite
- Find the property you want to make your favorite and go to the property page.
- Find the star to the left of the property name
- Click the star.
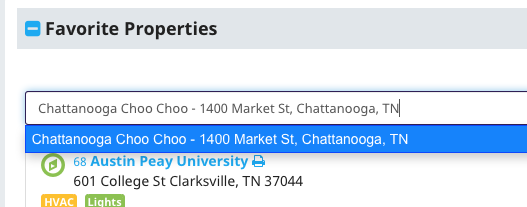
Make a property your favorite from your User page.
- Go to your user page
- Find the list of favorite properties on the right.
- Start typing the name of the property in the search box
- Select with your arrow keys of your mouse the property you wish to add.
- Hit return.
Trades
A Trade is a type of work conducted on your property locations. It can be work conducted by your staff or outside Vendors. Establishing a Trade for a property allows you to do the following:
- Establish a location to store Work Orders and Information for Similar Types of Work. (HVAC, Plumbing, Roofing, etc..)
- Establish a default Vendor for Certain Types of Work at Certain Properties. (Who's our Plumber in TN? What's his number?)
- See all of a specific type of Fixtures on your Property in One Place.
- Quickly access trade specific notes about your properties. (Does the Landlord maintain the HVAC units or the Tenant?)
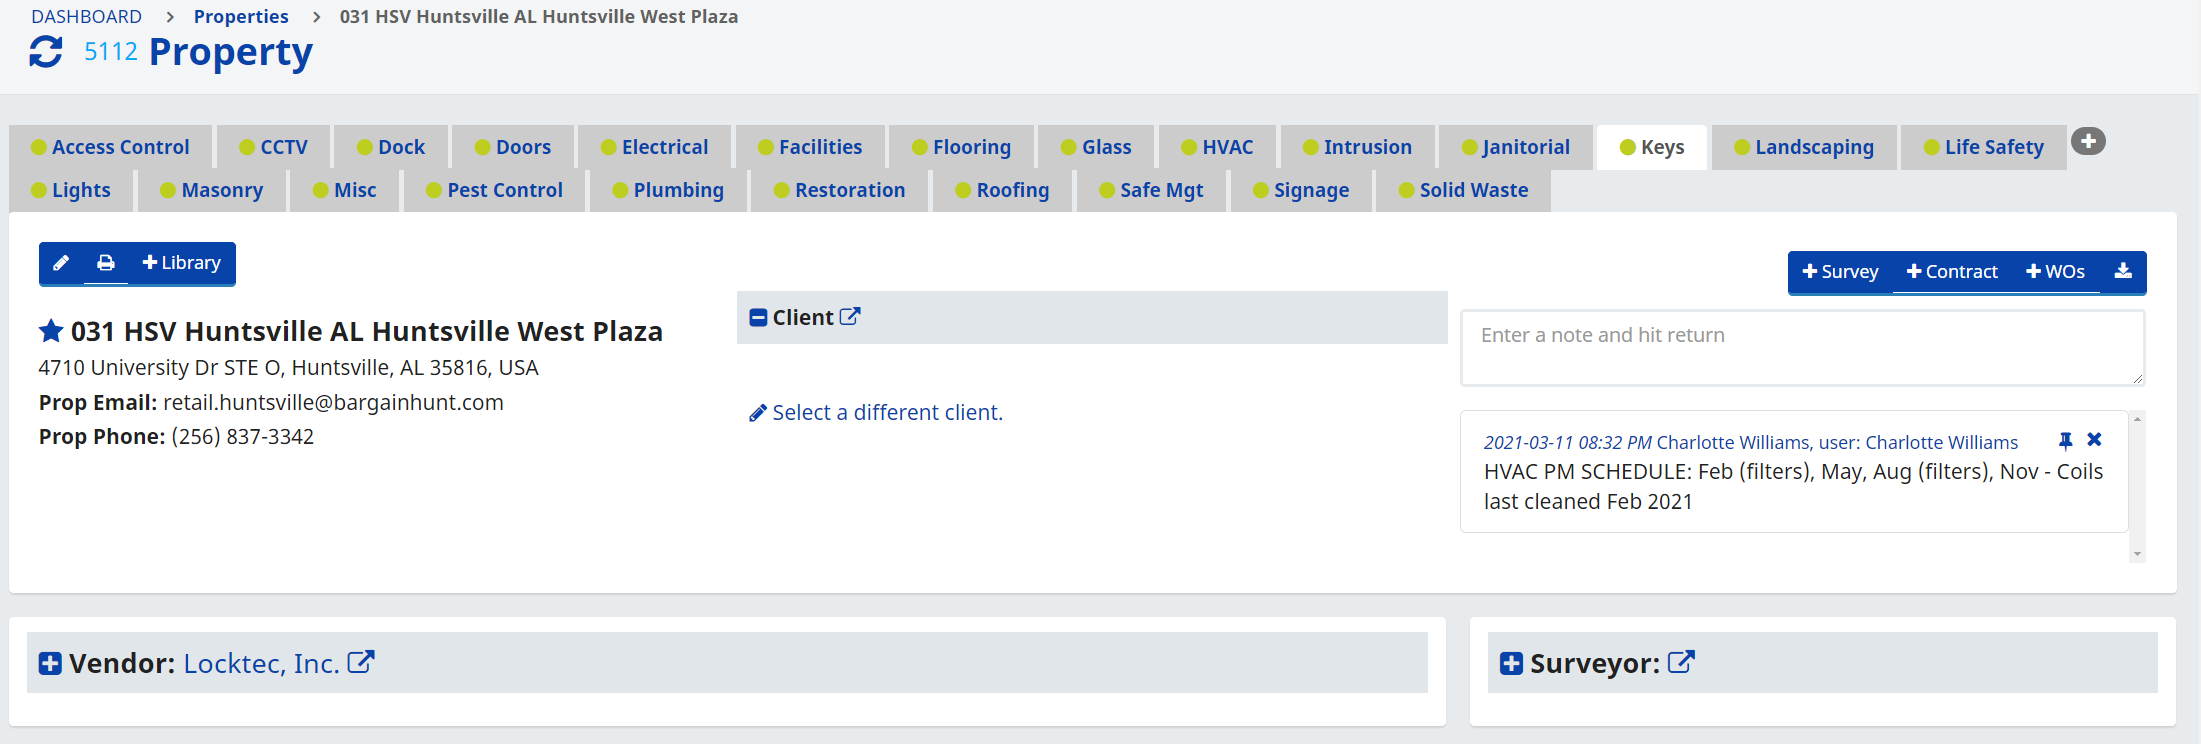
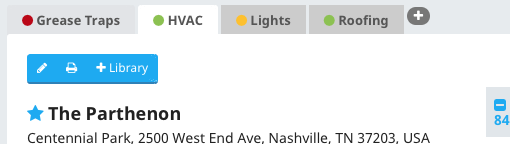
Below is a Property Header showing several Trades. Notice that the Keys Trade is Highlighted. The Preferred Vendor and Surveyor are listed just below the Property info. Your Client for this Property is listed along with any special notes. Moving from one Trade to another is as simple as clicking the Trade tab at the top of the Header.
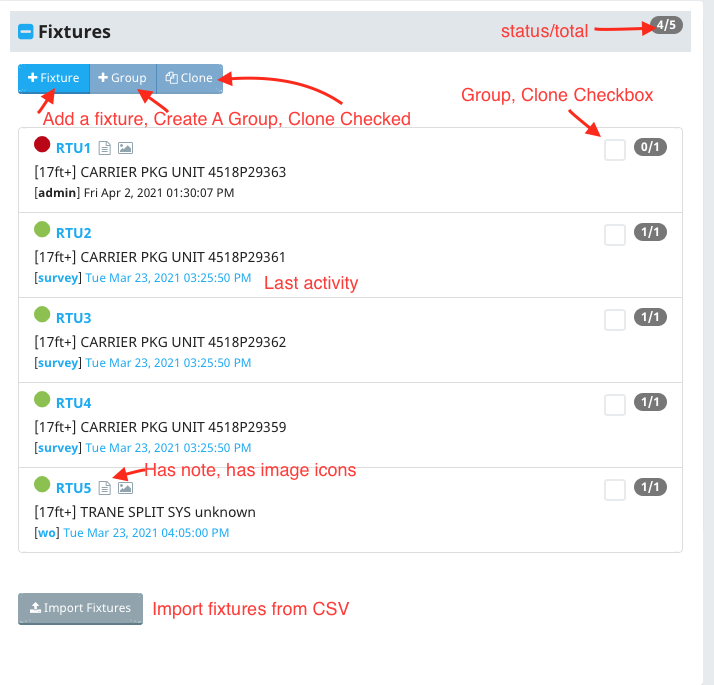
Fixtures
A fixture in Sytewise is the physical asset at a property that everything else revolves around. It is the piece of equipment -- an HVAC unit, a display, a lighting fixture, a security camera -- that gets surveyed, serviced, tracked, and documented over time. Work orders are written to address it, surveyors inspect it, parts are attached to it, and its condition history lives with it. If a property is the address, the fixture is what is actually inside that address that you are responsible for managing.. From the Property / Trade you can create fixtures in several ways. Click here to get the read in depth about Creating and Managing Fixtures.
Parts
Parts are Where the Work Gets Done
Parts helps you track the components of your fixtures along with their repairs and updates. They are the pieces of your Fixtures that wear out, need adjustment, get updated, and generally need to be maintained.
Actions can be Parts, Too!
Parts are mostly seen as the physical components of your Fixtures. But don't limit the usefulness of the Sytewise platform to only the physical parts of the system. Actions can be listed as parts also if you have a need or want to track them. Take Annual Fire Panel inspections for example, or Routine Maintenance. If you add Routine Actions to your Fixture, you can select them as a part that needs repair on a Work Order and keep track of their dates of service.
Examples of Actions that can be listed as a Fixture Part could be:
- Quarterly Filter Changes on HVAC Units
- Inspecting your Fire Extinguishers
- Annual Inspection of Backflow and Sprinkler Systems
What are the Good Parts to Add to my Fixture?
Some Fixtures you may want to list all of the parts from the beginning. This can establish what type of equipment you have on site at a particular location. A Solid Waste Dumpster for Example, may have a lock on it, It may be in an enclosure, and that enclosure may have doors, or gates, or even a roof. Listing all of these items up front lets you easily access what type of equipment you have at that location.
Other Fixtures may be best served by only listing the parts that need and/or have been repaired. This can make it easy to see what work has been done on a Fixture and keep track of updated parts and warranty information. An HVAC unit is a good example of a Fixture with a lot of Parts. You may be tempted to add the Compressor part numbers and other common features that you want to track. The information can be helpful, but it can also make it less apparent what, if any parts have been replaced.
A good rule of thumb on when to add a part to a Fixture, if a part is an element of structure that isn't likely to change, and you will need to be able to recall and track, make it a part. If a part is something that can be updated, like firmware, or changed when it wears out, like a compressor on an HVAC system, wait until you actually need to change it to add it to the Fixture. This allows you to see at a glance what the permanent elements of your Fixture are while quickly establishing which parts have been serviced or replaced.
Clients
Clients are the people or entities that own the properties or locations that you manage with Sytewise. Clients will be part of the contracts you create and can be associated with all or just some of the properties you manage.
Adding Photos to Fixtures
Fixtures are any fixed property asset that requires maintenance or repair. Fixtures are located within a Property / Trade that is managed by the Sytewise Management Platform. All fixtures have a GPS location or a coordinate location on a floorpan.
To add a photo to a fixture you need to be on the fixture page and click the "Upload Files" button in the right side of the Fixture Page Header.

This will open a Modal window on screen that allows you to drag and drop up to 10 files. You can also use the browse button to find files on your computer to upload. Here is the upload window.
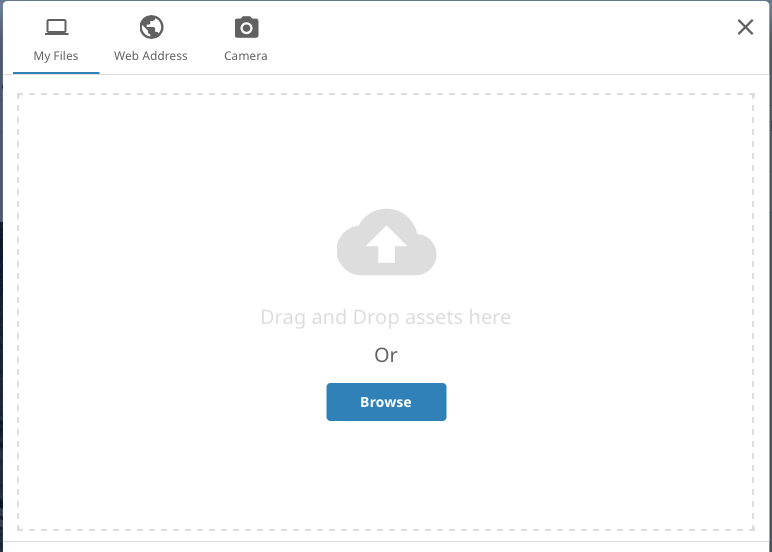
You can choose to add files from a web URL or your computer's camera.
You can only upload image files that are PNG, GIF, or JPG and PDF files. Images of any dimension larger than 400 x 400 pixels can be uploaded as long as they are less than 10MB in size.
Work Orders in Sytewise
A work order is the record of work -- requested, assigned, completed, and documented. Whether you're managing a retail portfolio's HVAC maintenance schedule or tracking a multi-site AV system service call, work orders are how Sytewise connects the people doing the work to the properties and systems they're responsible for.
This article covers creating a work order, understanding its fields and status, managing work orders across your portfolio, and how the vendor portal connects vendors to the work you assign them.
For recurring and scheduled work, see Building an Annual Workflow with Reminders. For attaching checklists to work orders, see Using Checklists with Work Orders.
What Is a Work Order?
A work order is a task record tied to a specific property and trade. It captures what needs to be done, who is doing it, when it's due, and what happened when the work was completed. Every work order lives within the Property / Trade structure -- meaning it belongs to a specific service category at a specific location.
For property managers, work orders are how you dispatch and track vendors across your portfolio -- HVAC calls, plumbing repairs, electrical inspections, landscaping, and any other service that touches your properties.
For AV integrators, work orders are how you track service calls, installations, and maintenance visits on the AV systems inside a property. Each work order connects to the fixtures -- the individual components of a system -- giving you a documented history of every service event at that location.
In both cases, the work order is the connective tissue between your property records, your vendors, and the documented history of what's been done.
Creating a Work Order
Work orders are created from the Property Page, within the trade tab for the relevant service category. Open the property, select the trade tab that applies to the work, and click Create a New Work Order. The form opens with the property and trade already filled in.
This approach is intentional -- anchoring the work order to a property and trade from the start keeps your records organized and ensures the right vendor pool, fixture list, and checklist options load automatically.
The Work Order Form
The creation form is organized into two columns. The left side handles the logistics of the job -- dates, vendor, contract, and costs. The right side handles fixtures, the description, and who receives the notification email.
[Screenshot: Work order creation form -- full view]
Left Column
Status: Complete A checkbox at the top of the form. Check this only if you are creating a historical record for work that has already been done. A work order marked complete at creation will not accrue overdue status regardless of its due date.
Subject / Title A short label for the work order -- what this job is, in plain language. This appears in list views, emails, and reports, so make it descriptive enough to recognize at a glance. Maximum 80 characters.
Order Date The date the work order is being created. Pre-filled with today's date.
Include a Work Start Date? A checkbox that reveals an additional date field when checked. Use this when the vendor isn't expected to start immediately and you want to document a scheduled start date separately from the due date.
Due Date The date by which the work should be completed. Used in overdue tracking, reporting, and reminder workflows. Required.
Vendor The vendor assigned to complete the work. The system suggests the preferred vendor for the selected property and trade combination if one has been configured. You can search and select any vendor in your account. See Vendors in Sytewise for how preferred vendors are set up.
Select a Contract Appears only when one or more contracts exist for the property. Linking a contract connects the work order to that contract record and can pull in associated pricing terms. Optional.
Reference No. A free-text field for a purchase order number, account number, or any external reference identifier you need to associate with this work. Appears in the work order list as Acc/Inv No. Optional, maximum 60 characters.
Line Items An expandable section for documenting the cost breakdown of the job. Each line item has a description, quantity, and unit amount -- the system calculates line totals and a running total automatically. Line items appear in the work order email sent to the vendor and in any attached bill records.
Right Column
Fixtures One or more fixtures the work order relates to. The fixture list loads automatically based on the property and trade. Each fixture displays a colored status indicator reflecting the current condition of its parts -- a green circle means all parts are functioning normally, yellow or orange means some parts need attention, and red means all parts are offline. These indicators give you a quick read on which fixtures in the property are already showing issues before you even open a work order.
Select individual fixtures, or use the All badge to select everything at once. Fixtures marked Already in a WO are currently assigned to another open work order -- you can still select them if the work applies to both.
To review or update the condition of parts within a specific fixture before creating a work order, open the fixture page for that fixture. Changes to part conditions there update the fixture's status indicator, which then reflects on the property page and in the fixture selection list here.
Linking fixtures creates a permanent entry on each fixture's service history. That history is what makes your system documentation credible over time and what speeds up future service calls on the same equipment.
Description What needs to be done. Write this as if the vendor is reading it cold -- include the specific location within the property, the nature of the problem or task, and any context that reduces the chance of a callback. A well-written description is one of the highest-leverage things you can do in a work order. See Descriptions Can Save You Time and Money.
Include Management Details in WO Emails? Controls whether management contact information -- site title, address, and phone -- is included in the email sent to the vendor. Uncheck this if you prefer to keep management details out of vendor communications for a particular job.
WO Email Addresses Two sections load dynamically based on the vendor and admin users in your account. Under Vendor Contacts, select which contacts on file for the assigned vendor should receive the work order email. Under Admins to Receive the WO Emails, check any admin users who should receive a copy.
Checklists A checklist template can be attached at creation time. This section loads eligible checklists for the property and vendor. See Using Checklists with Work Orders for the full workflow.
AV integrators: Linking fixtures at work order creation is strongly recommended. A work order tied to specific fixtures builds the service history that makes your system documentation credible and your future service calls faster. Before creating the work order, check the fixture status indicators on the trade tab -- red or yellow circles tell you exactly where the issues are. Use the description to call out the specific rack location, system, or component involved.
Property managers: Linking a work order to the correct trade, adding a reference number, and writing a clear description gives you the reporting foundation to track vendor performance and cost history by property over time. The fixture status indicators are also useful here -- a trade tab full of yellow and red circles is a quick visual summary of service needs across a property.
Saving and Sending
Click Save to create the work order. The system generates a unique work order number.
Saving does not automatically send a notification to the vendor. To notify them, open the work order after saving and click Send Work Order. This gives you the opportunity to review before it goes out and to confirm which contacts are receiving it. The vendor receives an email with the work order details, description, line items, and a direct link to the vendor portal.
If the vendor needs immediate access before you send the email, the work order detail page includes a Vendor Link button that generates a direct URL you can share manually.
See WO, Survey Email Preferences to configure notification defaults.
Managing Work Orders
Finding Work Orders
The WOs item in the left menu opens the full work order list -- every work order across your account. The list is searchable and filterable:
- Date Range -- filter by a specific window, toggling between order date and due/completion date
- Status -- All, Incomplete Only, Overdue Only, or Complete Only
- Type -- filter between Work Orders, Invoices, or both [VERIFY: confirm how invoice-type records are created and whether this filter applies to all account types]
- By User -- filter to work orders created by or assigned to a specific admin
- WO ID Search -- jump directly to a work order by its ID number
Results can be downloaded as a CSV -- either the full account list or the filtered results.
Work orders also surface contextually throughout the system: on a Property Page within the relevant trade tab, on a Fixture Page showing every WO ever linked to that fixture, and on a Vendor Profile Page showing every WO ever assigned to that vendor.
[Screenshot: Work order list -- filtered view]
Work Order Status
Status reflects where a work order stands in its lifecycle.
Incomplete is the default state for any new work order. The work has been assigned but not yet finished.
Complete means the work is done. A work order can be marked complete by an admin from the detail page, or automatically when a vendor submits their completion through the vendor portal.
Overdue is not a separate status but a display state. Any incomplete work order whose due date has passed shows as overdue in list views and reports. It resolves automatically once the work order is marked complete.
Rejected is set by the vendor through the vendor portal when they cannot accept the assigned work. A rejected work order is flagged visually and requires admin follow-up -- reassignment, rescheduling, or cancellation.
Keeping status current matters for two reasons: it gives you an accurate picture of what's open across your portfolio, and it's how vendors communicate progress back through the vendor portal.
Editing a Work Order
Open any work order by clicking its number or subject from any list. All fields can be edited from the work order detail page.
Account superusers have two additional options not available to standard users: Reopen Work Order, which reverses a completion and returns a work order to incomplete status, and Close Without Changes, which marks a work order complete without requiring vendor documentation. Both are intentionally restricted -- use them deliberately.
Deleting a work order is also restricted to superusers and only available on incomplete work orders. Deleting a work order detaches any linked checklists -- the checklists themselves are preserved and can be reattached elsewhere. See Using Checklists with Work Orders for details.
Work Order History
Every work order maintains a permanent record of what happened -- vendor notes, checklist completions, status changes, and any documentation attached. That history is tied to both the property and every linked fixture, and it doesn't go away when the work order is closed.
Work Orders and the Vendor Portal
When a work order is assigned to a vendor, that vendor accesses it through the Sytewise Vendor Portal -- a separate login environment where vendors see only the work assigned to them.
From the vendor portal, a vendor can:
- View the work order details, description, and line items
- Add notes to the work order record
- Enter their account or invoice number and actual fee for the job
- Document the condition of each linked fixture and part -- marking each as OK, Needs Service, or Repair Complete, with optional notes and photos per component
- Complete any attached checklist items
- Submit the work order as complete
- Reject the work order with a written reason if they cannot accept the assignment
[Screenshot: Work order as seen in the vendor portal]
This two-way connection is what makes Sytewise more than a task list. The vendor portal eliminates the phone and email back-and-forth of status checks -- the work order is the communication record, and both sides work from the same document.
For a full walkthrough of the vendor portal experience, see Work Orders in the Vendor Portal.
- Work Orders in the Vendor Portal -- what your vendors see and can do
- Using Checklists with Work Orders -- attaching and completing checklists
- Building an Annual Workflow with Reminders -- managing recurring and scheduled work
- WO, Survey Email Preferences -- configuring notifications
- Email Log -- confirming work order emails were delivered
- Descriptions Can Save You Time and Money -- writing descriptions that reduce callbacks
- Vendors in Sytewise -- setting preferred vendors per property and trade
Why Property / Trade?
The Sytewise Property Management System is property centric, meaning all activity recorded and stored is associated with a property. Properties can have multiple Trades. These trades represent the industries that install, maintain, repair and replace the fixtures on each property.
For example, a property may have several trades: Grease Traps, Lights, and Roofing; just to name a few. Each trade has it's subset of Fixtures, Contracts, Insurance, Preferred Vendors and associated Work Orders.
Depending on your Sytewise account profile the trades available to you may differ from those in the example above.
Adding a trade is as simple as clicking the [+] icon next to the trade tabs, selecting the new trade (if any are available to your account) and choosing a vendor. The default vendor for the property is already chosen for you.

Survey
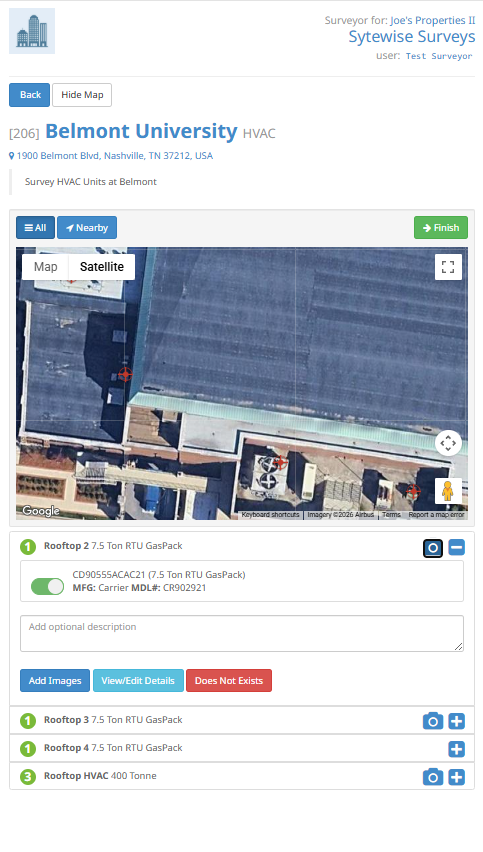
A survey is an action request for a Surveyor to look at and document the status of fixtures on a property or part of a system. A surveyor can be anyone that is able to determine the operational status of a fixture.
Surveyors can Add Images, Edit Fixture Details like Model and Serial Numbers, or decide the Fixture does not exist on site. Fixtures that are inherited from Property Templates my not exist at every location, and therefore need to be removed during the survey.
Tenants
Tenants are those that occupy the properties and spaces that you manage. They can be your actual tenants if you manage multi family properties or commercial shopping centers. They can also be the GM's of your local stores if you manage real estate for a multi-site commercial entity.
Users
Users is anyone that uses the Administration portal of the software. The can be a property manager or a project manager. Anyone that has log in credentials to view or add data in the system. A super-user can create other users in the system.
Contracts
Contracts are agreements between Clients, Vendors, and Properties. Contracts keep your scheduled work on track and terms of the agreement available to you, no matter where you are.
Contacts
Contacts are people associated with Vendors, Clients, or Properties. Keeping their contact information with you at all times in the context of their company or property is very useful, and in an emergency can keep an emergency from turning into a disaster.
The Sytewise Information Funnel
Sytewise is built around a hierarchy. Every piece of information in the system belongs somewhere. every work order, every checklist, every service record is in a structure that flows from the broadest context down to the most specific detail. Understanding that structure is the key to understanding why the system works the way it does, and how to get the most out of it.
The hierarchy has five levels, each one contained within the one above it.
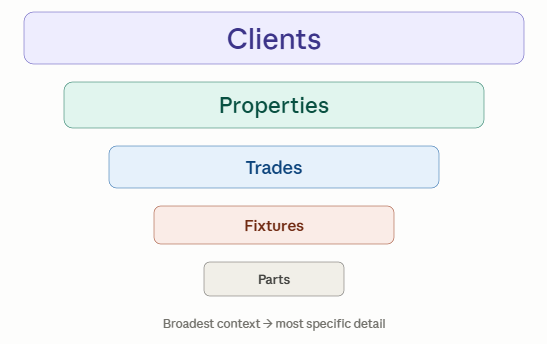
Clients sit at the top of the funnel. A client is the organization that owns or is responsible for the properties you manage. Everything below a client belongs to them.
Properties are the physical locations — buildings, sites, addresses — where work happens. Every property belongs to a client, and every trade, fixture, and work order ultimately traces back to a property.
Trades are the service categories within a property — HVAC, plumbing, electrical, AV systems, and so on. A trade is where you assign your preferred vendor, track your fixtures by type, and create work orders for a specific kind of work.
Fixtures are the individual assets and equipment tracked within a trade. Each fixture has its own record, its own service history, its own checklist archive, and its own parts list. The fixture is where the long-term value of the system accumulates — every job, every inspection, every replacement documented over time.
Parts are the component-level details inside a fixture — the serialized items, sub-assemblies, and consumables that make up the equipment itself. Parts are the most specific level of the funnel, and the most powerful for service documentation when populated accurately.
The funnel matters because it explains how Sytewise finds and organizes information. When you create a work order, you're working at the Trade level. When you attach fixtures to that work order, you're connecting it to the Fixture level. When a vendor documents parts replaced during the job, the record lands at the Parts level. Every piece of information knows exactly where it belongs — and that means you can always find it again.
The funnel also explains why setup order matters. Clients and properties need to exist before trades. Trades need to exist before fixtures. Fixtures need to exist before parts. Working top-down through the funnel when you set up a new location is the fastest path to a fully operational property record.
Hopefully you have as many clients as you want. Each of them can have several properties. Every property will employ vendors across several trades. Every trade will have several fixtures at each property. And every fixture is composed of its several parts.
At each level of the funnel, there are people who need information and people who can give you information about your assets.
Clients need information about their properties — how assets are performing, what work has been done, and what it cost.
Vendors need information about the property, the fixture, and the parts — enough context to arrive prepared, do the work right, and document what they found.
Tenants have helpful information about your property and need information about the work vendors are doing — closing the loop between the people who use the spaces and the people who maintain them.
Sytewise is the place to store everything — with an interface designed to support your daily tasks and surface the intelligence you need when you need it.
WO, Survey Email Preferences
When you create a Work Order or Survey, you have an option to send the vendor or surveyor an email of the order. This email has a link to the work to be done. Once The Survey or Work Order is complete, either work finished or rejected in the case of Work Orders, the status of that order is updated in the system along with all the fixtures, parts and properties are updated.
But what if you want to be notified of that completion? You can set email preferences for each Sytewise user that dictate when they are sent a message of the update.
To Set Your Global Email Preferences for Work Order or Survey Notification
Global settings are for every instance of a Work Order or Survey. For settings specific to any one property see below.
- Go to the user's page you wish to setup Users > User
- Under the section Global Email Preferences check your choices
- Receive All Work Order Responses - You will receive all Work Order submissions from vendors, no matter the property.
- Receive All Work Order Rejections - You will only receive Work Orders vendors reject.
- Receive All Survey Responses - Every survey submitted for any of your properties will be sent to your email address.
- Click Save to keep your choices.
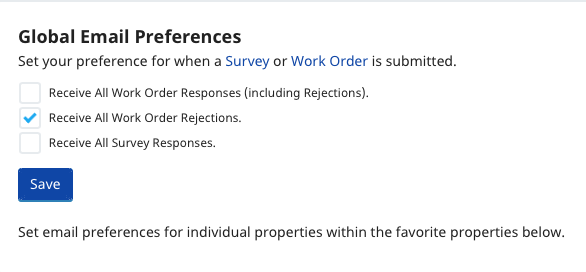
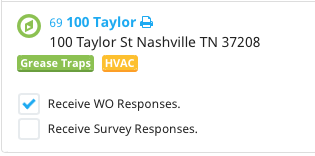
To Set Your Email Preference for Individual Properties
- You must create favorite properties to add email notices to.
- To add a property to your favorites
- start typing the name of the property in the text box provided.
- Select the property from the list of search results (be sure to spell it correctly)
- Hit return.
- To add a property to your favorites
- Any favorite property can have Work Orders or Survey responses sent to you.
- If you have set WOs or Surveys to be globally sent you cannot add individual properties to your email preference.
Favorite Properties
Your Dashboard and Properties pages in the Sytewise Admin show a list of your favorite properties. This is a convenient list for quick reference. Otherwise you can search for properties by name, by state, or by other user's favorites at the top of the property list.
To make a property your favorite
- Find the property you want to make your favorite and go to the property page.
- Find the star to the left of the property name
- Click the star.
Make a property your favorite from your User page.
- Go to your user page
- Find the list of favorite properties on the right.
- Start typing the name of the property in the search box
- Select with your arrow keys of your mouse the property you wish to add.
- Hit return.