Getting Started
- Quick Start Guide & Suggested Reading Order
- What Is Sytewise?
- Welcome to Your Dashboard
- Left Menu Options
- Creating a Vendor
- Creating a Property in Sytewise
- Creating Your First Fixture
- Using the Fixture Library to Build Properties Fast
- Creating Your First Work Order
- Set Up Recurring Work Orders
- Creating Your First Survey
- Using the Property Library to Build Your Portfolio Fast
- Setting Up Admin Users in Sytewise
Quick Start Guide & Suggested Reading Order
Where to Start
The articles below cover the core features of Sytewise. If you're new to the system, reading them in order is a reasonable path. If you're looking for something specific, fee; free browse the topics and jump straight to the subject that interests you.
-
What Is Sytewise — An overview of the platform and how it serves property managers, vendors, and AV integrators
-
A Tour of the Dashboard — Understanding your stats, map, property list, and navigation at a glance
-
Setting Up Vendors — How to add vendors, build out their contact records, and assign them as defaults for specific property trades
-
Creating a Property — Adding a property to the system, validating its location, and using the Library to build a fully populated property from a saved template
-
Adding Parts to Fixtures — How to document the equipment inside a fixture by hand, by cloning, or from a Library item, and why that record pays off over time
-
Creating and Sending a Work Order — Building a work order, selecting fixtures, assigning a vendor, sending the job, and managing it through completion
-
Using Checklists on Work Orders — How checklists and work orders work together, when to attach versus send directly, and what happens when a work order is reassigned or deleted
-
Fixture Checklists: From Assignment to Archive — The full lifecycle of a checklist from creation through vendor completion, media download, and archive
-
Creating Checklist Templates — How to build reusable checklist templates with required photos, signatures, notes, and custom checkboxes
-
Building an Annual Workflow with Reminders — Setting up recurring work orders, surveys, and inspections so your planned work runs on a calendar instead of on memory
-
Reporting in Sytewise — Property reports, fixture reports, work order and survey reports, CSV exports, and how to use a checklist as a fully customizable inspection report
-
The Left Menu: A Guide to Every Page — A quick reference to every page in the navigation and what it does
What Is Sytewise?
Sytewise is a systems operations platform built for teams that manage physical spaces and the work that keeps them running. Whether you're overseeing a portfolio of commercial properties, coordinating vendors across dozens of locations, or tracking the AV systems inside a building, Sytewise puts the whole operation in one place.
For Property Managers
Managing a portfolio means keeping track of a lot of moving parts simultaneously. Sytewise is built around that reality.
Properties and Fixtures are the foundation. Every property in your portfolio gets its own record, and every piece of equipment or infrastructure inside that property is tracked as a fixture. You always know what's where, what trade it belongs to, and what's been done to it.
Work Orders are how you assign and track jobs. Create a work order, assign a vendor, attach the relevant fixtures, and send it. The vendor gets an email with everything they need, including links to any checklists assigned to that job. When the work is done, the record stays.
Checklists let you define exactly what a vendor needs to do, step by step. Require photos, signatures, notes, or file uploads at specific steps. Vendors complete checklists from their phone through a simple public link, no login required. Completed checklists with all their attached media are stored permanently and downloadable in one ZIP file.
Surveys let you send structured inspections to surveyors and track their responses across properties.
Contracts and Bills keep the financial side organized. Track vendor contracts, service agreements, and bills all tied to the properties and work orders they belong to.
Reminders handle the recurring stuff automatically. Set up rules tied to property events and Sytewise keeps the actions queue filled so nothing slips through.
The Email Log records every outbound email the platform sends, so you can always confirm what was delivered and when.
For Vendors
Vendors don't need to learn a new system. When a work order is created and assigned to them, they get a plain email with the job details and direct links to any checklists they need to complete. No account required, no app to download.
Checklist links open a clean, mobile-friendly page. The vendor works through each step, uploads photos or files as required, signs where needed, and submits. The property manager sees completion in real time.
If a work order is reassigned, vendor assignments on linked checklists update automatically. Vendors only ever see what's theirs.
For AV Integrators
AV integrators working in commercial spaces regularly manage complex fixture environments: racks, cabinets, displays, control systems, and the relationships between them. Sytewise handles this through the Parts and Fixtures pages.
Fixtures track every piece of equipment at a property, organized by trade. Each fixture has its own record, its own checklist history, and its own media archive. Nothing gets lost in a spreadsheet.
The Cabinets module allows integrators to manage custom displays. Build display cabinet preset layouts using a grid-based editor to represent cabinet configurations and equipment wiring layout drawings. These presets can be attached to fixture records, giving integrators a visual reference for what's installed and how it's arranged.
Checklists on fixtures make commissioning and maintenance workflows precise. Define a commissioning checklist with required photos at specific steps, assign it to a fixture, send it to the integrator, and collect signed photographic proof of completion. The same checklist template can be reused across every similar installation in the portfolio.
Work Orders tie it all together. When a service call is needed, the work order captures the scope, the vendor, the fixtures involved, and the checklists required to close the job out. Integrators receive everything they need in a single email and complete the job record without a back-and-forth paper trail.
Sytewise is designed to reduce the communication overhead that comes with managing physical spaces and the people who work in them. Less chasing, more doing.
Additional Reading: DASHBOARD, WORK ORDERS, CHECKLISTS, REMINDERS, VENDORS
Welcome to Your Dashboard
The dashboard is the first thing you see after logging in, and it earns that spot. It gives you a live count of everything happening in your account, a map of all your properties, a full browsable property list, and quick access to vendors and clients. Whether you're getting your bearings or jumping straight into a busy day, this is where it all starts.
The Info Boxes
Running across the top of the page is a row of colorful shortcut buttons. Each one shows a live count of something important in your account: Properties, Vendors, Users, Work Orders, Surveys, Tenants, Reminders, Contracts, Bills, and Clients. Every button is clickable and takes you straight to the corresponding page.
You can choose up to 5 shortcuts to display on your Dashboard. To do this, scroll to the bottom of the info box row and click Shortcuts to pick the ones that matter most to your day. If you only care about Work Orders and Vendors, show just those. If you want the full picture every morning, keep them all.
If your account has an overdue invoice, a red alert banner will appear at the top of the dashboard above everything else. It won't be subtle.
Quick Actions
Just below the info boxes is a three-part action bar.
On the left, you have property management shortcuts:
- + Property creates a new property record.
- Print All Properties opens a print-ready view of your full property list.
- Download All to CSV exports your property list as a spreadsheet, up to 200 properties at a time.
In the middle, there's a vendor search field. Type at least three characters and a matching list of vendors appears. Select one and you go straight to that vendor's detail page.
On the right, a client search works exactly the same way. Three characters minimum, pick from the results, land on the client page.
The Map
The left half of the lower dashboard is an interactive Google Map showing a red pin for every property in your account. The map automatically adjusts its zoom level to fit all your properties in view when it loads.
Click any pin and a small popup shows the property name as a clickable link. Clicking that link takes you to the property page. At the same time, that property gets highlighted in the list on the right side of the page, so you always know exactly which one you clicked.
If you don't need the map taking up screen space, click the chevron in the Map card header to collapse it. Click again to bring it back.
The Properties List
The right half of the lower dashboard is your full browsable property list. By default it loads up to 200 properties at a time. If you have more, a Load Next 200 button appears at the bottom to pull in the next batch.
Searching and Filtering
You have four ways to narrow the list:
Search by Name or Zip is the search field at the top of the properties card. Type at least three characters and matching properties appear instantly. Selecting one takes you to that property's page.
View By State is a dropdown that filters the list to a single state. Pick a state and only properties in that state are shown. Changing the state filter automatically clears any manager filter you had active.
All Properties (the manager dropdown) filters the list to properties assigned to a specific manager or user in your account. Selecting a manager clears the state filter. These two filters work independently of each other.
Search by Address is a secondary search tucked below the other filters. Click the "Search by address" link to expand it. Type at least six characters of a street address and click Search to find a property by its address. This is handy when you know the street but not the property name.
What Each Property Shows
Every property in the list displays:
- Property name as a clickable link to the full property page
- Property ID (a small badge in the corner, or a QuickBooks ID if your account uses that integration)
- Print icon to open a printable report for just that property
- Full address
- Client assigned to the property, if one exists, as a clickable link
- Vendor assigned to the property, if one exists, as a clickable link
- Trade badges showing every trade active on that property. Each badge is clickable and takes you directly to that property/trade combination.
- Contracts are available via a file icon on the property row. Click it and the contracts associated with that property load inline.
If a property has been marked as sold, a red SOLD! label appears next to its name.
How the Map and List Work Together
The map and the property list are connected. When you apply a state or manager filter, both the list and the map update together. The map clears its current pins and redraws with only the properties that match your filter. Whatever you're looking at in the list, the map reflects it.
Clicking a map pin highlights the matching property in the list. Clicking a property link in the list navigates to that property. They're two views of the same data, and you can use whichever makes more sense for what you're trying to find.
Additional Reading: SYTEWISE USER INTERFACE, LEFT MENU
Left Menu Options
Dashboard
The Dashboard provides an at-a-glance summary of recent account activity, including open Work Orders, pending Surveys, and system notifications.
Properties
The Properties section manages the physical locations, buildings, and sites tracked in your account.
Properties — View and manage all Property records in the account.
New Property — Create a new Property record.
Property Search — Search Properties by name, address, or other criteria.
Merge — Combine duplicate Property records into a single unified record.
Clients — additional module required
The Clients section manages the organizations or individuals who are clients of your account. Sub-menu items are generated dynamically based on account configuration.
Vendors
The Vendors section manages the contractors, service providers, and other Vendors associated with Work Orders and property maintenance.
Surveyors
The Surveyors section manages the individuals assigned to conduct property and Fixture surveys.
Tenants
The Tenants section manages the occupants of properties tracked in Sytewise. Tenants can be linked to specific properties and associated with service requests and communications.
Users
The Users section manages access and contact records for the account.
Users — View and manage admin user accounts and their permission levels.
Contacts — Manage contact records associated with the account, independent of portal access.
Work Orders
The Work Orders section manages the creation, assignment, tracking, and completion of maintenance and service tasks across all properties.
Surveys
The Surveys section manages property and Fixture survey workflows, including survey assignment, completion tracking, and results.
Contracts — additional module required
The Contracts section manages service agreements and contractual arrangements associated with properties, Clients, or Vendors. Allows tracking of negotiated prices on invoices with the billing module.
Bills — additional module required
The Bills section manages billing records and payment tracking associated with Work Orders and service activity. Billing for your particular accounting platform may require an additional module or attachment to an API.
Fixtures
The Fixtures section manages the individual assets and equipment items installed at properties, including details, maintenance history, and associated Work Orders.
Cabinets — additional module required
The Cabinets section manages cabinet and controller records for AV integrators installing large display screens, including preset configurations for cabinets and equipment layout.
Forms — additional module required
The Forms section manages vendor-facing forms used to collect field data, safety and injury reports, training and compliance information from contractors and service providers.
Checklists — additional module required
The Checklists section manages structured work, inspection, and maintenance work by created curated lists of work steps so field technicians can follow and report on completed work including photos, checkboxes, notes, and signatures.
Insurance
The Insurance section manages insurance policy records associated with Vendors, properties, or Clients, including coverage details and expiration tracking.
Library
The Library section provides a list of all part, Fixture, Trade, and Property presets to allow Admins to deploy those Items on any property. I have the same HVAC unit on two properties. Create the Fixture once, then save it as a Library item. Deploy it on any property in your portfolio with the click of a button. Just change to location and serial number..
Reference — additional module required
The Reference section provides access to internal knowledge base articles and reference content to attach to Fixtures including maintenance, firmware, and support information for everyone.
Email Log
The Email Log displays a record of all outbound emails sent from Sytewise, including system notifications, Work Order communications, and survey-related messages.
Reminders
The Reminders section manages scheduled alerts and notifications associated with properties, Work Orders, Fixtures, or other records to establish an annual work flow.
Account
The Account section provides access to account-level settings, user preferences, and system configuration options.
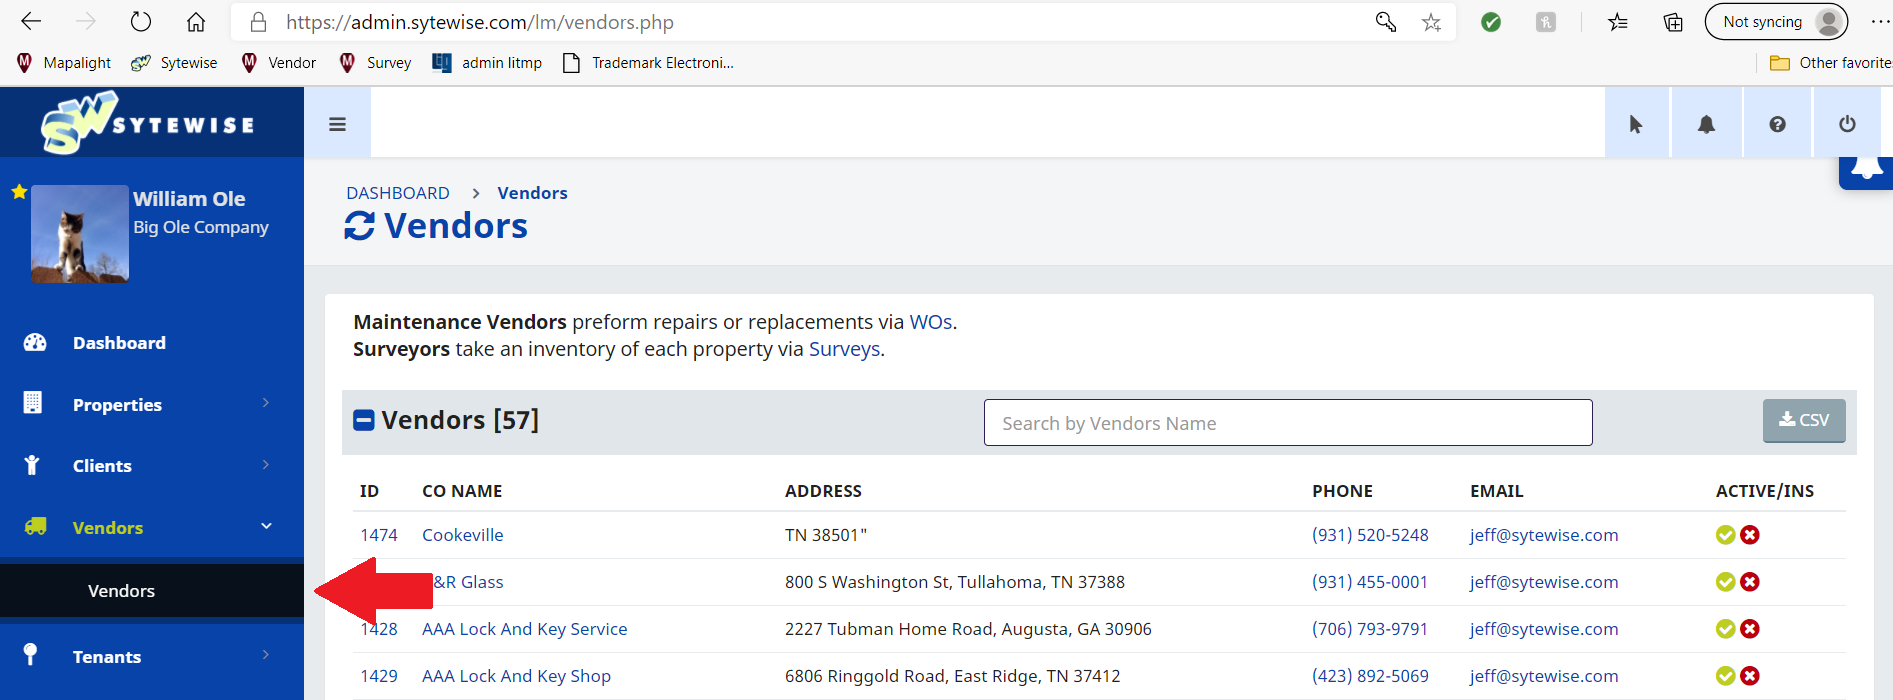
Creating a Vendor
Vendors are the people who work on your properties — outside contractors, service companies, or even employees whose work you want to schedule and document. Before you can create a property or issue a work order, at least one vendor must exist in the system.
To create a new vendor:
- Go to Vendors in the left navigation menu and select Vendors.
- Expand the Create A New Vendor section at the top of the page.
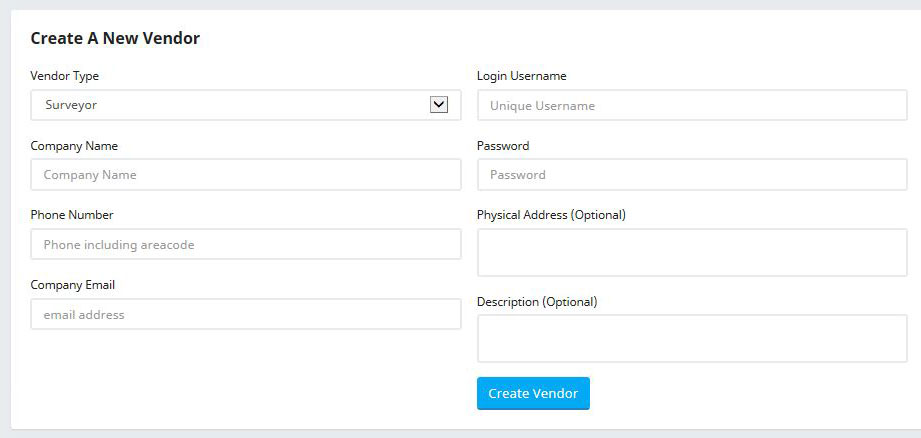
- Fill in the required fields:
- Company Name — must be unique in your account
- Phone Number — primary contact number
- Company Email — the main inbox for this vendor
- Login Username — the vendor's credential for the Vendor Portal
- Password — minimum 8 characters, one capital letter, and one number
- Address — the vendor's physical business address
- Click Lookup Geolocation to validate the address. The Create Vendor button will not appear until this step is completed.
- Click Create Vendor.
Once the vendor is created, you can add contacts, attach insurance certificates, and assign the vendor as the default for specific property trades.
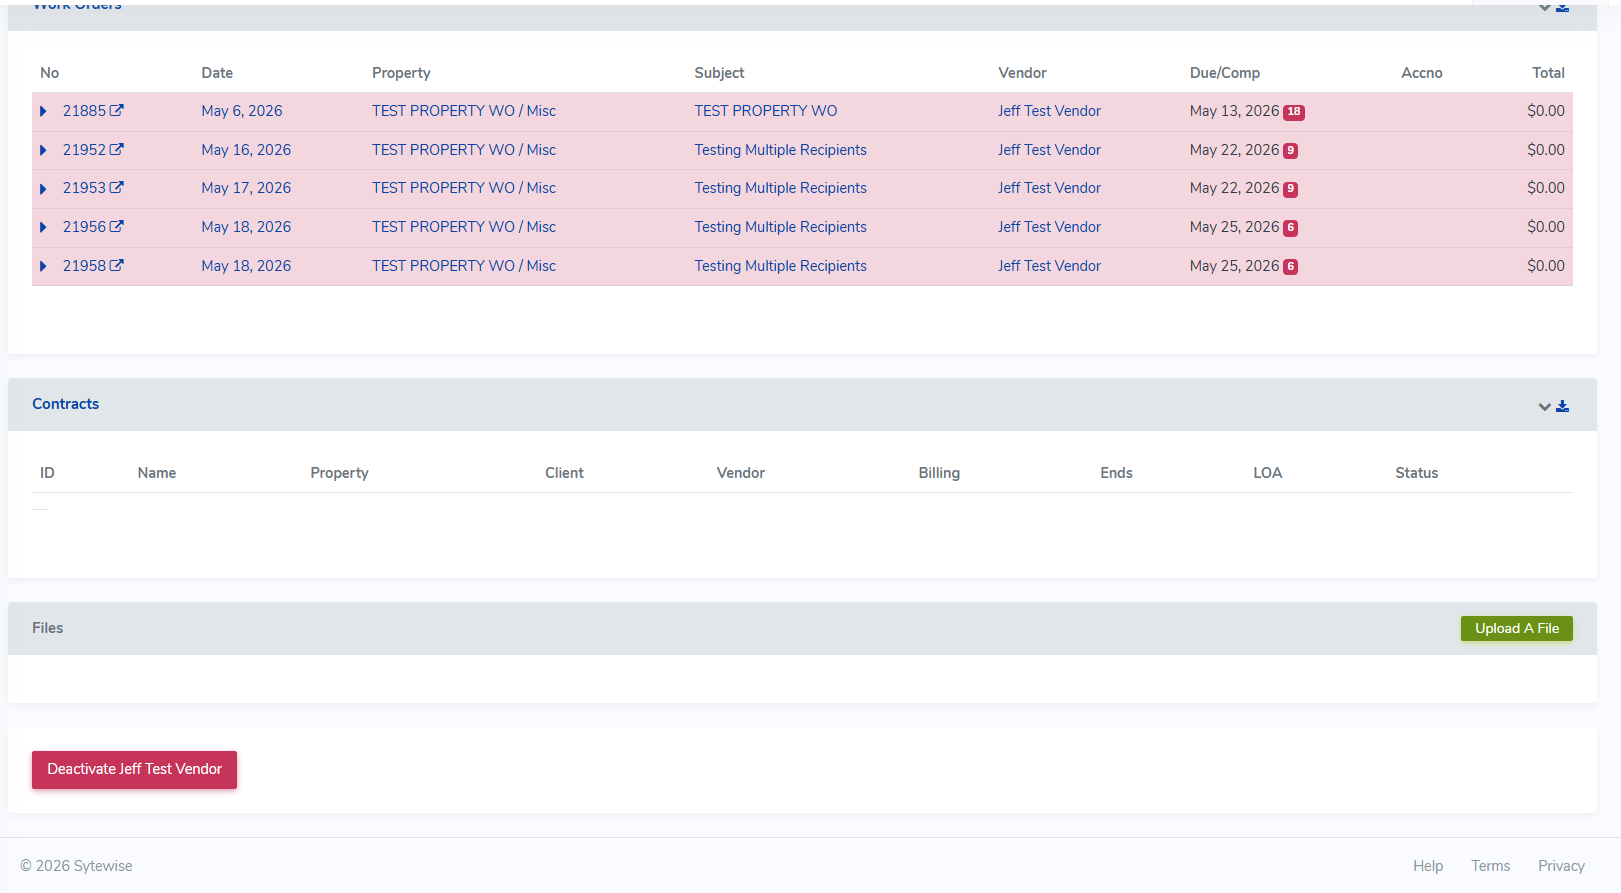
Adding an Insurance Certificate (COI)
Most accounts keep a Certificate of Insurance on file for every vendor. To add one:
- On the vendor's profile page, scroll to the files section and click Add a File or Policy.
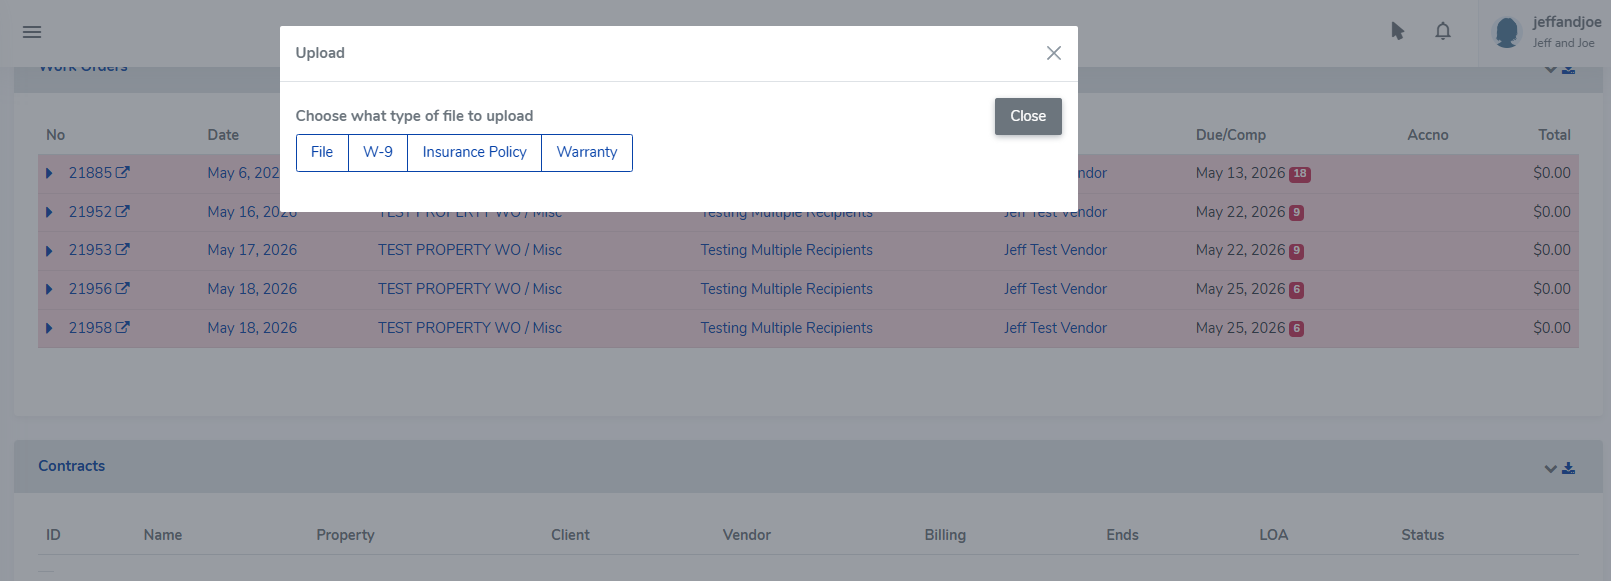
- Select the Insurance Policy tab.
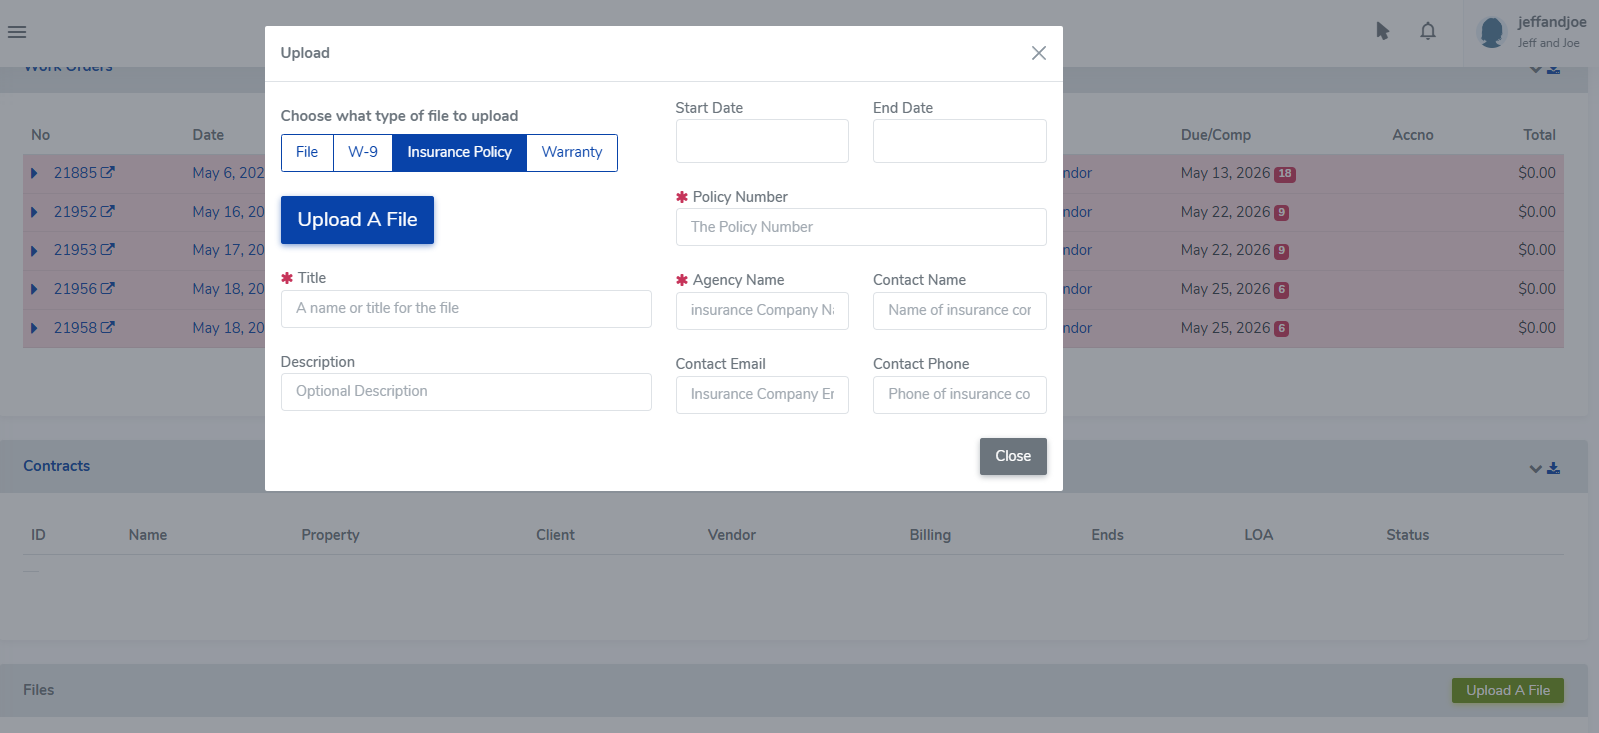
- Enter the policy details (carrier, policy number, effective and expiration dates) and click Save.
- Once the record is saved, a Choose File button appears. Select your COI document and click Save.
Your policy information will be listed with a link to the uploaded file. To edit or delete a policy or document, click the pencil icon next to the file link.
Vendors can add insurance and location information to their profiles from the vendor portal! Add instructions on how to do this in your invitational email and vendors are more likely to make those entries on their own. Vendors can have multiple COI's in their profile to confirm certificates on multiple properties.
For a complete guide to organizing vendors, assigning them to property trades, setting default vendors, and managing contacts, see Setting Up Vendors in Sytewise →
Creating a Property in Sytewise
Every building, location, or managed space in your portfolio starts as a property record. The property is the anchor for everything else: trades, fixtures, vendors, work orders, surveys, checklists, and reports all connect back to it. Getting a property created correctly takes about two minutes, and this article walks through every step, including how to use the Library to build a fully populated property from a saved template instead of starting from a blank slate.
Before You Start
Two things need to exist before you create a property:
A vendor must be in the system. The property creation form requires a default vendor for the first trade, and you can't proceed without one. If the vendor isn't in Sytewise yet, add them on the Vendors page first.
The property limit for your account must not be met. If your account has a maximum property count and you've reached it, the creation form won't appear and you'll see a message prompting you to contact your account representative. For most accounts this won't be an issue, but it's worth knowing.
Getting to the New Property Page
From the Dashboard, click + Property in the quick action bar or navigate to Properties in the left menu and select New Property from the submenu. Either route lands you on the same page.
The page has three cards working together: the property information form on the left, a library selection card in the middle (if you have library items saved), and the map and location confirmation on the right.
Creating a Property from Scratch
Step 1: Property Title
Property Title is required and must be unique within your account. Use a name that will be immediately recognizable in lists, reports, and dropdown menus. "2400 Commerce Street Nashville" or "Riverside Plaza HVAC" will serve you better than "New Property 1." Keep it descriptive enough that it reads clearly out of context.
The system checks title uniqueness in the background as you type. If the name is already in use, you'll know before you try to save.
Step 2: Full Address
Full Address is required and needs at least nine characters. Enter the complete street address including city, state, and zip. This is the address that gets sent to Google Maps for validation and coordinate lookup, so the more complete and accurate it is, the cleaner the result.
Step 3: Default Vendor
The Default Vendor field searches your vendor list as you type. Enter at least a few characters of the vendor name and select the right one from the autocomplete results. This vendor becomes the default assigned to the first trade on the property. You can change it later and add different vendors for additional trades once the property is created.
Step 4: Trade
The Trade dropdown shows all available trades in the system. Select the trade that applies to the first service area you're setting up on this property. If the property has multiple trades (HVAC, plumbing, electrical, AV, etc.), you'll add the others after the property is created. Every property needs at least one trade to start.
Step 5: Lookup Geolocation
This step is required and the Create Property button will not activate until it's complete.
Click Lookup Geolocation. Sytewise sends the address you entered to Google Maps, which validates it, formats it, and returns the precise coordinates. The map on the right zooms in to satellite view at the location, drops a marker, and displays the latitude, longitude, and formatted address.
Take a look at the formatted address that comes back. If Google interpreted the address differently than you entered it (a common occurrence with suite numbers or informal address formats), the formatted version shows you exactly what was matched. If the coordinates look right on the map, you're good. If the marker is in the wrong spot, you can drag it to the correct location. Dragging the marker updates the coordinates automatically.
If the geocoding fails (wrong address, unrecognized location, or an API issue), you'll see an error message describing what went wrong. Correct the address and try again.
Step 6: Create Property
Once geolocation succeeds and the map shows the right location, the Create Property button activates. Click it.
If the address is already in the system on another property, Sytewise will warn you about the potential duplicate and ask whether to proceed or start over. This is a safety check, not a hard block. If the property genuinely shares an address with an existing record (a multi-tenant building with separate property records, for example), choose Create Property Anyway.
On success, a confirmation message appears with a link to go to the new property detail page. From there you can add additional trades, assign a manager, link a client, add images, and start building out the full property record.
Creating a Property from a Library Item
If your account has property library items saved, a library selection card appears between the property information form and the map. This is one of the most powerful shortcuts in Sytewise for anyone managing a portfolio of similar or identical properties.
What a Library Item Contains
A property library item is a complete snapshot of a property's structure: trades, fixtures, and all the parts inside each fixture, including full part specifications. When you create a property from a library item, Sytewise builds all of that structure automatically as part of property creation. You end up with a fully populated property, with trades, fixtures, and parts already in place, rather than an empty shell you have to build from scratch.
The library card displays each saved item with its name and a set of trade badges showing how many fixtures each trade contains. A badge reading "HVAC 5 fixtures" means that library item includes an HVAC trade with five fixtures and all their associated parts ready to deploy.
Selecting a Library Item
The first option in the library card is always No Library: create a new, empty property, which is selected by default. To use a library item instead, click the radio button next to the one you want. The rest of the creation process is identical: fill in the title, address, vendor, and trade, run the geolocation lookup, and click Create Property.
When the property is created, Sytewise writes the base property record and then immediately layers in everything from the library item. Trades are created, fixtures are inserted with their coordinates and descriptions, and every part record from the library is recreated on the new property. You land on the property detail page with a complete structure waiting for you rather than an empty map.
What This Means for a Large Portfolio
The library feature is where Sytewise pays real dividends at scale. If you manage fifty retail locations that all run the same HVAC configuration, or a hundred venues with identical AV installations, you don't need to manually build out each property's trades, fixtures, and parts one by one. You build the first one carefully, save it to the library, and every subsequent property inherits that structure in seconds.
The consistency matters as much as the speed. When every property of a given type starts from the same library item, the records are structured identically. Trade names match. Fixture names match. Part numbers follow the same convention. That uniformity makes cross-portfolio reporting cleaner, makes searching more predictable, and makes onboarding new team members simpler because every similar property looks the same in the system.
The library item is a starting point, not a locked template. Once a property is created from it, every record on that property is fully independent and editable. You update the install dates, adjust the part numbers for the specific units on site, add location-specific notes, and the new property becomes its own complete record. The library item stays unchanged, ready for the next property.
Saving a Property to the Library
To save an existing property to the library, go to the property detail page, find the Fixtures section, and click the Library button. A small modal asks for a library title of up to 24 characters. Give it a name that clearly identifies the property type or configuration, something like "Standard Retail HVAC Config" or "Venue AV Platform v2," and click Save.
The system captures the complete structure: all trades, all fixtures with their coordinates and descriptions, all parts with their full specifications including manufacturer, model, part numbers, and technical detail fields. That snapshot is stored at the account level and immediately available on the new property page for any future property creation.
After the Property Is Created
The property detail page is where the rest of the setup happens. A few things to take care of right away:
Additional trades are added from the property detail page. Click New Trade, select the trade type, assign a vendor for that trade, and save. Each trade becomes its own operational area with its own fixture list, work orders, vendor assignment, and checklists.
Manager assignment is set on the property detail page. Assigning a manager connects this property to a specific admin user, which feeds into the manager filter on the dashboard property list and into property-level permission scoping.
Client assignment links the property to a client record. This is what makes the Clients module useful at a portfolio level: one client organization can have multiple properties grouped under it, with consolidated reporting and billing.
Property images can be uploaded after creation. Use the upload function in the map section of the property detail page to add site photos, floor plans, or reference images. Images appear in the property's map card and are included in the property print report.
Property details like square footage, number of units, contact phone and email, billing address, store hours, and QuickBooks ID are all editable on the property detail page. Fill in whatever is relevant for your workflow.
The property is ready the moment it's created. Everything else is refinement that makes the record more complete and more useful over time.
Additional Reading: SETTING UP VENDORS IN SYTEWISE, NAMING FIXTURES AND PARTS
Creating Your First Fixture
A fixture is any fixed asset on a property that requires maintenance, service, or documentation — an HVAC unit, a pole light, an AV system, a door, or any piece of equipment you need to track. Fixtures live inside a property's trade, and they're what work orders, surveys, checklists, and reports are built around. Here's how to create your first one.
Step 1: Find the New Fixture Form
From the property detail page, navigate to the trade where the fixture belongs. Look for the + Fixture button in the fixtures section and click it. A modal window opens with the New Fixture tab selected by default.
Step 2: Name Your Fixture
Fixture Name is required. Keep it short and specific — something like "RTU-4" or "Pole Light 6" rather than "Unit" or "Light." This name appears in work orders, surveys, reports, and dropdown menus throughout the system. A name that means something on its own, without any surrounding context, will serve you well as your fixture list grows.
Step 3: Write a Description
Description is also required. Think of the name as a label and the description as a sentence. "Northwest corner rooftop gas pack, 25-ton, 3-phase" tells the next technician something they can actually use when they arrive on site.
Step 4: Select a Type
Type is a dropdown populated from the fixture types configured in your account. Select the category that best fits this piece of equipment. If the type you need isn't listed, an account administrator will need to add it before you can proceed.
Step 5: Confirm the Vendor
The Vendor field is pre-filled with the default vendor assigned to this property and trade. If a different vendor is responsible for this specific fixture, start typing a name and select the right one from the autocomplete list.
Step 6: Save and Position
Click Save. You'll land on the fixture detail page. The fixture is created, but its map marker is sitting at the property's center coordinates — go ahead and drag it to the fixture's actual location on the map or floor plan right away, before the list gets long and harder to sort out.
From the fixture detail page you can add parts, upload photos, assign the fixture to a group, and attach checklists.
More Ways to Create Fixtures
Creating fixtures one at a time works well when you're building a new property or adding individual pieces of equipment. When you need to add a large number of fixtures at once, Sytewise offers additional options: you can import fixtures in bulk using a CSV file, deploy a complete fixture with all its parts from a saved Library template, or clone an existing fixture on the same property to avoid re-entering identical specifications. For a full walkthrough of all these methods, see the complete article below.
Additional Reading: CREATING AND MANAGING FIXTURES
Using the Fixture Library to Build Properties Fast
If you manage more than a handful of properties, you already know the feeling: new location comes on board, and someone has to sit down and build out every fixture from scratch. Again. The Fixture Library exists specifically to eliminate that repetition. Build a fixture once, save it to the library, and deploy it to any property in your portfolio in seconds -- with all its parts, specs, and group associations intact.
What the Library Actually Does
When you save a fixture to the library, Sytewise takes a complete snapshot of everything attached to it: the fixture definition, every part with its full specifications (manufacturer, model number, part numbers, firmware versions, install dates, table details), and any of its group associations you want to include. That snapshot sits at the account level, available to any property, any trade, any time.
When you deploy a library item as a new fixture, all of that comes with it. You're not getting a blank fixture with a familiar name -- you're getting a fully populated record that's ready to work with the moment it lands on the property.
Saving a Fixture to the Library
Before you can use the library, you need something in it. Once you have a fixture built and documented the way you want it, here's how to save it:
- Go to the fixture detail page.
- In the parts section, click the Library button.
- Enter a library title -- up to 24 characters.
- Click Save.
That's it. The fixture is now available for deployment across your entire account.
One thing worth spending a moment on: the title. You'll be selecting this item from a list later, possibly months from now, possibly by a team member who didn't build it. "Standard 20ft LED Pole w/ Driver" or "Plumbing - 2 Restroom Standard" will serve you far better than "Fixture 1" or "HVAC Template." Be specific enough that the name tells you exactly what's inside without having to open it.
Choosing the Right Fixtures for the Library
The library shines brightest when the fixtures you're deploying are either identical across properties or generic enough that the specifics get filled in after deployment.
If you standardize on a single manufacturer and part number across all your locations for a given fixture type -- the same AV controller in every venue, the same RTU model across a retail chain -- the library carries the full spec to every property automatically. One import, fully documented.
For fixture types where the specific part numbers vary by location (plumbing is the classic example), the library still earns its keep by getting the right fixture names and structure onto the property quickly. You fill in the location-specific details -- serial numbers, model variants, install dates -- after the fixtures land. "Commode 1," "Commode 2," "Mop Sink," "Floor Drain" all show up on the property in the right trade in one operation, and you work through the details at your own pace.
Building a Good Library Group
Before you save a fixture set to the library, it helps to think about what a useful group template looks like. A good group puts as many relevant fixtures on the property as possible without creating a cleanup problem on the exceptions.
For example: if most of your locations have two commodes per restroom, build your plumbing library group with two commodes. The handful of locations with three commodes just need one addition after import -- much less work than building from zero at every location. Think of the group as a sensible starting point that covers the common case, not a perfect fit for every edge case.
Generic, consistent names are your friend here. "Front Door," "Back Door," "Overhead Dock Door" or "Commode 1," "Commode 2," "Commode 3" give your staff, vendors, and surveyors clear reference points across every property without requiring location-specific creativity at import time.
Deploying a Library Item to a Property
When you're ready to add fixtures to a new property using a library item, here's the flow:
- Go to the property and select the trade where the fixtures belong.
- Click the + Fixture button.
- Switch to the Add From Library tab.
- Select the library item you want to deploy using the radio buttons.
- Set the Parts Install Date -- this becomes the installation date recorded on every part created from the template.
- Check or uncheck Include Groups (see below).
- Click Add From Library.
Sytewise creates the fixture and all of its parts in a single operation. Every part field from the library item copies to the new fixture with the install date you specified.
The Include Groups Checkbox
When you deploy a library item, you'll see an Include Groups checkbox. This is worth understanding before you click past it.
If the fixture was saved as part of a group, checking this box recreates that group association on the new fixture automatically. If you're building out a property and want your lighting fixtures to land in the "Pole Lights" group right out of the gate, check it. If you'd rather start fresh and organize your groups manually once everything is on the property, leave it unchecked.
For large bulk imports where group organization is part of your workflow, checking Include Groups can save a significant amount of post-import cleanup.
After the Library Item Lands: Reposition Right Away
Every fixture created from a library item starts its life at the property's center point on the map or floor plan. If you're adding a dozen fixtures at once, you'll have a dozen markers stacked on top of each other at the property center until you move them.
Make repositioning the first thing you do after a library import. Open each fixture, find the marker on the map, and drag it to where the fixture actually lives. The coordinates update automatically when you drop it. It takes less than a minute per fixture and makes the property map genuinely useful instead of decorative.
The Payoff at Scale
The first time you use the library it saves you some typing. By the tenth property it's saving you hours. By the fiftieth it's one of those things you can't imagine not having.
More than speed, though, the library enforces consistency. Every property built from the same library item has the same fixture names, the same part structure, the same trade organization. That uniformity makes cross-portfolio searching cleaner, makes reporting more predictable, and makes it much easier to onboard someone new because every similar property looks the same in the system.
Build your library items carefully the first time, name them well, and let them do the heavy lifting from there.
For a complete reference on all fixture creation methods including manual entry, cloning, and CSV import, see Creating and Managing Fixtures →
Creating Your First Work Order
Work orders are how you assign tasks to a vendor and kick off the paperwork trail. You create them right from the property page, and once you save, the system takes it from there and handles the email notifications automatically.
Opening the Work Order Form
On the property page, look for the New Work Order button. Clicking it opens a dialog with the full work order form, split into two columns. The left side covers the details and costs, and the right side handles fixtures, instructions, and who gets the email. If the property does not have a default vendor assigned yet, the form will not open and you will see a prompt to add one first, so take care of that ahead of time if you are setting up a new property.
Filling Out the Basics
The Subject or Title field gives the work order its name and pre-fills with the property name. You can leave it as-is or make it more specific. Order Date pre-fills with today, and Due Date pre-fills with five business days out. Adjust either one if your situation calls for it.
The Vendor field pre-fills with the property's default vendor. Start typing if you need to swap in a different one. If the property has contracts on file, the Contract field lets you pick the right one or choose to proceed without one. Reference No. is optional and useful for account numbers or tracking codes you want tied to the work order.
Use the Add Line Item button to break costs down by task or trade, or just drop a number into the Total field if you are keeping it simple.
Additional Options
If the job has a specific start date that differs from the order date, check the Include a Work Start Date box and a date field will appear. Leave it unchecked if the vendor can begin whenever and a separate start date is not needed.
The Include Management Details in WO Emails checkbox controls whether the property's management contact information gets included in the vendor email. It pre-checks based on the property's default setting, so you can leave it or toggle it for this particular work order without changing the default.
If you need to send the vendor supporting documents like floor plans, photos, or specs, use the Add A Zip File field to attach a zip archive. Zip files only here. The file gets stored with the work order and a download link will appear on the work order page after saving.
Choosing Who Gets Copied
At the bottom of the right column you will find a card listing all your Sytewise admin users. Check anyone who should receive a copy of the work order email. This is a great way to loop in the right people without having to remember to forward anything after the fact.
Selecting Fixtures
The right column also includes a fixture selector. Use Load All Fixtures to pull in the full list, then check the ones this work order covers. Any fixture already assigned to another open work order is highlighted in green, so you can see at a glance what is already spoken for.
Special Instructions
Use the Special Instructions text area for anything the vendor needs to know before arriving on site. Access details, timing requirements, contact names at the property, any of it goes here and gets included in the work order email.
Saving the Work Order
When everything looks good, hit Save. Sytewise will create the work order, send the notification email to the vendor contacts and any admins you selected, and drop you right on the new work order page.
Additional Reading: CREATING AND MANAGING WORK ORDERS
Set Up Recurring Work Orders
Setting up recurring work orders in the Sytewise platform is easy to do and keeps your recurring work up to date with minimal input.
Recurring work can be anything from grease trap maintenance to air conditioner filters. For our purposes we will use a work order for conducting the Annual Fire Alarm Inspection.
To set up recurring work orders:
- Select a Work Order you would like to replicate
- Click on the Reminder Bell in the Upper Right Corner
- Click on the Check Boxes to Attach a Reminder and Replicate a Work Order
- Add a Subject and Message Note about the work order
- Click the Checkbox for High Priority if desired
- Choose a recipient for Reminder from the list of Sytewise Users
- Click the Repeating Check Box to establish as Schedule for the Work Orders to Repeat
- Choose the Beginning and End Date of the Reminders. Forever equals 100 Years.
- Select your Repeat Time Frame of Day, Week, Month, or Year
- Click Save
Select a Work Order you would like to Replicate
This can be any work order. It can be Open or Completed. It can be past due. It doesn't matter. When selecting a work order make sure you look at the Special Instructions to make sure they will be appropriate over time. If you have a lot of information about special dates or times that won't be applicable in the future, it would be better to start with a new work order. Make sure your special instructions are going to be evergreen for any future work order they will be part of.
Click on the Reminder Bell in the Upper Right Hand Corner
Select the Reminder Bell at the Top Right Hand Corner of your browser and the New Reminder Modal will Appear. Once the Reminder Modal opens, click on the check boxes to Attach Reminder to this WO and Replicate This WO.
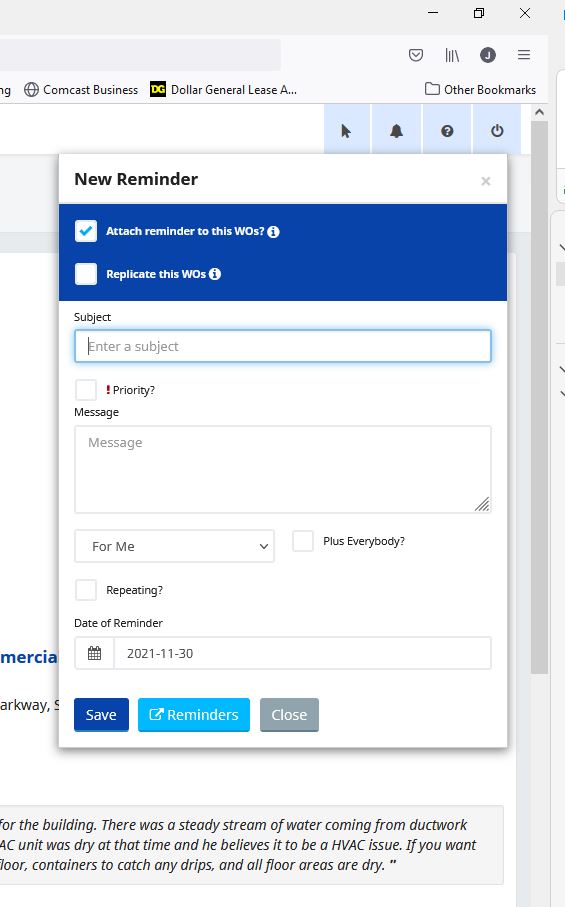
Add a Subject and Message Note about the Work Order
Once you have selected the check boxes for Attaching and Replicating the Work Order, Type in a Subject and Message about the work order. This is a note to you or another person that will be tracking this Work Order in the Future. Any Special items to remember as you go about getting the work completed. This is not the work order instructions to your vendor. Those are already in the work order you selected.
Check the box for Priority
This may be a simple item, but it will help work orders stand out in your work order list. It will also help you notice important items that may only come up once a year. All items are important. I usually add this to time sensitive items that may cause additional expense if they aren't handled in a timely manner. You can use it however best suits your workflow.
Choose a recipient for Reminder from the list of Sytewise Users
Every Sytewise System User is a potential candidate to receive the Reminder you are creating. The default will always be to the creator of the Reminder. You can select another user, or Select All users. If you opt to send the Reminder to Everyone it show up on everyone's Reminder List until one User completes the reminder activity. Then it will drop off of Everyone's list.
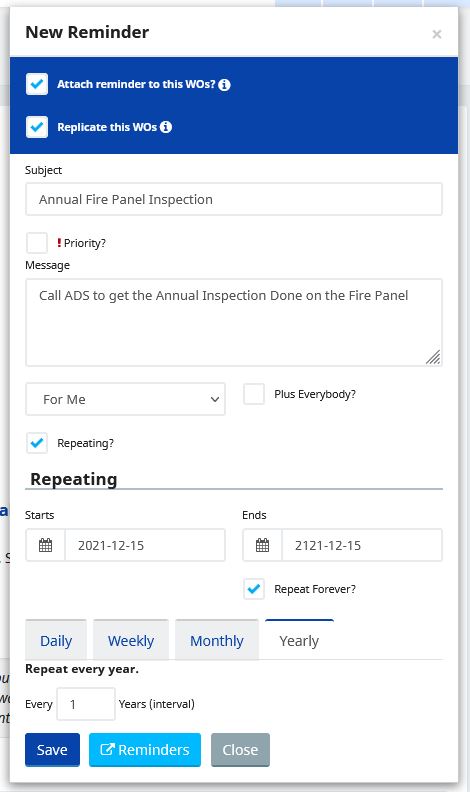
Click the Repeating Check Box to establish as Schedule for the Work Orders to Repeat
Once you Select the Repeat Check box you will see two boxes for a Start Date and an End Date for Reminders ( and Work Orders) to be scheduled and created. Reminders created today will show up the next calendar day. Choose your Starting Date and Ending Date for the recurring work orders. If you want them to recur indefinitely then select the Forever Check Box. That will immediately set the reminders to last for 100 years.
Select your Repeat Time Frame of Day, Week, Month, or Year
The calendar for reminders is very flexible. You can select a daily reminder for something, or make a weekly reminder for every Tuesday, or every Third Tuesday. You can select a Monthly Schedule to have reminders and work orders recur on a specific day of the month, or every other month. Yearly reminders are great for those annual inspections that show up again before you know it. That being said, best practice is to factor the amount of lead time you need for this work order into the reminder date. The work order will be generated on the date you select. Make sure that date gives your Vendor enough time to get the work on the books and completed by your deadline. I try to give my Fire Panel inspectors at least a couple of weeks to respond. Your lead times may be different.
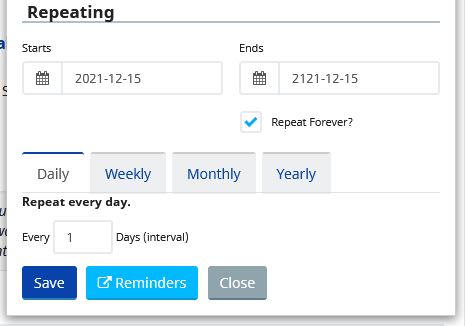
A Daily Schedule will repeat every day, or every interval of days you select. If you enter a 1 the reminder will show up every day. If you enter a 3 it will show up every day.
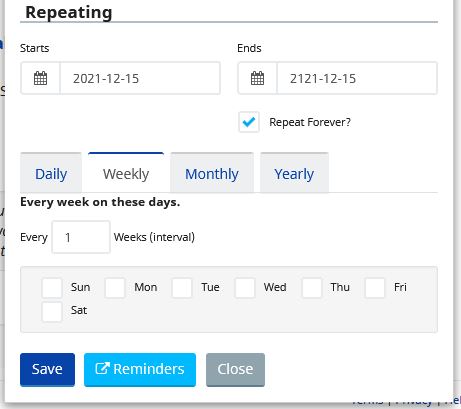
A Weekly Schedule is much the same. Select the days of the week you would like the reminder to occur and then select the number of weeks in between each reminder. This is great for work orders that repeat every other week or or on specific days of the week regardless of the number of monthly visits. Any Weekly Service Schedule is perfect for this.
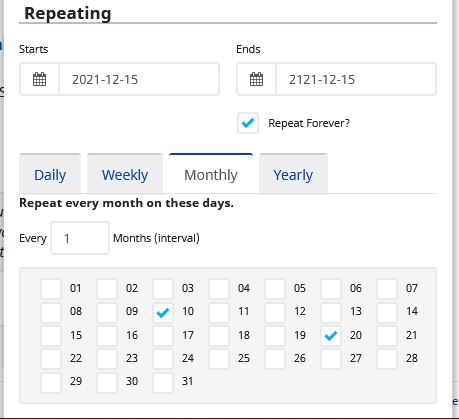
The Monthly schedule is great for events that occur on specific days of the month, every month, regardless of the day of the week.
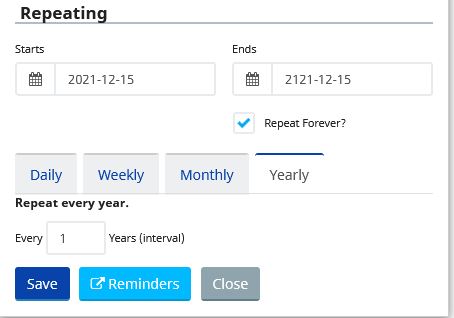
Annual is great for those inspections or reports that need to be done every year. Send a Work Order out to get your Annual Sprinkler or Backflow inspections on the calendar before your Vendor gets backed up. You can also set multi year reminders and work orders for specific Contractual Work or Lease Sensitive Items. I have tenants that require repaints every 5 years. Asphalt repairs or striping are other good uses of the multi year reminder. If you have new staff, they may not know when the parking lot in front of Kroger was last striped. Sytewise remembers and can remind them that this is the year to get it done.
Click Save
Of course you must hit save to complete the work. Once you click Save your Reminder can be found on the Reminder Page. Whe a
What happens Next?
Once your reminder is in the Sytewise System your calendar takes over. Every morning the Reminder System looks for actions that are to be completed today. When that happens you will have a Notification icon telling you how many reminders or actions that are current in your Reminder and Actions List.
The reminder will have an Action Button that says Create Work Order. Select this button and a duplicate of the original work order is made. Look at the work order, Make whatever changes you like. Change the text. Change the Vendor. Once you are done, click on the Send Work Order button and you are done.

If the Reminder is attached to the work order, the Action Button will say Create Work Order. If it is attached to a Survey, the Action Button will say Create Survey.
The Circle with Line icon will delete this instance of the recurring Work Order, but future Work Orders will still be created. To Edit the Reminder Settings for your Work Order Reminder, click on the Pencil button.
You can always edit the reminder settings for the work order . If you want to go from quarterly filter changes to every two months. Change it in the settings. If you want to Change the Vendor for all future work orders, you can do that in the Settings.
Creating Your First Survey
Creating Your First Survey
Surveys are how Sytewise puts a trained set of eyes on a property before any decisions get made. Instead of scoping work from the office and hoping for the best, you send a surveyor to document what is actually out there, and the results become the factual basis for whatever comes next. A surveyor walks the fixtures, notes what they find, uploads photos, and submits a report. You review it and decide what warrants a work order. This article covers how to create and send a survey from the Admin Portal.
Before You Begin
You will need at least one active surveyor in the system before you can create a survey. If you have not set one up yet, head to the Surveyors page in the left navigation and create a record there first. The surveyor will need a username and password, which become their login credentials for the Survey Portal. Once that is in place, come back here and you are ready to go.
Creating the Survey
Due Date is required and must be a future date. This is the deadline for the surveyor to complete and submit their findings.
Surveyor is an autocomplete search field. Start typing the surveyor's company name and select from the results. Only active surveyors will appear in the list.
Special Instructions is your chance to set the surveyor up for success before they arrive. Access codes, on-site contacts, specific systems to prioritize, areas that are off-limits, or particular questions you need answered all belong here. The more useful context you give a surveyor upfront, the better the report you get back.
The property and trade are already set based on where you started the form, so you do not need to select those.
Sending the Survey
When you save the form, Sytewise creates the survey and lands you on the survey detail page. Take a moment to look everything over. The survey email has not gone out yet, and this is your chance to catch anything before the surveyor is notified.
When you are ready, click Send Survey. Sytewise will send an email to the surveyor's address on file with the survey details, due date, special instructions, and a login link to the Survey Portal. From there the surveyor takes it and the field work begins.
What Happens Next
Once the surveyor submits their findings you will be able to review the results on the survey detail page, including fixture conditions, part statuses, notes, and any photos they uploaded. From there you decide what warrants a work order and what does not. That review step is yours, and it is intentional.
For a complete walkthrough of survey results, surveyor permissions, and how surveys fit into your broader maintenance workflow, see Surveys and Surveyors.
Additional Reading:
- Surveys and Surveyors -- the complete reference for everything the survey system can do
- Surveys and Surveyors: Reading Survey Results -- understanding what comes back when a surveyor submits
- Surveys and Surveyors: Surveys in the Work Order Chain -- how assessments and work orders work together
- Creating and Managing Work Orders -- turning survey findings into actionable vendor assignments
Supporting setup:
- Surveys and Surveyors: Setting Up a Surveyor -- creating records, login credentials, and permissions
- Surveys and Surveyors: Surveyor Permissions -- understanding Can Edit and Can Create and when to use them
Broader workflow context:
- Building an Annual Workflow with Reminders -- scheduling recurring surveys so nothing falls through the cracks
- Fixture Page -- Managing, Editing Parts Status
Using the Property Library to Build Your Portfolio Fast
Using the Property Library to Build Your Portfolio Fast
You just added a new location to your portfolio. It's the same retail format you manage at fifteen other properties -- same trades, same HVAC configuration, same lighting setup, same plumbing fixtures. You could spend the next two hours building it out from scratch. Or you could be done in about two minutes.
That's what the Property Library is for.
What Makes the Property Library Different
You may already know about the Fixture Library, which lets you save and redeploy individual fixtures across properties. The Property Library operates at a bigger scale. When you save a property to the library, Sytewise captures the entire structure of that property: every trade, every fixture in each trade, and every part inside each fixture -- with full specifications, manufacturer data, model numbers, part numbers, firmware versions, and all technical detail fields included.
When you create a new property from that library item, all of that structure gets built automatically as part of the creation process. You don't land on an empty property and start adding trades one by one. You land on a fully populated property, ready to refine, with the whole framework already in place.
How to Save a Property to the Library
The best time to save a property to the library is after you've built out a location carefully and completely -- one where the trades, fixtures, and parts are accurate and well-named. That first property becomes the master template for every similar location you add afterward.
Here's how to save it:
- Go to the property detail page.
- Find the Fixtures section and click the Library button.
- Enter a library title -- up to 24 characters.
- Click Save.
The system captures everything: all trades, all fixtures with their positions and descriptions, and all parts with their complete specifications. That snapshot is stored at the account level and is immediately available the next time you create a property.
Take your time with the title. "Standard Retail HVAC + Lighting" or "Venue AV Platform v2" will mean something six months from now. "Property Template 1" will not.
Creating a Property from a Library Item
When you go to create a new property and your account has library items saved, a library selection card appears on the New Property page, sitting between the property information form and the map. By default it shows "No Library" selected, which creates a standard empty property. To use a library item instead, just click the radio button next to the one you want.
From there, the process is exactly the same as creating any other property:
- Enter the Property Title.
- Enter the Full Address.
- Select the Default Vendor for the first trade.
- Select the Trade.
- Select your Library Item from the library card.
- Click Lookup Geolocation to validate the address and place the map marker.
- Click Create Property.
Sytewise writes the base property record first, then immediately layers in everything from the library item. Trades are created, fixtures are inserted with their descriptions, and every part record is recreated with the specifications from the library. By the time you land on the property detail page, the structure is already there.
What the Library Item Brings -- and What It Doesn't
A property library item is a structural starting point, not a locked-in clone. Once the property is created, every record on it is fully independent and editable. The library item itself stays unchanged, ready for the next property.
What comes with the library item:
- All trades, with their names and configurations
- All fixtures in each trade, with names, descriptions, and types
- All parts inside each fixture, with full specifications
What you'll fill in after creation:
- Map positions -- every fixture starts at the property center point, just like individual library imports. Plan on spending a few minutes moving markers to their actual locations after the property is built.
- Install dates -- part records are created, but installation dates should reflect the actual install at this specific location.
- Serial numbers and site-specific variants -- model numbers and part numbers come from the library, but serial numbers and any location-specific details get added as you document the actual equipment.
- Property details -- square footage, unit count, contact phone and email, store hours, QuickBooks ID, and any other property-level information.
- Manager and client assignments -- these are set on the property detail page after creation.
Think of the library item as handling the 80 percent that's the same at every location so you can focus on the 20 percent that's specific to this one.
Designing a Good Property Library Item
The quality of what comes out of the library is only as good as what you put into it. A few things worth thinking about before you save a property as a library item:
Build to the common case. The same principle that applies to fixture library groups applies here. If most of your retail locations have four HVAC units, build the library item with four. The locations with six get two additions. The locations with three get one deletion. Either way, it's faster than starting from zero.
Name fixtures generically but clearly. Library items work best when the fixture names are consistent across every property that uses them. "RTU-1," "RTU-2," "RTU-3," "RTU-4" will show up on every property in the same way, making cross-portfolio searching predictable. Location-specific names can always be added in the description field once the property is live.
Include your most complete property. The library captures part specifications, so if one of your properties has especially thorough part documentation -- correct model numbers, firmware versions, warranty data -- that's the one to save. Every subsequent property starts with that level of detail rather than having to be built up to it.
One library item per property type. If you manage multiple formats -- say, a standard retail configuration and a larger anchor tenant configuration -- save one library item for each. A few well-built templates cover a lot of ground.
The Payoff Compounds Over Time
The first time you use a property library item, you save yourself an hour or two of fixture entry. By the time you've brought ten properties on board from the same template, you've saved a day's worth of data entry and ensured that all ten properties are structured identically.
That consistency is the part that keeps paying off. When every similar property starts from the same library item, the trade names match, the fixture names match, the part structure matches. Cross-portfolio reports are cleaner because the data is organized the same way everywhere. New team members can navigate any property in the portfolio because they all look the same. And when a problem shows up at one location, you can search for the same fixture type across all similar properties in seconds rather than hunting through inconsistent naming conventions.
Build the first property right. Save it to the library. Let it do the work for you from there.
For more on how the Fixture Library works at the individual fixture level, including saving parts, deploying library items to existing properties, and using Include Groups, see Using the Fixture Library to Build Properties Fast →
For a complete walkthrough of the property creation process including all fields and geolocation setup, see Creating a Property in Sytewise →
Setting Up Admin Users in Sytewise
This article walks through the entire process: creating the account, configuring every setting on the user profile page, and understanding how Assigned Properties and Favorite Properties work together to give each of your team members exactly the right slice of the portfolio.
Who Can Create and Manage Users
User management in Sytewise is a superuser privilege. Only accounts flagged as Super Users can access the Users page, create new users, or modify another user's superuser status. Standard admin users can view and edit their own profile, but they cannot see the full user list or create new accounts. If you need access to the Users page and don't have it, find your account's superuser and have them take a look at your profile.
Creating a New User Account
Name is the user's display name throughout the system. It shows up in work order assignments, the user list, and anywhere Sytewise identifies who did what. Use the person's real name, or at least something recognizable to the rest of the team. "User 4" will confuse everyone including you.
Username is what the person types at login. It must be unique across the account, at least five characters, and cannot contain special characters. Spaces are allowed, but keeping it simple (first initial and last name, for example) will make everyone's life easier. Once the account is created, the username cannot be changed, so take a moment before you finalize it.
Email is where Sytewise sends work order and survey notifications. Make sure it's accurate. A misspelled email address is a quiet problem: the account creates successfully, the user can log in, and you only find out something is wrong the first time an important notification goes nowhere.
Password and Confirm Password set the initial login credentials. Passwords must be at least eight characters, include at least one capital letter, and include at least one number. The user can change their password after logging in, so the initial password just needs to get them through the door.
Click Create User. The account is active immediately and the user can log in right away.
The User Profile Page
Once the account is created, click the user's name in the list to open their profile page. This is where the real configuration happens. The page is organized into a left sidebar with profile details and a series of cards on the right covering account settings, password management, email preferences, and property assignments.
Account Settings
The main account settings card contains the fields you filled in during creation, plus a few more that only appear after the account exists.
Name can be updated here at any time.
Username is displayed but locked. It cannot be edited after creation, which is a good reason to get it right the first time.
Email can be updated here. If a user changes their email address, update it here so notifications keep reaching them.
Phone is an optional contact number for the user. It's for internal reference only and doesn't affect any system behavior.
Default Trade for Properties sets the trade that is pre-selected when this user creates a new property. If your account primarily manages one type of system, setting this saves a step every time a new property gets added. A user who creates nothing but lighting properties, for example, should have their default trade set to Lighting so they're not hunting through the dropdown every time.
User Permissions
Four checkboxes sit in the account settings card. Each one is small. Each one matters.
Active, can log in is the on/off switch for the account. Unchecking it locks the user out without deleting the account or any of its history. When a team member leaves and you're not sure yet whether their records need to stay associated with their name, deactivate rather than delete. You can always reactivate later.
Super User This role gives the user full administrative access: the ability to create and edit other users, manage the full property list regardless of assignments, and access every area of the system. Assign this carefully. Most users don't need it. If the user is managing a group or team, I recommend it.
Can view onboarding results grants access to vendor onboarding files with personal information. Enable this for team members who are involved in vendor management and HR. Users who do not handle vendor onboarding, or should not have access to private information do not need this
Do not show reminder popups suppresses the reminder notification that appears when the user logs in. By default, users with pending reminders see a popup drawing attention to them. If a particular user finds that disruptive or manages their reminders through other means, check this to give them a quieter login experience.
Global Email Preferences
This section is small on the page but has a significant effect on how useful Sytewise is as a communications tool. Three checkboxes control whether this user automatically receives email notifications for activity across the entire account, regardless of which specific properties are involved.
Receive All Work Order Responses (including Rejections) sends this user an email every time a vendor submits a response to any work order in the account. That's every completion, every partial update, every rejection. For the person running operations who needs a finger on the pulse of everything in motion, this is the right setting. For a regional manager who only cares about their twelve properties, it will quickly become noise.
Receive All Work Order Rejections is a narrower version of the above. Instead of all responses, this user only gets notified when a vendor rejects a work order. Rejections typically require some kind of follow-up action, making this a good fit for a supervisor or dispatch coordinator who doesn't need to know about every completed WO but absolutely needs to know when something got turned down.
Receive All Survey Responses sends a notification every time a survey is submitted anywhere in the account. Survey responses often include photos, inspection results, and field notes. The people who need to review those and act on them should have this checked. The people who don't should not, or their inbox will tell the story of every survey in the portfolio whether it involves them or not.
These are global settings. They apply to every property and every vendor in the account. For users who need notifications tied to specific properties rather than the whole portfolio, the per-property email preferences live in the Favorite Properties section below, and they offer more precise control.
Assigned Properties
The Assigned Properties card shows which properties this user has been designated as the managing user for. Assigning a property to a user is a superuser action: the search field only appears for superusers, and the assignments are made directly on the user's profile page by searching for a property name and selecting it.
When a user has properties in their Assigned list, those properties are associated with their user record in the system. The dashboard defaults to showing that user's assigned properties, and the system can filter work orders, reports, and other views by the assigned user. This is how you organize a large portfolio among multiple managers: each person's assigned properties represent their territory or their responsibility.
To remove a property from the Assigned list, click the remove action next to the property name. The property itself is not affected. Only the association between this user and that property is removed.
A regional manager who handles all retail locations in the Southeast is a good example. Assigning those twelve properties to her profile means her dashboard shows her portfolio when she logs in, work orders for those properties can be filtered by her name, and the rest of the team's view stays organized around their own assignments.
Favorite Properties
Favorited properties are important for workflow. If you want to work on a specific Client's properties, select them as favorites. Or if you are working on HVAC maintenance on a group of properties, select those properties of favorites and they will show up as a subset of the entire portfolio. You can also select to see properties by state, map view, and other users.
Adding a property to your Favorite List is easy. To add a property to your Favorites, start typing the name of the property in the field and select the property from the list that appears. To remove it, click the trashcan icon and it will be removed.
The Difference Between Assigned Properties
These two lists are easy to conflate, but they serve different functions.
Assigned Properties is an organizational designation. It answers the question: who is responsible for this property? Assigning a property to a user is typically done by a superuser and reflects the actual structure of the team. It affects dashboards, reporting filters, and how the account's portfolio is divided among the people managing it.
Favorite Properties is a personal preference and a notification tool. It answers the question: which properties does this user want to watch closely? Any user can add or remove their own favorites, independent of who is formally assigned to what.
Two examples to make the distinction concrete:
A maintenance coordinator oversees a portfolio of twenty warehouse properties. All twenty are assigned to her by a superuser. Her dashboard opens to those twenty properties and excludes everything else in the account. Inside her Favorites, she's added three properties that have been especially active recently so she gets email notifications every time a work order comes back or a survey is submitted at those locations.
A company owner wants visibility into everything but isn't the hands-on manager for any individual property. He has no Assigned Properties at all, so his dashboard shows the full portfolio. He's added four flagship client locations to his Favorites and has survey notifications turned on for each one, so he sees those results when they come in without being buried in notifications from the rest of the account.
Dashboard Shortcuts
Profile Picture
Also in the left sidebar is a Profile Picture card. Click Upload New Profile Image to upload a photo via Cloudinary. The image appears on the user's profile card and, in some views, alongside the user's name in the interface. It's entirely optional and has no effect on system behavior, but it does make the user list feel a little less like a spreadsheet.
Changing a User's Password
The Edit Password card provides a straightforward two-field form for setting a new password. This is useful when a user is locked out, when an initial temporary password needs to be replaced by an admin, or when someone has forgotten their credentials entirely. The same rules apply as during account creation: at least eight characters, one capital letter, one number.